
Finding your perfect fit starts with knowing your measurements. When you choose the right size bike, you get a downhill bike frame that matches your body and riding style. This makes a huge difference in comfort, control, and power. Studies show that a perfect fit boosts your performance, cuts down on fatigue, and keeps you safer on rough trails. You do not need to worry about confusing terms. I will explain how to get the right size frame so you can enjoy every ride with a bike that feels just right.
Key Takeaways
Choosing the right downhill bike frame size improves comfort, control, and safety on the trails.
Measure your height, inseam, and arm length carefully to find a frame that fits your body well.
Understand key bike geometry terms like reach, standover height, chainstay, and wheelbase to pick the best frame.
Use size charts and simple formulas as guides, but always test ride bikes to feel what fits you best.
Get expert help from local bike shops or online tools to fine-tune your bike fit and enjoy every ride.
Why Downhill Bike Frame Size Matters
Comfort and Control
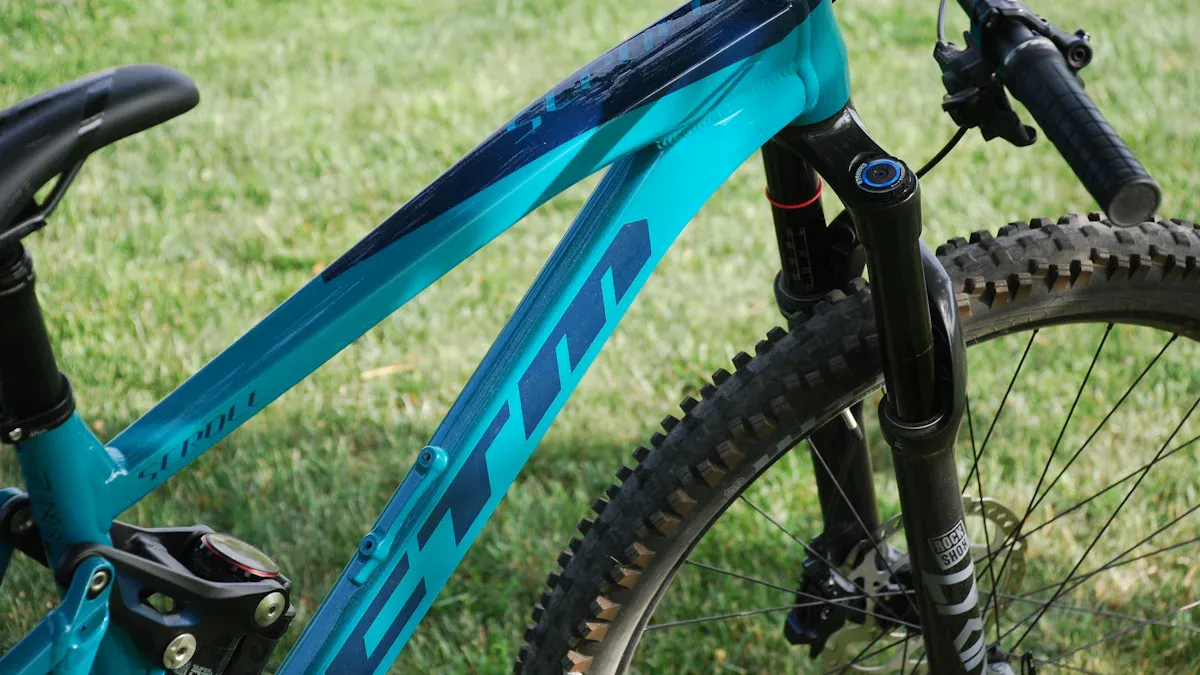
You want your downhill bike frame to feel like an extension of your body. The right size helps you stay comfortable and in control, especially when the trail gets rough. If you pick a smaller frame, you get more maneuverability. This makes tight turns and technical trails easier. A larger frame gives you smoother handling and more comfort on fast descents. You need enough clearance between the top tube and your body for safe moves. Your body proportions matter, too. Arm length, torso, and legs all play a part in finding the best fit. Reach and stack are two measurements that help you dial in comfort and control. Reach affects how stretched out you feel, while stack sets your handlebar height. When these numbers match your body, you ride with confidence and less fatigue.
Tip: Test ride different sizes if you can. You’ll notice how a smaller bike feels playful and quick, while a larger one feels stable and steady.
A smaller frame increases agility for technical riding.
A larger frame offers more stability and comfort at speed.
The right fit boosts your control and makes every ride more enjoyable.
Safety and Performance
Safety starts with a downhill bike frame that fits you well. If your bike is too small, you might need a longer handlebar stem. This can make the bike feel lively but less stable. A shorter wheelbase also means quicker turns but less stability. On the other hand, a larger frame gives you a longer wheelbase, which helps you stay steady on steep descents and big jumps. You want a bike that matches your riding style. If you love technical trails, a smaller frame might suit you. If you prefer high speeds and big drops, a larger frame is better. The right size keeps you safer and helps your bike last longer. When your frame fits, you get better control, more comfort, and improved performance every time you ride.
Smaller frames feel playful and easy to maneuver.
Larger frames inspire confidence on rough terrain.
The right size helps you avoid fatigue and stay safe.
Measure Your Body

Getting your downhill bike frame size right starts with knowing your own measurements. You do not need fancy tools. You just need a tape measure, a book, and a little patience. Let’s break it down step by step.
Height and Inseam
Your height and inseam are the foundation for picking the right frame. These numbers help you match your body to the bike and make sure you feel comfortable and safe.
How to Measure Your Height and Inseam:
Put on your riding shoes. Stand straight against a wall with your feet flat and your back touching the wall.
Use a pencil to mark the top of your head on the wall. Measure from the floor to this mark. This is your height.
For your inseam, grab a book and place it between your legs, spine up, as if you were sitting on a bike saddle.
Stand naturally. Measure from the top of the book to the floor. This is your inseam.
Tip: Always measure your height and inseam with your riding shoes on. This gives you the most accurate numbers for bike fitting.
Your inseam is key for standover clearance. You want about 1-2 inches between the top tube and your inseam when you stand over the bike. Most size charts use rider height and inseam to suggest the best frame size. Many riders use the formula: inseam (in inches) x 0.66 to estimate the right frame size for a mountain bike.
Reach and Arm Length
Reach is the distance from the bottom bracket to the head tube. This number affects how stretched out you feel on the bike. If your reach matches your arm length, you get better control and comfort, especially on steep descents.
How to Measure Reach and Arm Length:
Stand with your arm out to the side. Measure from the inside of your armpit to the tip of your longest finger. This is your arm length.
Compare this to the bike’s reach measurement. If you have longer arms, you might prefer a frame with more reach for stability. Shorter arms may feel better with a shorter reach for easier handling.
A good fit means you can bend your arms slightly while riding, not feeling cramped or overstretched. Reach and rider height together help you find a downhill bike that feels just right. Test different bikes if you can. You’ll notice how reach changes your comfort and control.
Downhill Bike Geometry Terms
Understanding downhill bike geometry helps you pick the right frame and ride with confidence. Let’s break down the most important terms you’ll see when shopping for a downhill bike.
Reach
Reach measures the horizontal distance from the bottom bracket to the head tube. This number tells you how stretched out you’ll feel when standing and riding aggressively. A longer reach puts you in a more forward, aggressive position. This helps you stay stable at high speeds and on steep descents. You’ll notice that downhill bikes often have longer reach numbers than other bikes. This is because stability matters most when you’re flying down a mountain. If you have a longer reach, you get more room to move and shift your weight. This makes your frame feel steady and boosts your confidence. If you go too short, you might feel cramped and lose control on fast sections.
Tip: Try a bike with a longer reach if you want more stability on rough trails.
Standover Height
Standover height is the distance between the ground and the top tube of your frame. You want 2–3 inches of clearance between your inseam and the top tube when you stand over the bike. This space lets you jump off quickly if you need to stop or bail out. Good standover height keeps you safe and comfortable. It also helps you balance better on uneven ground. If your standover is too tight, you risk injury during sudden stops. Too much standover can make your riding position awkward. Always check standover height before you buy a new frame.
Standover height = safety and comfort
2–3 inches of clearance is best for downhill bikes
Always measure standover with your riding shoes on
Chainstay and Wheelbase
Chainstay length is the distance from the bottom bracket to the rear axle. Wheelbase is the distance between the front and rear axles. These two parts of bike geometry work together to shape how your frame handles. Longer chainstays and a longer wheelbase make your bike more stable at speed. This is great for downhill riding, where you want your frame to feel planted and smooth. Shorter chainstays make your bike more nimble and easier to turn. If you like tight, technical trails, you might prefer a shorter chainstay. Most downhill bikes use longer wheelbases for extra control and confidence.
Longer chainstays = more stability, better weight balance
Shorter chainstays = quicker turns, playful feel
Wheelbase affects both stability and how easy it is to handle your frame
Knowing these bike geometry terms helps you find a frame that fits your body and your riding style. When you understand reach, standover height, chainstay, and wheelbase, you can choose a downhill bike that feels just right.
Find Your Mountain Bike Frame Size
Choosing the right downhill bike frame can feel tricky, but you can make it simple by using a size chart and a basic formula. Let’s walk through both steps so you can find a frame that fits your body and your riding style.
Size Charts
Most brands use your height and inseam to help you pick the best size. For downhill bikes, reach is also important because it affects how you handle the bike on steep trails. Companies like Canyon use these measurements to group riders into sizes from XS to XXL. You can use the chart below to match your height and inseam to the right frame size. This chart works for most downhill bikes and gives you a good starting point.
Size | Frame Size (inches) | Rider Height Range (cm) | Inseam Range (cm) | Suggested Wheel Size |
|---|---|---|---|---|
XS | ~13.5″ | 137 – 155 | 64 – 73 | 26″ or 27.5″ |
S | ~15.5″ | 153 – 166.5 | 72 – 79 | 27.5″ or 29″ |
M | ~17.5″ | 161 – 172 | 76 – 81 | 27.5″ or 29″ |
M/L | ~18.5″ | 165.5 – 179 | 77 – 84 | 29″ or 27.5″ |
L | ~19.5″ | 177 – 188 | 83 – 88 | 29″ or 27.5″ |
XL | ~21.5″ | 186 – 196 | 87 – 92 | 29″ or 27.5″ |
XXL | ~23.0″ | 195 – 203 | 92 – 95 | 29″ or 27.5″ |
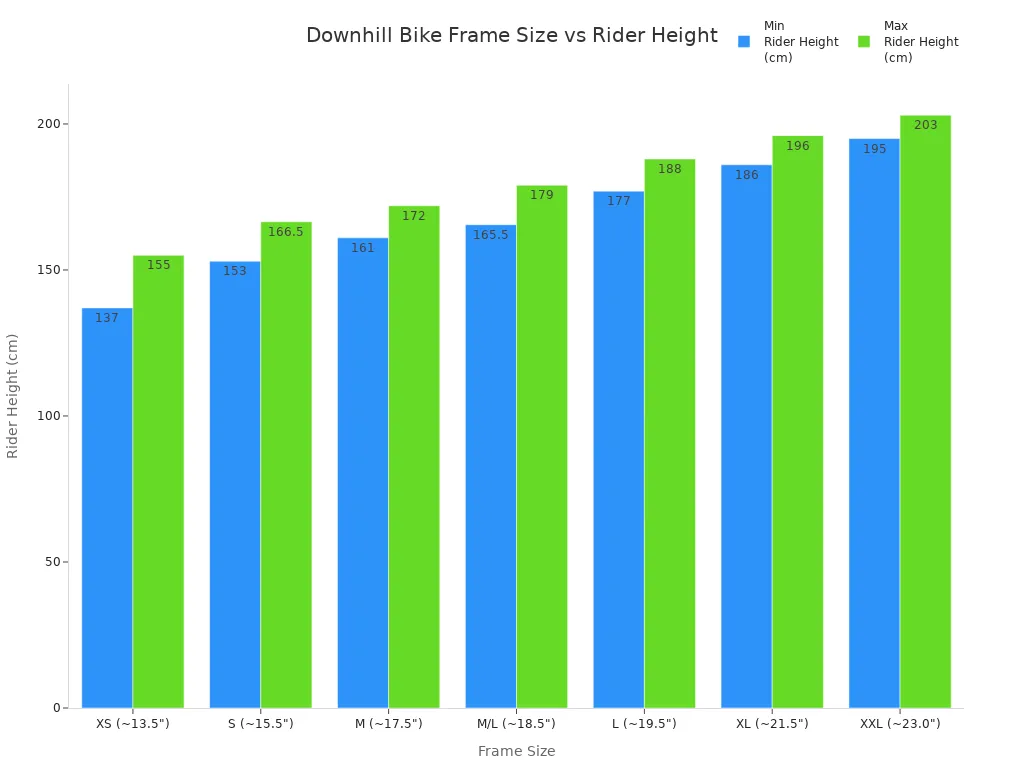
When you look at this chart, find your height range and inseam. This will point you to the right frame size. If you fall between two sizes, think about your riding style. Do you want a playful bike for tight turns? Go smaller. Want more stability for fast descents? Pick the larger size.
Tip: Downhill bikes often use 29″ wheels for speed and stability, but smaller riders may feel better on 27.5″ wheels.
Sizing Formula
You can also use a simple formula to estimate your mountain bike frame size. This works well if you want a quick answer or if you do not have a size chart handy. Here’s how you do it:
Measure your inseam in inches.
Multiply your inseam by 0.67.
The result is your suggested frame size in inches.
For example, if your inseam is 30 inches:
30 x 0.67 = 20.1
You should look for a frame around 20 inches. This formula gives you a good starting point, but always check the brand’s chart and try the bike if you can.
Note: Downhill bikes have some unique features. They usually have longer reach and lower standover height than other mountain bikes. This helps you stay stable and safe on steep trails. The longer wheelbase and slack angles make the bike feel planted at high speeds. You may notice that downhill bike frames feel heavier and have more suspension travel, usually around 200mm. These differences set them apart from cross country or trail bikes.
When you use both the chart and the formula, you get a clear idea of your ideal mountain bike frame size. Always remember to check reach and standover height, since these matter most for downhill riding. If you are unsure, ask for help at your local shop or use an online bike sizing tool.
Test the Fit

Standover Clearance
You want your downhill bike to feel safe and comfortable from the start. The first thing to check is standover height. Stand over the frame with your riding shoes on. Make sure you have about 2–3 inches of space between your inseam and the top tube. This standover clearance helps you jump off quickly if you need to stop or if you lose balance on a rough trail. It also lowers your risk of injury and gives you better control. Downhill bikes often have sloped top tubes and lots of suspension, so always check the clearance with the bike on level ground. If you feel cramped or the gap is too small, try a different size. The perfect fit means you can move freely and feel confident every time you ride.
Tip: Always measure standover height with your shoes on and the bike upright. This gives you the most accurate fit.
Handlebar and Seat Adjustment
Once you have the right frame, you can start fine-tuning the fit. Adjust the seat height so your leg has a slight bend at the bottom of each pedal stroke. This helps you pedal smoothly and keeps your knees happy. Next, check the seat’s position. When your foot is forward on the pedal, your knee should line up with your forefoot. Keep the seat level for comfort.
Now, look at your handlebars. You want a slight bend in your arms when you grip them. This position gives you control and helps you react fast on steep trails. If you feel stretched out or cramped, try moving the seat or adjusting the handlebar height. Downhill bikes often need a more upright position, so don’t be afraid to make changes until you find the perfect fit.
Here’s a quick checklist for testing your downhill bike fit:
Check for 2–3 inches of standover clearance.
Adjust seat height for a slight knee bend.
Set seat fore/aft so your knee is over your forefoot.
Keep the seat level.
Adjust handlebars for comfort and control.
A perfect fit makes every ride safer and more fun. Take your time and make small changes until your bike feels just right.
Special Sizing Tips
Shorter Riders
If you are a shorter rider, finding the right downhill bike can feel tough. You want a frame that fits your height and gives you control on the trail. Most riders between 4’9″ and 5’5″ do best with XS or S frames. These sizes help you reach the handlebars and pedals without feeling stretched. Smaller wheels, like 26″ or 27.5″, make the bike easier to handle and boost your confidence on tight turns.
Rider Height (cm) | Frame Size | Wheel Size |
|---|---|---|
145 – 155 | XS (13-14″) | 26″ / 27.5″ |
153 – 165 | S (15-16″) | 27.5″ |
You can also adjust your cockpit for comfort. Try higher rise handlebars or a shorter stem. This setup gives you more room to move and helps you avoid the feeling of a wrong size mountain bike.
Women and Teens
Women and teens often have unique body shapes. You might have longer legs or a shorter torso. Start by measuring your height and inseam. Use a size chart to match these numbers to a frame. If you feel cramped or stretched, check the reach and standover. Sometimes, a small frame with a few tweaks fits better than a medium. Test ride different bikes if you can. This helps you avoid the pain of riding a wrong size mountain bike.
Tip: Always measure your inseam with a book between your legs for the best standover fit.
Sizing Up or Down
Choosing between two sizes? Think about your riding style. If you want more stability for fast descents, size up. A bigger frame gives you a longer reach and helps you stay steady. If you love tight trails and quick moves, size down. A smaller bike feels nimble and playful. Always check the reach, stack, and standover before you decide. Riding the wrong size mountain bike can make you tired and take the fun out of your ride. Test different sizes to see what feels best for you.
Mountain Bike Fitting and Expert Help
Local Bike Shop
Visiting your local bike shop is one of the best steps you can take when searching for the perfect downhill bike fit. You get to work with a professional bike fitter who knows how to match your body to the right frame. These experts use special tools and years of experience to make sure your bike feels like it was made just for you.
Here’s what you gain from a professional bike fitter:
You feel more comfortable because the bike fits your body. No more sore knees or numb hands after a long ride.
You ride faster and with less effort. The right position helps you use your power better, which is important for downhill trails.
You lower your risk of injury. A professional bike fitter checks your position and fixes anything that could cause pain or strain.
You gain confidence. When your bike fits, you feel in control, even on steep descents.
You get custom adjustments. The professional bike fitter sets your saddle height, handlebar reach, and even your cleat position to match your style.
A mountain bike fitting session at a shop can make a huge difference. You can ask questions, try different setups, and leave knowing your bike is ready for any trail.
Tip: Always tell your professional bike fitter about your riding style and any pain you feel. This helps them make the best adjustments for you.
Online Tools
If you can’t visit a shop, you still have great options. Many websites offer online calculators and geometry comparison tools. For example, eBicycles.com has a mountain bike size calculator. You enter your height and inseam, and it suggests a frame size. This tool works well for downhill bikes because they fall under the mountain bike category.
You can also try advanced tools like the Specialized / Retül bike sizing app or the Wrench Science Fit System calculator. These ask for more details, such as your torso, arm, and leg length. They give you a more personalized fit, almost like a virtual professional bike fitter. While these tools do not focus only on downhill bikes, they help you find a frame that matches your body and riding style.
Online tools are easy to use and give you a good starting point. You can compare different bikes, check geometry charts, and even print your results to bring to a shop. If you want the best fit, use these tools along with advice from a professional bike fitter.
Finding your perfect fit makes every downhill ride safer, smoother, and more fun. When you double-check your measurements and use tools like Dupli-Fit PRO, you get a bike that matches your needs. If you ever feel unsure, talk to a certified fit specialist or test ride different bikes. Remember, the perfect fit is all about your comfort and control. Enjoy the ride—your perfect fit is waiting for you on every trail!
FAQ
How do I know if my downhill bike frame is too big or too small?
If you feel stretched out or can’t reach the handlebars easily, your frame might be too big. If you feel cramped or your knees hit the handlebars, it’s probably too small. Always check your standover clearance and reach.
Can I use a regular mountain bike size chart for downhill bikes?
You can use a mountain bike size chart as a starting point. Downhill bikes often have longer reach and lower standover. Always check the brand’s chart and test the bike if possible.
What should I do if I fall between two frame sizes?
If you like stability and speed, go for the larger size. If you want a playful, nimble ride, pick the smaller one. Try both if you can and see which feels better.
Do women need special downhill bike frames?
Most women can ride standard downhill frames. Some brands offer women-specific models with shorter reach or lower standover. Always choose what feels most comfortable for your body.
How often should I check my bike fit?
Check your fit at least once a year or after any big growth or fitness changes. Your comfort and control can change over time, so regular checks help you stay safe and happy on the trails.
See Also
Understanding Mountain Bike Geometry To Choose The Perfect Size
Use A Frame Size Calculator To Get Your Best Fit
A Complete Guide To Racing Bike Frame Sizes For Riders