
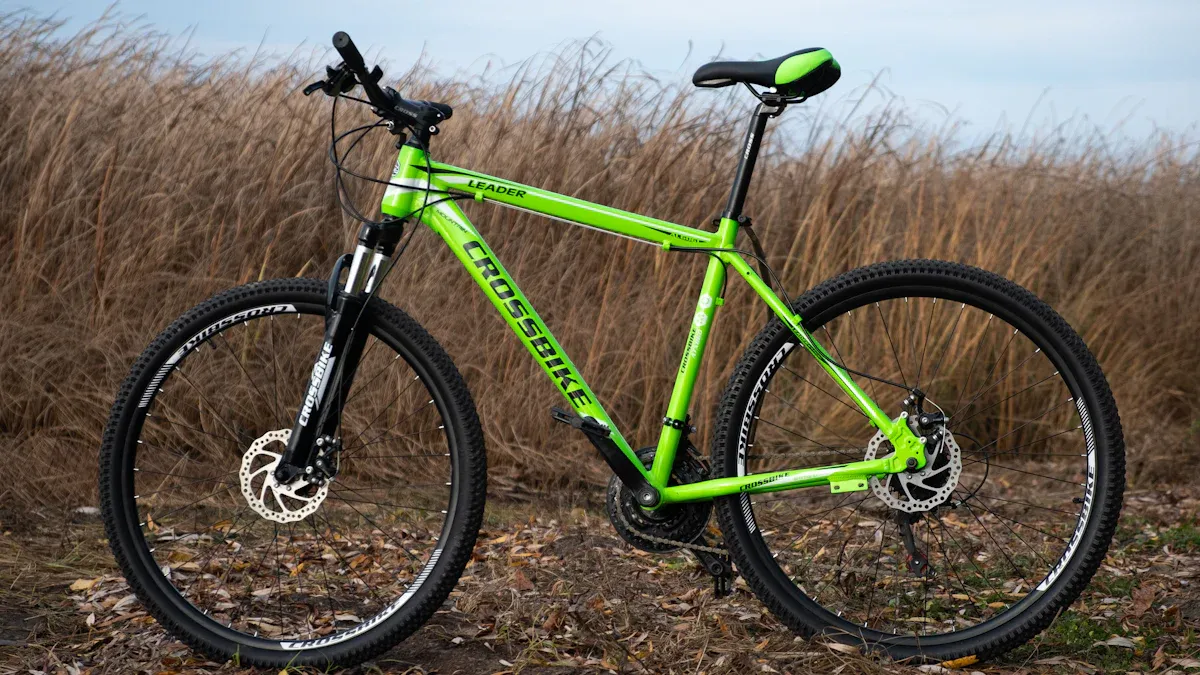
When choosing a mountain bike, it’s essential to consider key mountain bike frame dimensions such as seat tube length, top tube length, reach, stack, head tube angle, chainstay length, wheelbase, bottom bracket height, and standover height. Each frame size affects how the bike fits your body, your comfort level, and your overall riding performance. Research shows that selecting the wrong mountain bike frame size—particularly crank-arm length—can lead to knee pain and injuries caused by overusing your legs. By using measurements like your inseam, height, and other body dimensions, you can find the right bike size. A proper fit prevents pain and allows you to ride your mountain bike with confidence.
Key Takeaways
Use your inseam and height to find the right mountain bike frame size for comfort and safety.
Check key frame measurements like seat tube length, top tube length, reach, stack, and standover height to match your body shape.
Longer reach and lower stack suit fast, stable riding; shorter reach and higher stack offer more control and comfort on tight trails.
Choose chainstay length and wheelbase based on your riding style—longer for stability, shorter for quick handling.
Always test ride bikes and use size charts to ensure the best fit, adjusting parts if needed for a comfortable ride.
Mountain Bike Frame Dimensions
Seat Tube Length
Seat tube length is measured from the bottom bracket’s center to the seat tube’s top. This tells you how high or low you can put your saddle. When you look at frame sizes, seat tube length is usually listed first. It helps the frame fit your legs and gives you standover clearance. If the seat tube is too long, you might not have enough standover height. This can make getting on or off the bike hard and unsafe. If it is too short, you may not be able to stretch your legs fully. This can make riding uncomfortable and less efficient. Most brands use seat tube length to start sizing, but you should check other measurements too.
Top Tube Length
Top tube length is the flat distance from the head tube to the seat tube. It affects how far you reach to grab the handlebars. When you compare bikes, top tube length shows how stretched out you will feel. Experts say you should look at both top tube length and reach. These two numbers help decide your riding position. If you have a long torso, you might need a longer top tube for comfort. Bike fitting today focuses more on reach and stack, but top tube length still matters. You can change your reach a little by adjusting the stem, but not too much.
Modern fitting uses stack and reach to match your body and riding style.
A good fit balances frame shape and adjustable parts like the stem.
Reach and Stack
Reach and stack are very important for finding the right fit. Reach is the flat distance from the bottom bracket’s center to the top of the head tube. Stack is the straight-up distance between those same points. These numbers show how long and tall the frame feels when you stand on the pedals.
As frame sizes get bigger, reach and stack both go up. But reach grows faster than stack. For example, medium bikes have reach around 450-460mm. Large bikes can have reach up to 490mm. Stack also goes up, but not as much. The ratio between stack and reach changes with bike type and size. So, you need to check each bike’s geometry, not just use averages.
On tricky trails, reach and stack change your posture and control. A longer reach makes you stretch out and lowers your center of gravity. This helps with stability at high speeds and on downhills. But if reach is too long, you might feel too stretched. A shorter reach puts you more upright. This makes turning and steering easier, which helps on tight trails. Stack controls how high your handlebars are. A higher stack gives you a more upright and comfy ride. This is good for control on tough trails. A lower stack puts you in a more forward position, which helps with climbing and speed.
Riders pick reach and stack based on their body and how they like to ride. A neutral fit uses balanced stack and reach. An endurance fit has a higher stack and shorter reach for comfort.
Head Tube Angle
Head tube angle is the tilt between the head tube and the ground. This angle changes how the bike steers and handles. A slacker head tube angle (lower number) pushes the front wheel out. This makes the bike more stable on steep hills and at fast speeds. A steeper angle (higher number) brings the front wheel closer. This makes the bike turn faster and feel more lively.
Bike Type | Notes | |
|---|---|---|
~68 to 68.5 | Modern XC bikes like the Specialized Chisel have angles around 68°, slightly slacker than 20 years ago (71°). | |
Trail | Approaching 62.5 (projected future) | Trail bikes are evolving towards slacker angles, possibly in the low 60s range. |
Downhill | Around 67 (historically) | DH bikes started near 67° and have gotten slacker over time for improved stability. |
Changing the head tube angle by just 1 degree can really change how the bike feels. Slacker angles slow down steering but make the bike feel steady. Steeper angles make the bike turn quicker but can feel jumpy at high speeds. You should look at head tube angle along with other frame numbers, like chainstay length and reach, to get the best fit.
Chainstay Length
Chainstay length is the distance from the bottom bracket’s center to the rear axle. This changes how the back wheel follows you and how weight is spread on the bike. Longer chainstays make the wheelbase longer and the bike more stable. This helps with climbing and keeps the front wheel down. It also helps the bike go straight but can make turning slower. Shorter chainstays make the bike turn faster and feel playful. This is good for tricky riding and quick moves.

Longer chainstays:
Make the wheelbase longer and the bike steadier.
Help with climbing by moving weight forward.
Make the bike go straight better but turn slower.
Shorter chainstays:
Make turning and quick moves easier.
Help you do tricks like manuals or wheelies.
Bike designers balance chainstay length with other frame numbers to fit your needs. Riders who want better climbing and stability pick longer chainstays. Riders who want quick handling pick shorter ones.
Wheelbase
Wheelbase is the space between the front and back axles. This is a key measurement for stability and handling. A longer wheelbase gives you more stability at fast speeds and on rough trails. It also makes the bike feel smoother and more steady. A shorter wheelbase makes the bike turn faster and feel more lively. This is good for tight trails and tricky features.
Make the bike steadier at high speeds.
Give a smoother ride and better control going downhill.
Shorter wheelbases:
Make the bike turn quicker and handle better.
Give a sportier, more playful feel.
Pro riders often pick longer wheelbases for downhill and enduro bikes. Cross-country and trail riders may like shorter wheelbases for twisty trails.
Bottom Bracket Height/Drop
Bottom bracket height is the space from the ground to the bottom bracket’s center. Bottom bracket drop is how far the bottom bracket sits below the line between the wheel axles. These numbers change your center of gravity and pedal clearance.
A lower bottom bracket height lowers your center of gravity. This makes the bike more stable and easier to control, especially on fast or flat trails. But it can make pedal strikes more likely on rough ground. A higher bottom bracket gives you more room over rocks and roots. But it can make the bike feel less steady. Most new mountain bikes try to balance bottom bracket height for both stability and clearance.
Pedal strikes depend more on how you ride and where your cranks are than on small changes in bottom bracket height. On tough trails, you want a bottom bracket height that fits your style and the places you ride most.
Standover Height
Standover height is the space from the ground to the top of the top tube, usually measured in the middle or just in front of the saddle. This tells you how much room you have between your body and the frame when you stand over the bike. Standover is important for safety and comfort, especially on bumpy ground.
Mountain bikes should have a standover height 2 to 3 inches less than your inseam.
To measure your inseam, stand with your feet 6 to 8 inches apart and measure from the floor to your crotch.
This space lets you get on and off the bike quickly, lowers injury risk, and helps you feel confident on the trail.
Standover height matters more for mountain bikes than road bikes because off-road riding is tougher.
When you check frame sizes, always compare your inseam to the standover height. This helps you get the right fit and avoid pain or accidents.
Bike Frame Size and Inseam
Sizing by Rider Height
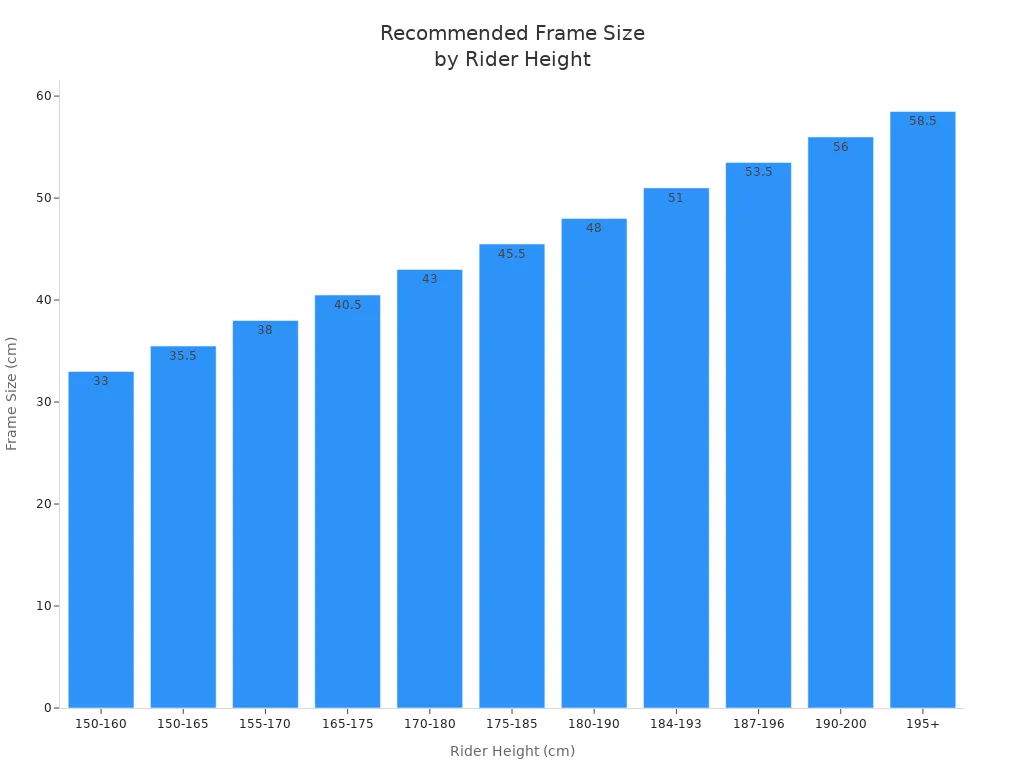
You can start finding your bike size by looking at your height. Most brands use a mountain bike size chart that matches your height to a frame size. These charts help you see if you need a small, medium, or large frame. For example, if you stand between 5’5″ and 5’9″, you often fit a medium frame. Height-based sizing gives you a quick way to narrow down your choices. You should also check your inseam, because height alone does not always give the best fit. Your torso and arm length can change which frame feels right.
Rider Height (ft/in) | Frame Size (in) | Standard Size |
|---|---|---|
5’1″ – 5’5″ | 15″ – 16″ | S |
5’5″ – 5’9″ | 17″ – 18″ | M |
5’9″ – 6’0″ | 18″ – 19″ | L |
6’0″ – 6’3″ | 19″ – 21″ | XL |
Using Inseam for Frame Size
Your inseam gives you a more accurate way to pick a bike size. You measure your inseam length from the ground to your crotch. Most experts use formulas to turn inseam into a frame size. One common formula is inseam × 0.7 = frame size in centimeters. Another method uses inseam × 0.225 to get the frame size in inches. For example, if your inseam length is 84 cm, you get an 18-inch frame. The Lemond Sizing Method multiplies inseam by 0.883 to find the best saddle height and frame fit. You should always use a size chart to check your inseam against recommended frame sizes.
Tip: Measure your inseam with shoes off and feet about 6 inches apart for the most accurate bike size.
Standard Size Categories
Most mountain bikes use standard size labels like XS, S, M, L, XL, and XXL. Each label matches a range of inseam lengths and rider heights. You can use a bike size chart to see which frame fits you best. Women’s bikes often have shorter top tubes and sloping frames for longer legs and shorter torsos. Men’s bikes usually have straighter frames and longer top tubes. Always check the size chart for your brand and model. This helps you match your inseam and height to the right bike size.
Frame Size (in) | Rider Height Range (cm) | Inseam Range (cm) | |
|---|---|---|---|
XS | 13.5 | 137 – 155 | 64 – 73 |
S | 15.5 | 153 – 166.5 | 72 – 79 |
M | 17.5 | 161 – 172 | 76 – 81 |
L | 19.5 | 177 – 188 | 83 – 88 |
XL | 21.5 | 186 – 196 | 87 – 92 |
XXL | 23.0 | 195 – 203 | 92 – 95 |

Measuring Mountain Bike Frame Dimensions

Tools Needed
To start measuring a bike frame at home, you need a few simple tools. These help you get accurate numbers for each part of the frame.
Measuring tape or a long ruler for all main measurements.
A level surface to keep your bike upright and steady.
A book or similar object to help measure your inseam.
Pen and paper or a phone to record your results.
Tip: Always place your bike on a flat surface before you begin. This helps you avoid mistakes and get the most accurate measurements.
Step-by-Step Guide
Measuring a bike frame at home is easy if you follow the right steps. Start by making sure your bike stands upright. Use your measuring tape to check each part of the frame.
Measure the seat tube length from the center of the bottom bracket to the top of the seat tube.
For the top tube, measure the horizontal distance from the center of the head tube to the center of the seat tube.
To find the standover height, measure from the ground to the top of the top tube, right in front of the saddle.
Check the head tube length by measuring from the bottom to the top of the head tube.
For the wheelbase, measure from the center of the front axle to the center of the rear axle.
To get your inseam, stand against a wall with your shoes on. Place a book between your legs to mimic the saddle. Measure from the top of the book straight down to the floor.
When you finish measuring a bike frame, compare your inseam to the standover height. You should have 1-2 inches of clearance for comfort and safety. Use your inseam and a size chart to pick the right frame size. This is a key part of proper bicycle frame measurement.
Manufacturers use fixed numbers like seat tube length, stack, and reach in their charts. These numbers describe the frame’s shape and handling. Independent fitting guides focus on your body, like inseam, torso, and arm length. They help you adjust the frame and parts for a custom fit. Both methods help you find the best bike, but personal measurements make your ride more comfortable.
Fit and Correct Bike Size
Combining Measurements for Fit
You want your mountain bike to feel comfortable and easy to control. To get the correct bike size, you need to use several measurements together. Start with your inseam. Measure your inseam length and compare it to the standover height of the frame. You should have about 2 inches of clearance. Next, check the size chart from the bike brand. This chart matches your height and inseam to the right bike size. Do not rely on just one number. Look at reach, stack, and top tube length. These frame numbers help you find a fit that matches your body shape.
If you have long legs and a short torso, you may need a frame with a shorter reach. If your arms are long, a longer reach might feel better. Always use your inseam, inseam length, and the size chart together. This helps you avoid pain and makes your ride more fun. Try to sit on the bike before you buy it. Stand over the frame and check the fit. Adjust the seat and handlebars if needed. A good fit uses all these steps, not just one.
Tip: Write down your inseam, inseam length, and reach numbers. Bring them when you shop for a new bike size.
Matching Frame to Riding Style
Your riding style changes which frame and bike size you need. If you ride on rough trails, you may want a compact frame for better control. If you like downhill riding, a larger frame gives you more stability. Use the chart below to see how different riding styles affect frame choices:
Riding Style | Frame Dimension Priorities and Recommendations |
|---|---|
Road Biking | Slightly smaller frame for a more aerodynamic position and speed. |
Mountain Biking | Compact frame for maneuverability on technical trails; larger frame for stability on downhill runs. |
Touring | Upright frame geometry for comfort over long rides. |
Hybrid/Commuter Bikes | Taller head tube for a comfortable, upright position. |
Endurance/Gravel | Higher stack and shorter reach for a more upright and comfortable ride, especially for older riders. |
Professional bike fitters say that endurance and gravel bikes often use a higher stack and shorter reach. This gives you a more upright and comfortable position. If you have limited flexibility, avoid aggressive race frames. Always check the size chart and try different sizes. If you cannot get the right fit with your current frame, you may need a new bike size. Your inseam, inseam length, and reach help you find the correct bike size for your goals.
Note: The best bike size matches your inseam, reach, and riding style. Use the size chart and test bikes in person for the best fit.
Choosing the right bike size helps you enjoy your mountain bike and ride safely. You need to know your height, inseam, and body shape to match the best size for your needs. Use a size chart to compare your measurements with each bike size. Try different mountain bike sizes in person to see which bike size feels best. Ask for expert advice if you feel unsure about your bike size.
Tip: Write down your size numbers before you shop. This makes finding the perfect bike size easier.
Check your inseam and height for every bike size.
Test ride different size bikes to find your best fit.
Use a size chart and expert help for the right bike size.
FAQ
What if you fall between two mountain bike frame sizes?
You should try both sizes if possible. Choose the smaller frame for better control and a more playful ride. Pick the larger frame for more stability and a stretched-out position. Always check reach and standover height before deciding.
How does body shape affect mountain bike sizing?
Your torso, arm, and leg lengths change how a bike fits. If you have long legs, you may need a taller frame. If your arms or torso are long, look for a longer reach. Always measure your inseam and compare it to the bike’s geometry.
Can you adjust a bike that feels too big or small?
You can make small changes with a different stem, seat post, or handlebar. These adjustments help fine-tune your fit. If the bike still feels wrong, you may need a different frame size.
Why do mountain bike brands have different sizing charts?
Each brand designs frames with unique shapes and measurements. A medium in one brand may feel like a large in another. Always check the specific size chart for the brand and model you want.
See Also
Key Measurements Needed To Choose The Right Bike Frame
Essential Factors To Consider When Comparing Bike Frames
How To Find The Perfect Mountain Bike Size Using Geometry
Understanding Large Mountain Bike Frame Sizes And Geometry Basics