

Finding the right bike frame size and height starts with measuring your height and inseam. You can do this at home with just a tape measure and a book. Proper sizing helps you ride in comfort, keeps you safe, and lets you enjoy every trip. Ready to get started?
Key Takeaways
Measure your height and inseam at home. Use simple tools like a tape measure and a book. This helps you get the right numbers for bike fitting.
Your inseam is more important than your height for bike frame size. It shows your real leg length. It also helps you set the right saddle height.
Use your numbers with bike size charts. Try test rides to find a bike that feels good, safe, and works well. Make sure it fits your riding style and body.
Why Size Matters
Comfort and Safety
You want your bike to feel good every time you ride. When you pick the right frame size, you avoid pain and discomfort. If your bike is too big or too small, you might run into problems like:
Lower back, neck, or shoulder pain from leaning too far forward.
Wrist pain or numbness if your saddle angle is off.
Soreness from a saddle that sits too high or too low.
Pedaling that feels awkward because your seat is too far forward or backward.
Tip: A bike that fits you well helps you stay comfortable and keeps you safe on the road.
A properly sized bike also makes riding safer. Here’s how:
You get better control and balance.
You can mount and dismount easily.
You keep a good posture, which protects your joints.
You handle turns and stops with confidence.
You lower your risk of injury.
Test rides and professional fittings help you fine-tune your fit. Bikes for men and women have different shapes to match your body, so you feel secure and comfortable.
Performance
You want to go faster and farther, right? The right frame size helps you do that. When your bike fits, you pedal more efficiently and waste less energy. You get better speed and endurance because your body works in a natural position. A good fit means you transfer power to the pedals without strain. Over time, you enjoy longer rides with less joint stress and fewer aches. You stay healthy and keep cycling fun for years to come.
Tools You Need

At-Home Essentials
You do not need fancy gadgets to measure yourself for a bike. Most people already have what they need at home. Here is a simple list to get you started:
Cycling kit or close-fitting shorts – Wear your bike shorts or something similar. This helps you get a true measurement.
Bare feet – Take off your shoes and socks. You want to stand flat on the floor.
A sturdy book – Use a book with a hard cover. You will place this between your legs to copy the feel of a bike saddle.
A pencil – You will use this to mark the wall.
A measuring tape – This tool helps you check the distance from the floor to your mark.
Tip: Stand with your back against a wall and your feet shoulder-width apart. This position gives you the most accurate results.
These tools help you measure your inseam and height at home. You do not need to buy anything special.
Preparing Your Space
Set up your space before you start. Pick a spot with a hard, flat floor and a clear wall. Good lighting helps you see your marks and measure correctly. If you want to take photos or videos, set your camera at hip height and keep it steady. Try to keep the camera straight and centered. This avoids mistakes in your measurements.
You get the best results when you take your time and prepare. Careful setup means you get numbers you can trust. This makes it easier to find the right bike size for your body.
Measure Height

Step-by-Step
Measuring your height is the first step to finding your perfect bike frame size and height. You can do this at home with just a few tools. Here’s how you do it:
Stand against a flat wall with your back straight and your heels touching the wall.
Keep your feet about shoulder-width apart. Make sure you stand tall and look straight ahead.
Place a sturdy book flat on your head. Slide it gently until it touches the wall.
Mark the spot where the bottom of the book meets the wall with a pencil.
Step away and use a measuring tape to check the distance from the floor to your mark. This number is your height.
Tip: Ask a friend or family member to help. They can make sure the book stays level and the mark is in the right place.
Tips for Height
Getting an accurate height measurement helps you choose the right bike. Here are some things to keep in mind:
Don’t pick a bike just by looking at wheel size. This works only for kids’ bikes.
Your inseam matters more than your total height. People have different leg and arm lengths, so always measure your inseam carefully.
Bike brands use different ways to measure frames. For example, some brands measure the seat tube differently, which can change the size by several centimeters.
Always check the frame geometry and seat tube angle. These details affect how the bike fits you.
If you want the best fit, think about your riding style and the type of bike you want. Road, mountain, and city bikes all use different sizing methods.
Remember, the best bike frame size and height for you depends on your body, not just a chart. A good fit keeps your knees safe and helps you ride longer without pain.
Measure Inseam
Step-by-Step
Getting your inseam right is the most important part of finding your perfect bike frame size and height. Your inseam tells you how much room you need between the saddle and the pedals. Here are two popular ways to measure it at home:
1. The Book Method (Most Accurate)
Stand tall against a wall on a hard, flat floor.
Wear your riding shoes or go barefoot for a true measurement.
Place a sturdy book between your legs, pressing it up as if you were sitting on a bike saddle.
Keep your feet about 6-8 inches apart. This matches your stance on a bike.
Have a friend help you mark the top edge of the book on the wall.
Step away and measure from the floor up to the mark. This number is your inseam.
Tip: Ask someone to help. You get a more accurate mark and measurement.
This method is tried-and-true. Cyclists and bike shops trust it because it copies the way you sit on a bike. You can also use a yardstick or a dowel with a level for even more accuracy.
2. Standing Height Minus Sitting Height Method
This method uses two measurements:
Measure your standing height as you did before.
Sit on a hard chair with your back straight and feet flat. Measure from the floor to the top of your head.
Subtract your sitting height from your standing height. The result is your inseam.
Measurement Method | Reference Point for Saddle Height | Example Inseam (32″) | Calculated Saddle Height | Notes |
|---|---|---|---|---|
Book Method (Lemond) | Center of Bottom Bracket to top of saddle | 32″ (81.3 cm) | ~71.78 cm | Accurate for most bike fits; measures from crank axle |
Standing Height Minus Sitting Height | Top of pedal (crank down) to top of saddle | 32″ (81.3 cm) | ~88.62 cm | Measures from pedal; gives slightly higher saddle height |
Adjusted Lemond Method | Adds crank length to Lemond measurement | 32″ (81.3 cm) | ~89 cm | Comparable to Hamley method when crank length is added |
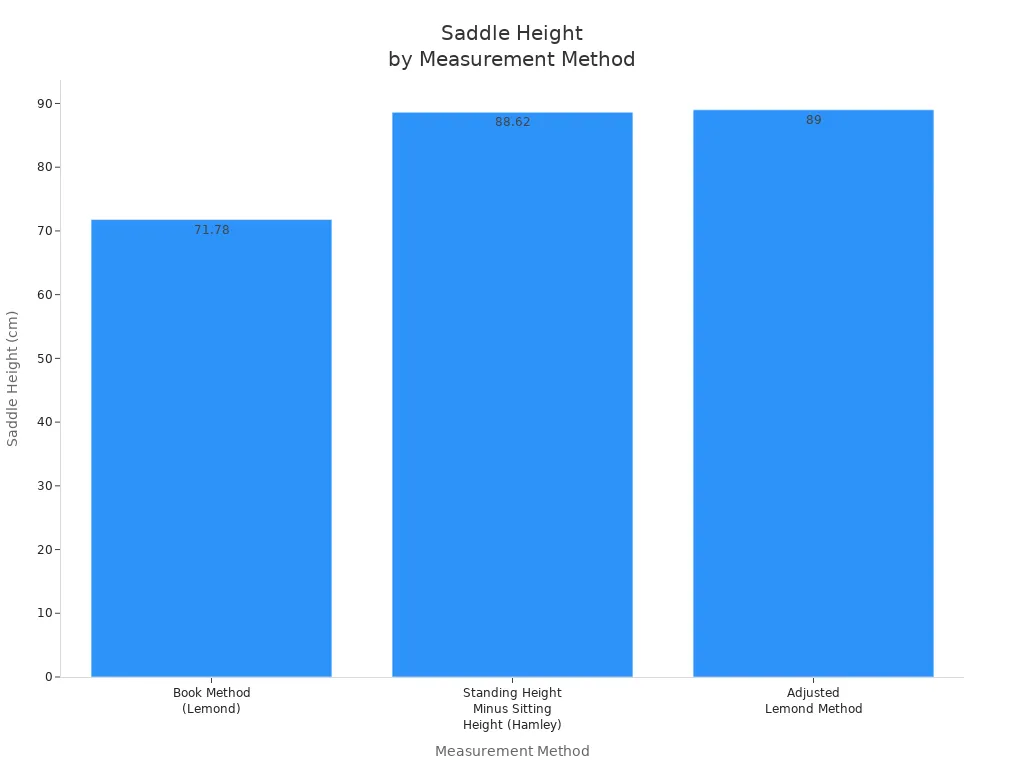
You can see that these methods use different starting points. The book method is the most common and works well for most people. The other method can give a higher number, but both help you get close to your best fit.
Accuracy Tips
You want your inseam measurement to be as close as possible to what you need for your bike. Here are some tips to help you get it right:
Stand with your feet 6-8 inches apart. This matches your riding position.
Use a hard, flat surface. Carpet can throw off your numbers.
Wear your riding shoes if you plan to ride with them. This gives you a real-world measurement.
Always press the book up firmly, but not so hard that it hurts.
Have someone help you mark and measure. You get a more accurate result.
Double-check your measurement. Small errors can make a big difference in comfort and safety.
Note: At-home measurements can be off by a few degrees or centimeters compared to professional tools. Take your time and measure twice for the best results.
Why Inseam Matters More Than Height
Inseam is the key number for bike frame size and height. Your inseam shows your true leg length, which decides how high your saddle should be and what frame size fits you best. Height alone can be misleading. People have different leg-to-torso ratios. For example, you might be the same height as a friend but need a different bike size because your legs are longer or shorter.
Bike fitting experts say inseam is more important than height. Your inseam helps you set your saddle height for comfort, power, and injury prevention. It also helps you pick a frame that matches your body, not just a chart. This is true for adults and kids. Kids’ bikes use inseam first to make sure they can ride safely and grow with the bike.
Inseam is your starting point, but not the only thing to check.
Bike brands use different sizing systems. Always check their charts.
Combine inseam with your height, riding style, and a test ride for the best fit.
Tip: If you are between sizes, always try both. Your inseam will help you decide which one feels better.
Bike Frame Size and Height Guide
Using Measurements
You have your height and inseam numbers. Now, you can use them to find your best bike frame size and height. Most bike brands and shops use charts or formulas to match your measurements to the right frame. These tools help you narrow down your choices before you even step into a store.
Here’s a simple way to use your inseam and height:
Look up your height and inseam on a size chart for your bike type.
Use the formulas below to get a quick estimate for frame size:
Hybrid Bike Size (cm) = Inseam (cm) × 0.685
Mountain Bike Size (inches) = Inseam (cm) × 0.225
Road Bike Size (cm) = Inseam (cm) × 0.665
Round your answer to the nearest whole number.
Let’s check out some standard size charts:
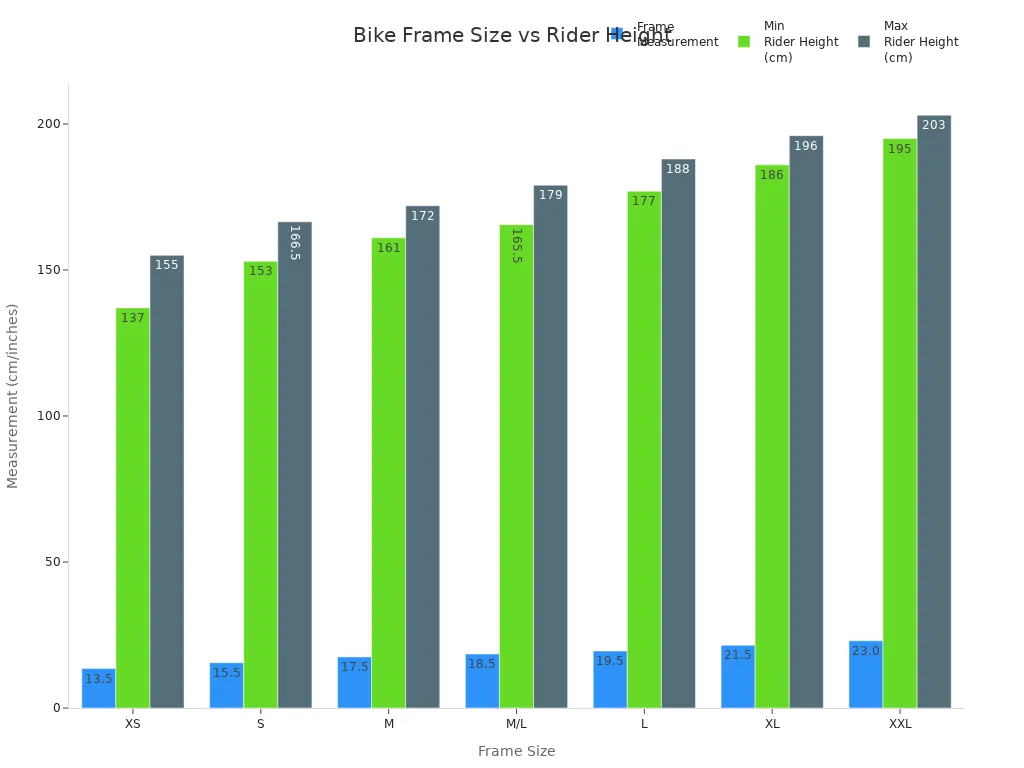
Rider Height (ft/in) | Rider Height (cm) | Suggested Frame Size (cm/inches) | Bike Type |
|---|---|---|---|
5’6″ – 5’9″ | 168 – 175 | 54-55 cm | Road Bike |
5’9″ – 6’0″ | 175 – 183 | 56-58 cm | Road Bike |
5’6″ – 5’10” | 168 – 178 | 17″ – 18″ | Mountain |
5’1″ – 5’3″ | 155 – 160 | 47-49 cm | Women’s Road |
4’10” – 5’2″ | 148 – 158 | 13″ – 14″ | Mountain |

Tip: Always check the brand’s own chart. Some brands measure frames a little differently.
If your numbers fall between two sizes, don’t worry. Many riders land in the middle. Here’s what you can do:
Choose the smaller frame if you want a lighter, more agile ride.
Pick the larger frame for more comfort and a stable feel.
Think about your arm length and riding style. Long arms or a relaxed style? Go bigger. Short arms or want to sit upright? Go smaller.
Make sure you have at least an inch of space between the top tube and your body when you stand over the bike.
A test ride is the best way to know for sure. You can feel the difference in comfort, reach, and control. Adjust the seat and handlebars after your ride to fine-tune your fit.
🚲 Pro Tip: After you pick your bike frame size and height, set your saddle height using this formula:
Saddle Height = Inseam (cm) × 0.885
This gives you a starting point. Adjust it until your legs feel just right when you pedal.
Different Bike Types
Not all bikes use the same sizing rules. Each type has its own way to match your body to the frame.
Road Bikes: These use seat tube length in centimeters. They fit best when you use both your height and inseam. Road bikes often have a more stretched-out position for speed.
Mountain Bikes: These can use inches or centimeters for frame size. Mountain bikes usually have smaller frames for better control on rough trails. Use your inseam and height with a mountain bike chart.
Hybrid Bikes: These mix features from road and mountain bikes. Their sizing charts are unique, so always check before you buy.
Kids’ Bikes: These use wheel size, not frame size. For kids, the right wheel size helps them ride safely and grow with the bike.
Here’s a quick look at how sizing works for different bikes:
Bike Type | Sizing Method | What to Check |
|---|---|---|
Road | Frame size (cm) | Height, inseam, reach |
Mountain | Frame size (in/cm) | Height, inseam, standover |
Hybrid | Frame size (cm) | Height, inseam |
Kids | Wheel size (inches) | Inseam, ability to touch ground |
Note: Sizing systems can change between brands. Always double-check before you buy.
A test ride is super important. Even if the numbers look right, only a ride can show you how the bike feels. Try both sizes if you’re between them. Adjust the seat and handlebars to see what feels best. If you’re not sure, ask for help at a bike shop. They can help you find the perfect fit for your bike frame size and height.
Final Tips
Common Mistakes
You want your bike to fit just right, but many beginners slip up during sizing. Here are the most frequent mistakes you should avoid:
Relying only on your height and skipping inseam or reach measurements.
Ignoring standover height, which keeps you safe when mounting or stopping.
Skipping test rides and trusting charts without feeling the bike in person.
Thinking you can fix a bad frame size with small adjustments like moving the seat or changing the stem.
Forgetting to check the manufacturer’s size chart or using a generic chart for every bike.
Not considering your riding style or arm length when choosing between two sizes.
Overlooking handlebar, saddle, and pedal positions for comfort.
Tip: Always use both your height and inseam to pick a frame. Try to get a slight bend in your knee at the bottom of each pedal stroke. Make sure you have enough standover clearance—at least 2 cm for road bikes and 4 cm for mountain bikes.
When to Get Help
Sometimes, you need more than a tape measure and a chart. You should seek professional fitting if you feel pain in your knees, back, or shoulders after riding. If you have one leg longer than the other or special physical needs, a bike shop expert can help. After riding for a few months, you may notice discomfort or want better performance. That’s a good time to get a pro fit.
If you have injuries or want to ride longer distances, a professional can adjust your bike for your body.
Experts use special tools to check your flexibility, riding style, and muscle balance.
The fitting process may take more than one visit to get everything perfect.
🚲 Note: A professional fitting can make your rides smoother, safer, and more fun. Don’t hesitate to ask for help if you’re unsure about your fit or want to ride your best.
You can find your best fit by following these steps:
Measure your height and inseam with care.
Test ride bikes and adjust for comfort.
If you feel unsure, visit a local bike shop. Experts can help you ride with confidence!
FAQ
How often should you measure your height and inseam?
You should check your measurements once a year. If you grow, lose weight, or change shoes, measure again before buying a new bike.
Tip: Kids and teens should measure more often since they grow fast!
Can you use a regular ruler instead of a tape measure?
You can use a ruler, but a tape measure works better. It helps you measure longer distances and curves easily.
What if your inseam and height suggest different bike sizes?
Try both sizes if you can. Your inseam matters more for comfort. Always test ride to see which bike feels best for you.
See Also
Determine Your Perfect Bike Frame Size Using Height And Inseam
Step By Step Guide To Measuring Bike Frames For Comfort
Using A Bike Frame Size Chart To Ensure Proper Fit