

You want a mountain bike that feels just right every time you hit the trail. Geometry numbers like reach, seat angle, and stem length play a big role in matching a bike to your body and riding style. Even if you’re new to this, learning a few key terms can help you use a mountain bike frame size chart with confidence. Riders of all levels find that understanding geometry leads to better comfort, control, and fun—no matter how or where you ride.
Key Takeaways
Mountain bike geometry has important measurements. These include reach, stack, and angles. These things change how comfortable and easy the bike is to control on trails.
You can use a frame size chart with your height and inseam. This helps you pick a good first bike size. But looking at geometry numbers helps you get a better fit.
Picking the right size depends on your body shape and how you ride. A bigger size gives more stability. A smaller size makes the bike easier to turn.
Try riding different bikes. Make small changes to the seat and handlebars. This helps you feel better and control the bike more easily.
Knowing about bike geometry helps you ride longer. It keeps you safe. It also helps you enjoy every trail and feel confident.
Mountain Bike Geometry Basics
What Is Bike Geometry?
You might hear mountain bike geometry and wonder what it means. Bike geometry is the measurements and angles that shape how your bike fits and rides. These numbers include reach, stack, head tube angle, and wheelbase. Each frame part has a measurement that affects your position and comfort.
Many new riders get confused by size labels like Small, Medium, and Large. These sizes can mean different things for different brands. That’s why looking at a geometry chart is important. The chart shows real numbers, like effective top tube length and chainstay length. These help you compare bikes. Some measurements, like reach and effective top tube length, show how roomy the bike feels. Others, like head tube angle and wheelbase, change how the bike handles on the trail.
Here are some key mountain bike geometry terms:
Geometry Element | Description | Effect on Bike Handling |
|---|---|---|
Head Tube Angle | Angle of head tube compared to ground | Slack means stable descents; Steep means sharp turns |
Seat Tube Angle | Saddle position compared to pedals | Steeper makes climbing easier |
Chainstay Length | Rear wheel to bottom bracket | Longer is more stable; Shorter is easier to lift |
Bottom Bracket Height | Center of crank to ground | Lower is stable; Higher gives more pedal clearance |
Reach | Bottom bracket to top of head tube | Longer is stable; Shorter is nimble |
Stack | Vertical height from bottom bracket to head tube | Higher is upright; Lower is aggressive |
Why Geometry Matters
Mountain bike geometry affects every part of your ride. If you pick a bike with the right geometry, you feel comfortable and in control. The wrong setup can cause pain, tiredness, or even injury. Changing saddle height and setback changes how your muscles work and how much effort you need to pedal. A good fit helps you ride longer and enjoy the trail more.
You also need to think about pedal clearance and weight distribution. If your bottom bracket is too low, you might hit your pedals on rocks or roots. Toe overlap can make your foot touch the front wheel during tight turns. This can lead to falls. Experts say you should aim for about 55% of your weight on the front wheel during descents for better stability.
Mountain bike geometry is not just about numbers. It is about finding a bike that matches your body and riding style. When you understand these basics, you can use a geometry chart to make smart choices and get the most out of every ride.
Key Geometry Terms for Mountain Bike Fit
Reach and Stack
When you look for the right mountain bike fit, reach and stack are two numbers you cannot ignore. Reach measures the horizontal distance from the bottom bracket to the top of the head tube. Stack is the vertical distance from the same points. These two numbers set your main riding position. If you want a more stretched-out position, a longer reach will help. This gives you a lower center of gravity, which boosts control and stability, especially on fast descents. A shorter reach lets you sit more upright, making it easier to shift your weight and handle tight trails.
Stack changes how high your handlebars sit. A higher stack means you ride in a more relaxed, upright position. A lower stack puts you in a more aggressive stance. Professional bike fitters say stack and reach are the most important geometry numbers for dialing in your position. You can also use the stack to reach ratio to see if a bike feels aggressive or relaxed. Most mountain bikes have a ratio between 1.4:1 and 1.6:1. Remember, your effective reach can change with stem length and saddle position, so you can fine-tune your fit.
Tip: If you feel cramped or too stretched, check your reach and stack numbers first. Small changes here can make a big difference in comfort and control.
Head Tube and Seat Tube Angles
Head tube angle and seat tube angle shape how your bike handles and how you sit. The head tube angle is the tilt of the front fork. A slacker head tube angle (around 64 degrees) makes your bike more stable at high speeds and on steep descents. A steeper angle (closer to 67 degrees) gives you quicker steering, which is great for cross-country rides.
The seat tube angle, often between 71 and 78 degrees, sets your hips over the pedals. A steeper seat angle (about 78 degrees) moves you forward, helping with climbs and giving you better power transfer. A shallower seat tube angle (around 75 degrees) shifts your weight back, which can ease wrist pressure on flat trails. You can adjust your saddle position to fine-tune your effective seat tube angle and get the best fit for your riding style.
Wheelbase and Top Tube Length
Wheelbase is the distance between your front and rear axles. A longer wheelbase gives you more stability, especially at speed or on rough trails. This makes your bike feel smooth and steady. A shorter wheelbase makes your bike more nimble and easier to turn, which is perfect for tight, technical trails.
Top tube length, especially effective top tube length, helps you figure out how roomy the bike feels. It works with reach to set your main riding position. If you want a bike that feels spacious, look for a longer top tube length. If you like a compact feel, go shorter. Both wheelbase and top tube length play a big role in how your bike fits and handles.
Bottom Bracket Height
Bottom bracket height is the distance from the center of your cranks to the ground. This number affects pedal clearance and standover. A higher bottom bracket gives you more room to clear rocks and roots, which helps prevent pedal strikes. However, it can also raise your standover height, so you need to check your standover clearance to make sure you can safely straddle the bike.
Aspect | What It Means for You |
|---|---|
Pedal Clearance | Higher bottom bracket means fewer pedal strikes on rough trails. |
Standover | Higher bottom bracket raises standover, so always check standover clearance for a safe fit. |
Handling | Bottom bracket height does not change handling much, but it does affect how easy it is to get on and off the bike. |
Fit | Choose a bottom bracket height that matches your riding style and gives you enough standover clearance. |
When you understand these geometry terms, you can match your bike to your body and riding style. This helps you find the best position, comfort, and control for every ride.
Using a Mountain Bike Frame Size Chart
How to Read a Size Chart
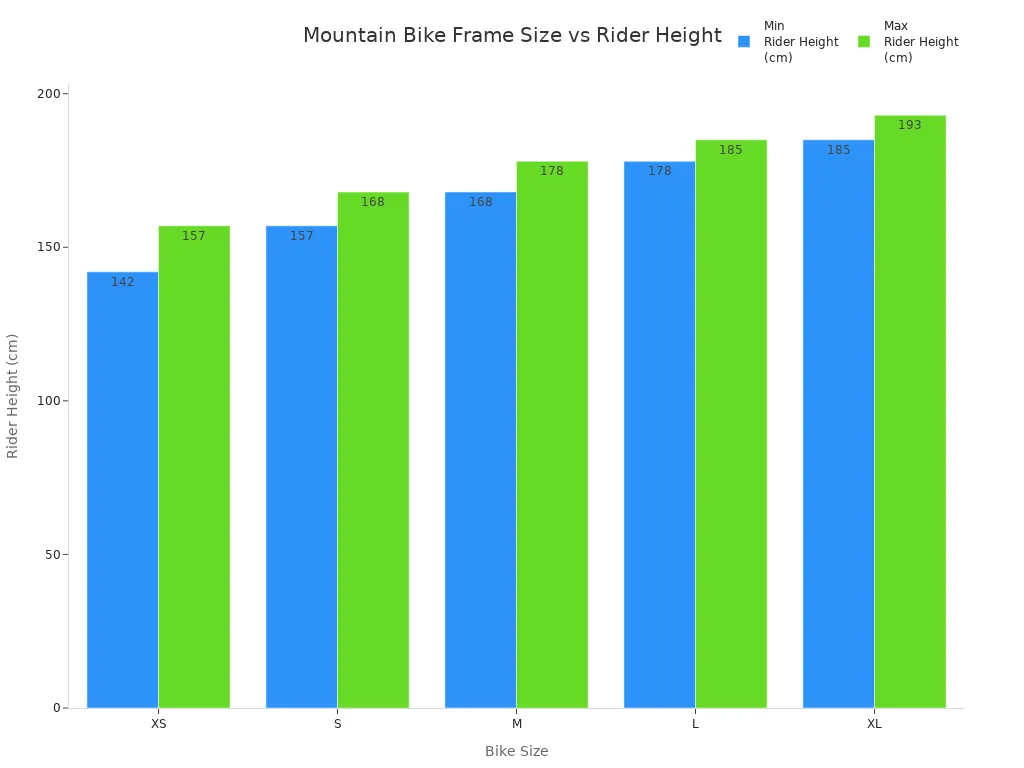
You want to find your ideal fit, so start with a mountain bike frame size chart. Most charts use rider height and inseam to match you to a frame size. You’ll see sizes like XS, S, M, L, and XL. These labels make it easy to compare bikes, but each brand may use slightly different measurements. Always check the chart for the specific bike you like.
Here’s a typical mountain bike frame size chart:
Bike Size | Frame Size (inches) | Rider Height (feet/inches) | Rider Height (cm) |
|---|---|---|---|
XS | 13 | 4’8″ – 5’2″ | 142 – 157 |
S | 15 | 5’2″ – 5’6″ | 157 – 168 |
M | 17 | 5’6″ – 5’10” | 168 – 178 |
L | 19 | 5’10” – 6’1″ | 178 – 185 |
XL | 21 | 6’1″ – 6’4″ | 185 – 193 |
Note: These numbers are a starting point. Always check the manufacturer’s chart for the most accurate fit.
You’ll also notice that some brands use smaller wheels on XS frames or adjust geometry for different sizes. That’s why you should look at the chart and the geometry numbers together.
Matching Chart to Your Body
Getting the right position starts with measuring your height and inseam. Stand straight against a wall without shoes. Use a tape measure to check your height. For your inseam, place a book between your legs to mimic the saddle, then measure from the top of the book to the floor. These two numbers help you match yourself to the mountain bike frame size chart.
Once you have your measurements, find your size on the chart. If you fall between sizes, look at your body proportions. Do you have a long torso or long arms? You might prefer a larger frame for a more stretched position. If your legs are longer than your torso, a smaller frame could give you a better position and standover clearance.
Here’s a step-by-step guide to using a mountain bike frame size chart:
Find your measurements on the chart for the bike you want.
Check the geometry numbers like reach, stack, and top tube length for each size.
Think about your riding style—do you want a relaxed position or a more aggressive stance?
Test ride if possible to check comfort, standover height, and handlebar position.
Adjust saddle and handlebar setup for the best fit after picking your size.
Tip: Your inseam helps you check standover height, which is important for safety and comfort. Always make sure you have enough clearance when standing over the bike.
Sizing Up vs. Sizing Down
Sometimes you land between two sizes on the mountain bike frame size chart. Should you size up or size down? Each choice has its own advantages.
Sizing down gives you a bike that feels nimble and easy to handle. You get a more upright position, which is great for beginners or riders who want quick steering. The bike feels playful, especially on twisty trails or jump parks. But a smaller frame can feel cramped if you have a long torso or arms. It may also feel less stable at high speeds.
Sizing up means you get a longer, more stable bike. This is perfect for riders who want confidence on fast descents or rough terrain. You get a stretched position, which helps with control and stability. However, a bigger bike can be harder to maneuver on tight trails. It may also be tough to adjust if your legs are short compared to your torso.
Here’s a table to help you decide:
Sizing Option | Advantages | Disadvantages |
|---|---|---|
Sizing Down | – Nimble handling, easy to turn | – Can feel cramped |
Sizing Up | – Stable at high speeds | – Less nimble |
Note: It’s easier to make a big bike feel smaller with adjustments than to make a small bike feel bigger. Always test ride both sizes if you can.
Using Geometry Numbers Alongside the Chart
A mountain bike frame size chart gives you a starting point, but geometry numbers help you fine-tune your position for an ideal fit. Reach and stack show how far and how high you’ll sit. Top tube length affects how roomy the bike feels. Standover height tells you if you can safely straddle the bike.
Frame size charts use height and inseam, but geometry numbers let you adjust for your body shape and riding style. If you want a more aggressive position, look for a frame with longer reach and lower stack. If you prefer comfort, choose a bike with a shorter reach and higher stack. Wheelbase and chainstay length also change how the bike handles.
Pro Tip: A professional bike fit can help you match geometry numbers to your body and riding style. This gives you the best position for comfort, control, and performance.
Many riders make mistakes by relying only on the chart. Always check the geometry numbers and test ride the bike. Adjust the saddle, stem, and handlebars to get the best fit. If you’re between sizes, remember that comfort and personal preference matter most.
Comparing Bike Geometry for the Best Fit
Geometry and Riding Style
When you compare mountain bikes, you’ll notice that geometry numbers can look similar but feel very different. Even if two bikes have the same size label, their geometry can change your riding experience. For example, a bike with a slacker head tube angle and longer wheelbase gives you more stability on steep descents. This setup boosts your confidence and makes bike handling smoother when you ride fast or hit rough trails. On the other hand, a steeper head tube angle and shorter chainstays make the bike feel playful and quick to turn. You’ll love this if you enjoy tight, twisty trails.
Your riding style matters a lot. If you like cross-country rides, you’ll want a bike that feels light and climbs well. Look for a steeper seat tube angle and shorter wheelbase. These features help you put more power into each pedal stroke and keep the front wheel planted. Trail bikes balance stability and agility, so you get good handling on both climbs and descents. Downhill bikes have the slackest geometry, long reach, and low bottom brackets. This design gives you maximum control and handling at high speeds, but it’s not great for climbing.
Here are some key geometry features to compare for your riding style:
Head tube angle (slack for stability, steep for quick turns)
Wheelbase length (long for stability, short for agility)
Seat tube angle (steep for climbing power)
Top tube length and reach (affect comfort and control)
Bottom bracket height (lower for better cornering and handling)
Test Rides and Adjustments
Once you narrow down your choices, take each bike for a test ride. Pay attention to how the bike feels when you sit and stand. Does the handling match your expectations? Do you feel in control on corners and descents? Try climbing a hill to see if you can put power down comfortably. Notice if the bike gives you the comfort you need for longer rides.
After you pick a frame, you can fine-tune your fit. Adjust your saddle height so your leg has a slight bend at the bottom of the pedal stroke. Set the saddle setback so your kneecap lines up with the pedal axle. Handlebar width and height also affect comfort and handling. A wider bar gives you more control, while a higher bar can make your position more relaxed. Don’t forget about crank length and cleat position—they help you use your power efficiently and avoid pain.
Tip: Make small changes one at a time. Ride the bike and see how each adjustment affects comfort, handling, and power. If you want the best results, consider a professional bike fit.
By comparing geometry numbers and making careful adjustments, you’ll find a bike that matches your riding style and gives you the best handling, comfort, and power for every ride. This approach helps you get the most out of your bike’s performance and enjoy every trail.
You want a mountain bike that feels good and safe. When you know about geometry, you can choose a bike that fits you well. This means you will not get tired as quickly. You will feel more comfortable when you ride. Experts say you should look at geometry charts and measure yourself for the best fit.
The right geometry helps you ride longer and stay safe. It also makes every trail more comfortable.
Remember, a bike that fits you well lets you have fun and enjoy your adventure!
FAQ
How do I know if my mountain bike is the right size?
You should feel comfortable when you ride. Your feet touch the ground when you stop. You can reach the handlebars without stretching. If you feel cramped or too stretched, try a different size.
Can I adjust my bike if it feels a little off?
Yes! You can move your saddle up or down. You can also change the handlebar height or swap the stem. Small changes can make a big difference in comfort and control.
What if I am between two sizes on the chart?
Tip: If you like a playful ride, pick the smaller size. If you want more stability, go bigger. Always test ride both if you can.
Does bike geometry matter for kids’ mountain bikes?
Absolutely! Kids need bikes that fit their bodies. Look for a bike with the right standover height and reach. A good fit helps kids ride safely and have more fun.
See Also
Guide To Choosing The Right Bike Frame Size Chart