
Choosing the right bike frame helps you ride better and feel more comfortable. It also gives you more control each time you ride. Many cyclists feel pain in their neck, back, or knees. This happens when their bike does not fit their body well. You should measure your inseam and check the standover height. This helps you find a frame that matches your bicycle style. The frame material changes how your bike feels and moves. When you buy a new bike, think about your budget. Decide if you want a custom or used frame for your needs.
A bike frame that fits you well keeps you safe from pain and injury on long rides.
A good bike fit helps you go faster and ride longer by matching the frame size and height to your body and riding goals.
The best material and shape make you feel better and give you more control on any bike.
Key Takeaways
Measure your inseam. Check the standover height. This helps you find a bike frame size that fits your body and how you ride.
Pick a frame material that fits your budget. Choose one that matches your riding needs. Steel is good for comfort. Carbon fiber is good for speed.
Learn about frame geometry and design. This helps you handle your bike better. It also makes riding more comfortable for your style.
Change the saddle, handlebars, and pedals. This helps you adjust your bike fit. It can stop pain when you ride.
Think about getting professional bike fitting services. This gives you the best comfort and performance. It is helpful if you ride a lot or feel discomfort.
Select the Right Size
Finding the right size bike frame is the first step to a comfortable and safe ride. When you select the right size, you avoid pain and improve your control on any bicycle. You need to measure your body and compare it to the bike size chart. This helps you match your body to the frame and get the right height for your riding style.
Inseam Measurement
Your inseam is the distance from your crotch to the floor. This measurement is very important for bicycle frame selection. You can follow these steps to measure your inseam:
Stand on a hard, flat surface with your feet about 6-8 inches apart.
Place a book or ruler firmly against your crotch, like a bike saddle.
Make sure the book or ruler is level with the ground.
Measure the distance from the top of the book or ruler to the floor.
You should wear your cycling shoes when you do this. Ask someone to help if you need it. Use this inseam measurement with a bike size chart to find the right size bike frame. For example, you can multiply your inseam by 0.685 for a hybrid bike or by 0.225 for a mountain bike to estimate the frame size. This method helps you get the right height and makes sure your bike fits well. Professional bike fitting services can also help you adjust your saddle height and pedal position for the best comfort and performance.
Tip: Always double-check your inseam measurement before choosing the right size of a bicycle frame.
Standover Height
Standover height is the space between your body and the top tube of the bike when you stand over it. You need at least one inch of clearance above the frame’s top tube for comfort and safety. For road bikes, the standover height is usually around 27 inches. Mountain bikes have a slanted top tube, so the standover height can change depending on where you measure. More standover clearance helps you stay stable and reduces the risk of accidents. If you want more clearance, you can use a shallower saddle or shorter cranks to lower your seat height. Tire size also affects standover height. Bigger tires make the bike taller, so check the tire size when you look at the bike frame size.
Height Reference
You can use a bike size chart to match your height and inseam to the right frame. Each type of bicycle uses a different sizing method. Road bikes use centimeters and often have smaller frame sizes. Mountain bikes use inches or general sizes like S, M, or L. Hybrid bikes use a mix of both. Here is a simple table to help you compare:
Bike Type | Sizing Method | Frame Size Example (for ~5’6″ rider) | Standover Clearance |
|---|---|---|---|
Road Bike | Centimeters (cm) | 54-55 cm (M) | 1-2 inches |
Mountain Bike | Inches or S/M/L | 17″-18″ (M) | 2-4 inches |
Hybrid Bike | Inches or cm/S/M/L | 16″-17″ / 51-53 cm (S/M) | 1-2 inches |
You should not rely on height alone for bicycle frame selection. Inseam length, reach, and bike geometry also matter. If you have unique body proportions, you might need a custom build. Sometimes, you may fall between two sizes on the bike size chart. In that case, choose the smaller frame for better control or the larger frame for a more relaxed ride. Micro adjustments, like changing the stem or saddle position, can help, but they cannot fix a bike frame size that is too big or too small.
A frame that is too large stretches your body and causes pain in your back, shoulders, and wrists.
A frame that is too small makes the bike twitchy and harder to control.
Note: Always test ride a bicycle before you buy it. This helps you feel if the frame and size are right for you.
Choosing the right size bike frame keeps you comfortable and safe. Use your inseam, standover height, and a bike size chart to guide your decision. If you are unsure, ask a professional for help or consider a custom frame for the best fit.
Bike Frame Materials
When you choose a bicycle, you need to think about bike frame materials. The types of material used in a frame change how your bike feels, how much it weighs, and how long it lasts. Each material has its own strengths and weaknesses. You should learn about these differences before choosing the right model for your needs.
Steel vs. Aluminum
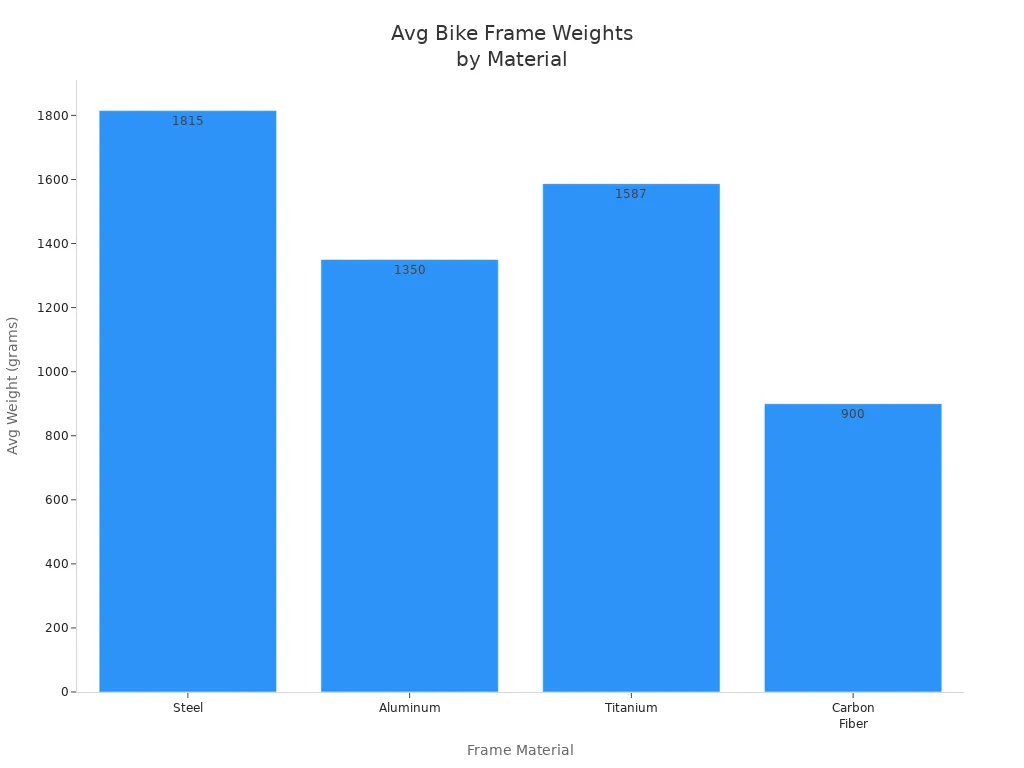
Steel and aluminum are two of the most common materials for bicycle frames. Steel frames have a long history. They are strong and easy to repair. Many riders like the comfort of steel because it absorbs bumps well. Steel frames usually weigh between 3 to 5 pounds. If you take care of them and protect them from rust, they can last 10 to 20 years or more.
Aluminum frames are lighter than steel. Most aluminum frames weigh about 2.4 to 3.5 pounds. This makes your bike easier to lift and faster to ride. Aluminum does not rust, but it can feel stiffer on rough roads. The average lifespan for an aluminum frame is about 5 to 10 years. Aluminum bikes cost more than steel, but less than titanium or carbon fiber.
Here is a table to help you compare steel and aluminum:
Material | Weight Range | Average Lifespan | Comfort Level | Cost Level |
|---|---|---|---|---|
Steel | 3-5 lbs | 10-20+ years | Plush, smooth | |
Aluminum | 2.4-3.5 lbs | 5-10 years | Moderate |
Tip: If you want a tough, comfortable ride and do not mind extra weight, steel is a good choice. If you want a lighter bike for speed, try aluminum.
Titanium vs. Carbon Fiber
Titanium and carbon fiber are premium materials for bike frames. Titanium frames are strong and light. Most titanium frames weigh between 3 to 4 pounds. They do not rust and can last a lifetime with good care. Titanium gives you a smooth ride, but it costs much more than steel or aluminum. The high price comes from the labor needed to weld titanium. For example, a custom titanium frame can cost more than double a steel frame.
Carbon fiber bikes are the lightest. Most carbon fiber frames weigh between 2 to 2.6 pounds. Carbon fiber is very stiff, so it gives you excellent power transfer. This makes it popular for racing and high-performance bikes. Carbon fiber frames can last 6 to 10 years with regular use. They cost the most because making them takes special skills and tools.
Here is a table to compare titanium and carbon fiber:
Material | Weight Range | Average Lifespan | Comfort Level | Cost Level |
|---|---|---|---|---|
Titanium | 3-4 lbs | Lifetime | Smooth, durable | High |
Carbon Fiber | 2-2.6 lbs | 6-10 years | Stiff, fast, tunable | Highest |
Note: Carbon fiber frames are very light and stiff, but they can break if you crash. Titanium frames are tough and last a long time, but they cost a lot.
Material and Riding Style
You should match the frame material to your riding style and budget. If you ride for fun or need a bike for daily use, steel or aluminum works well. These materials give you good value and last a long time. If you want a bike for racing or long rides, titanium or carbon fiber may suit you better.
Think about the terrain where you ride. Steel and titanium absorb bumps and give you more comfort on rough roads. Aluminum and carbon fiber are stiffer, so you feel more of the road. Tire width and pressure also change how your bike feels. Wider tires and lower pressure make any frame more comfortable.
Here is a quick guide to help you choose:
Steel: Best for comfort, durability, and value. Good for city riding and touring.
Aluminum: Best for light weight and speed at a moderate price. Good for road and mountain bikes.
Titanium: Best for riders who want a light, strong, and long-lasting frame. Good for adventure and endurance rides.
Carbon Fiber: Best for racing and high performance. Lightest weight, but highest cost.
Frame Material | Average Weight Range | Average Lifespan | Cost Level | Best Use Case |
|---|---|---|---|---|
Steel | 3-5 lbs | 10-20+ years | Most affordable | Comfort, touring, city riding |
Aluminum | 2.4-3.5 lbs | 5-10 years | Moderate | Speed, road, mountain |
Titanium | 3-4 lbs | Lifetime | High | Endurance, adventure |
Carbon Fiber | 2-2.6 lbs | 6-10 years | Highest | Racing, performance |
When choosing the right model, always think about your budget, how much weight matters to you, and what kind of riding you do most. A well-built frame of any material can give you a great ride. The design and fit matter as much as the material itself.
Bike Fit and Geometry
Frame Geometry Basics
It is important to know about frame geometry for a good bike fit. Geometry means the shape and angles of your bike frame. The main measurements are reach, stack, head tube angle, and chainstay length. Reach is how far it is from the bottom bracket to the head tube, going straight across. Stack is how high it is from the bottom bracket to the top of the head tube. These numbers help you pick a frame that fits your body and how you ride. If you pick the wrong geometry, you might feel too stretched or too tight. The right frame geometry is the first step to a good bike fit.
Handling and Comfort
Frame geometry changes how your bike turns and how comfy it feels. The head tube angle and fork offset work together to help you steer. A slacker head tube angle gives you more balance on bumpy roads. A steeper angle makes the bike turn faster. Trail is the space where the front wheel touches the ground behind the steering line. More trail makes your bike feel steady. Less trail makes it feel quick but harder to control. Handlebar width and stem length change how hard it is to steer. A short stem and narrow bars make the bike react faster. Tire width can also change how easy it is to steer and how soft the ride feels. All these things work together to give you a bike that fits you well.
Tip: No single number can tell you everything about how a bike handles. You should try different bikes to see which one feels best for you.
Design Features
Different frame shapes work for different ways of riding. Racing bikes have a short wheelbase and steep angles for fast turning. Touring bikes have a longer wheelbase and slacker angles for more balance and comfort when you carry bags. Commuter bikes use middle geometry for both speed and comfort. Gravel bikes mix road and mountain bike features, so you get a steady ride on many surfaces.
Riding Style | Key Geometry Features | Purpose/Effect |
|---|---|---|
Touring | Stable and comfortable for long rides with cargo | |
Racing | Short wheelbase, steep head tube | Fast, responsive handling for speed |
Commuting/Sport | Moderate geometry | Mix of comfort and performance for daily use |
Gravel/Bikepacking | Mixed geometry, wide tire clearance | Versatile for rough and smooth surfaces |
If you want your bike to fit well, look at the frame shape and design. This helps you avoid problems like feeling sore, bad balance, or your toes hitting the wheel. Always check if you can move the saddle and handlebars to get the best fit.
Adjusting for Bike Fit
Once you have the right frame, you can make small changes to improve your bike fit. These adjustments help you ride longer and feel better on every trip. You can change the saddle, handlebars, and pedals to match your body and riding style.
Saddle Position
The saddle is one of the most important parts of your bike. You should start by setting the saddle height so your leg has a slight bend at the bottom of each pedal stroke. This helps you avoid knee pain and makes pedaling easier. Move the saddle forward or backward to find the best spot for your hips and legs. Many riders slide forward on the saddle during hard efforts to get more power and a flatter back. This position can help you ride faster and feel more comfortable when you push hard. You may also tilt the saddle nose down a little if you want to reduce pressure. Remember, you do not always sit on your sit bones. Most of your weight rests on the ischiopubic ramus, which changes how the saddle feels. Try different saddle positions during climbs, descents, and flat roads to see what works best for you.
Tip: Adjusting the saddle can change how much power you produce and how comfortable you feel on long rides.
Handlebar Setup
Handlebar setup affects your comfort, control, and speed. You can change the stem length to bring the handlebars closer or farther from the saddle. This helps you match the reach to your torso and arm length. Different handlebar types work best for different riding styles:
Handlebar Type | Best Use | Key Features |
|---|---|---|
Drop Bars | Road, racing | Many hand positions, aerodynamic |
Riser Bars | Mountain, casual | Upright grip, better control |
Flat Bars | Fast riding, MTB | Direct control, less strain |
Bullhorn Bars | Time trials | Aerodynamic, speed focus |
Gravel Bars | Mixed terrain | Wide, stable, versatile |
Choose a handlebar width that matches your shoulders. Adjust the height and angle to reduce strain on your back and wrists. A good handlebar setup lets you ride longer without pain.
Pedal Placement
Pedal placement is key for power and injury prevention. Place the ball of your foot just in front of the pedal axle, about 6–12 mm. This position helps you push harder with less effort. If you use clipless pedals, adjust the cleats so your knees track straight and your feet feel stable. Make sure your foot does not tilt too far in or out. This reduces stress on your knees and ankles. A good pedal setup helps you ride smoothly and keeps your joints safe.
Adjusting the saddle, handlebars, and pedals can change your bike fit by up to two frame sizes.
Start with the right frame, then fine-tune these parts for the best comfort and performance.
Note: Some fit problems cannot be fixed by adjustments alone. If you still feel pain or discomfort, you may need a different frame size.
Inspecting and Choosing a Bike Frame
Used Frame Checklist
When you shop for a used bike, you need to know what to look for in a frame. Careful inspection helps you avoid hidden problems and costly repairs. Start by checking the frame for cracks, dents, or bends. Run your fingers along the underside of each tube to feel for damage you might not see. Use a flashlight if the paint is dark, and pay close attention to the top tube, downtube, seat stays, and chain stays. Minor scratches or paint chips are common and usually do not affect how the bike rides. Look at the welds for signs of stress or corrosion. Make sure all threaded inserts for bottle cages and racks are intact. Verify the serial number with the manufacturer to confirm the bike is not stolen.
Here is a simple checklist to guide your inspection:
Check for cracks, dents, or bends in the frame.
Inspect welds for stress, corrosion, or flaked paint.
Run fingers along tubes to detect hidden damage.
Use a flashlight to reveal damage on dark paint.
Look for rust, especially on steel frames.
Check threaded inserts and mounts.
Verify the serial number’s authenticity.
You should listen for groaning noises when you ride, as these can signal frame issues. Notice if the wheels seem closer together, which may mean the geometry has changed. Metal frames often tolerate small dents, but cracks near welds are serious. Carbon frames need extra care because they can fail suddenly if damaged.
Professional vs. DIY Fit
You can choose between professional bike fitting services and DIY fitting methods. Professional fitters use advanced tools like indoor trainers, computer programs, and 3D motion capture systems. These tools help them measure seat height, setback, handlebar height, and stem length with high accuracy. You get real-time adjustments while you sit on the bike. Professional fitting improves comfort, efficiency, and power output. Fitters can adjust for your physical needs and riding style. Most riders feel better and ride longer after a professional fit. Local bike shops train staff and invest in equipment to give you expert service. Professional fitting often includes follow-up visits for minor adjustments.
DIY fitting uses simple tools and basic measurements. You might use a book to measure your inseam or a plumb bob for seat position. DIY methods work for basic adjustments, but they lack the precision of professional services. You may not get the same level of comfort or performance.
Professional bike fitting services cost between $250 and $500 for most riders. Advanced fittings can cost more, especially with certified experts. The price often covers a follow-up visit.
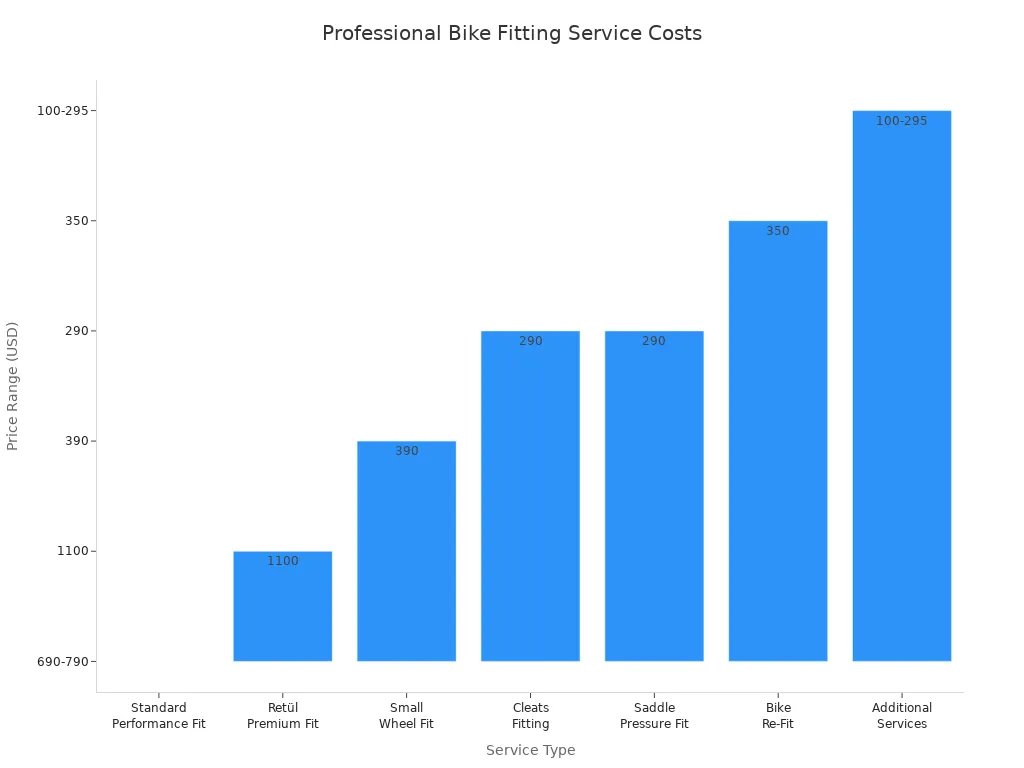
Service Type | Duration | Price Range (USD) |
|---|---|---|
Standard Performance Bike Fit | Approx. 2-3 hrs | $690 – $790 |
Retül Premium Bike Fit | Approx. 3 hrs | $1100 |
Small Wheel Bike Fit | Approx. 2 hrs | $390 |
Cleats Fitting | Approx. 1 hr | $290 |
Saddle Pressure Fitting | Approx. 1 hr | $290 |
Bike Re-Fit (after 1 year) | N/A | $350 |
If you want the best fit and long-term satisfaction, consider a professional fitting. You get expert advice and ongoing support. DIY fitting can help you start, but it cannot match the accuracy or comfort of a professional service.
Picking the right bike frame helps you ride farther and feel good. The right frame supports your body and stops pain. Always look at the size, material, and fit before buying. Some riders forget about fit or only use size charts. You should measure well, try riding the bike, and ask for help from experts. The right frame choice helps your health and makes biking more fun. Use this checklist to help you pick:
Checklist Item | What to Check For |
|---|---|
Frame Size | Match seat tube, top tube, reach, and stack to your body |
Head Tube Length | Choose for upright comfort or racing posture |
Brake Compatibility | Make sure frame fits your brake type |
Tire Clearance | Check if frame fits your preferred tire width |
Mounting Points | Look for eyelets for racks and fenders |
FAQ
How do you know if a bike frame is too big or too small?
If you feel stretched out or cannot touch the ground with your feet, the frame is likely too big. If your knees hit the handlebars or you feel cramped, the frame is probably too small. Always test ride before buying.
Can you adjust a bike frame that does not fit perfectly?
You can make small changes with the saddle, handlebars, or stem. These adjustments help improve comfort. However, you cannot fix a frame that is much too large or too small. Start with the right size for the best results.
Does frame material really affect your ride?
Yes, frame material changes how your bike feels. Steel absorbs bumps and feels smooth. Aluminum is light and stiff. Titanium lasts a long time. Carbon fiber is very light and fast. Choose the material that matches your riding style and budget.
Should you get a professional bike fit?
A professional bike fit helps you ride longer and avoid pain. Experts use special tools to match your bike to your body. If you ride often or have pain, a professional fit is a smart choice.
See Also
Guide To Choosing The Right Bike Frame Size Chart
Exploring The Innovations In Carbon Fiber Bike Frame Design
How Carbon Fiber Enhances Bike Rides With Lightness And Smoothness