
Restoring classic old bike frames brings a unique joy. You connect with each old bike frame, uncovering its story as you breathe new life into it. This project isn’t just about fixing rust or choosing the right paint; it’s about preserving history and being kind to our planet. By choosing to restore old bike frames, you contribute to a sustainable future. So grab those tools and get ready to restore an old bike frame. You’ll find that the process is as rewarding as the ride itself!
Key Takeaways
Look for old bike frames at thrift stores, garage sales, or online. Check for rust, dents, and original parts before you buy.
Gather important tools like cleaning supplies, wire brushes, sandpaper, and rust removers. This will help you prepare your bike frame well.
Take apart the bike carefully. Keep the parts organized and take photos. This will help you put it back together later.
Remove rust and clean the frame well before painting. You can choose to spray paint it yourself or use professional powdercoating for a new look.
Put the bike back together step-by-step. Check the brakes and gears. Take a test ride to make sure your restored bike is safe and ready to ride.
Finding Old Bike Frames
Finding the right old bike frames for your project can be fun. You can start looking in many places. Check local thrift stores, garage sales, or online sites like Craigslist and Facebook Marketplace. You might even discover great finds at bike shops that sell vintage models.
Assessing Condition
Once you find a frame, it’s time to check its condition. Here are some tips to help you:
Look for Rust: Check for rust spots, especially near joints and welds. Surface rust can often be fixed, but deep rust may weaken the frame.
Inspect the Frame: Look for dents or cracks on the frame. A straight frame is important for a safe ride. If you see major damage, it might not be worth fixing.
Check the Components: Look at parts like the fork, handlebars, and wheels. If they’re in good shape, you can save money on repairs during the bike restoration.
Identifying Key Features
As you check the frame, notice its key features. These can help you know the bike’s value and potential:
Material: Classic bikes often use steel, aluminum, or titanium. Steel frames are strong and easy to repair, while aluminum is light but harder to fix.
Brand and Model: Research the bike’s brand and model. Some brands have loyal fans, which can raise the bike’s value.
Original Parts: If the bike has its original parts, that’s great! Original parts can make the bike more authentic and appealing.
By checking the condition and noticing key features, you’ll be on your way to finding the perfect old bike frame for your project. Happy hunting!
Essential Tools to Restore an Old Bike

Restoring an old bike frame requires the right tools. You’ll want to gather a few essential items to make the process smoother and more enjoyable.
Cleaning Supplies
Before diving into the restoration, you need to clean the bike frame thoroughly. Here’s a list of cleaning supplies you should have on hand:
Soap and Water: A simple mixture of soap and water works wonders for removing dirt and grime.
Sponges and Rags: Use these to scrub the frame gently. Microfiber cloths are great for a streak-free finish.
Degreaser: This helps break down grease and oil on components. Look for a biodegradable option to be eco-friendly.
Brushes: A variety of brushes, including toothbrushes, can help you reach tight spots and crevices.
Rust Removal Tools
Rust can be a significant issue when restoring classic bike frames. You’ll need specific tools to tackle it effectively:
Wire Brush: This tool is perfect for scrubbing away surface rust. Just be careful not to damage the frame.
Sandpaper: Use different grits to smooth out rusted areas. Start with a coarser grit and finish with a finer one for a smooth surface.
Rust Converter: This product transforms rust into a stable compound. It’s a great way to prevent further rusting after you’ve cleaned the area.
Protective Coating: After removing rust, apply a rust-proofing treatment. This will help protect your frame from future rust issues.
Having these tools ready will set you up for success in your restoration project. Remember, taking the time to clean and remove rust properly will make a big difference in the final outcome. Happy restoring!
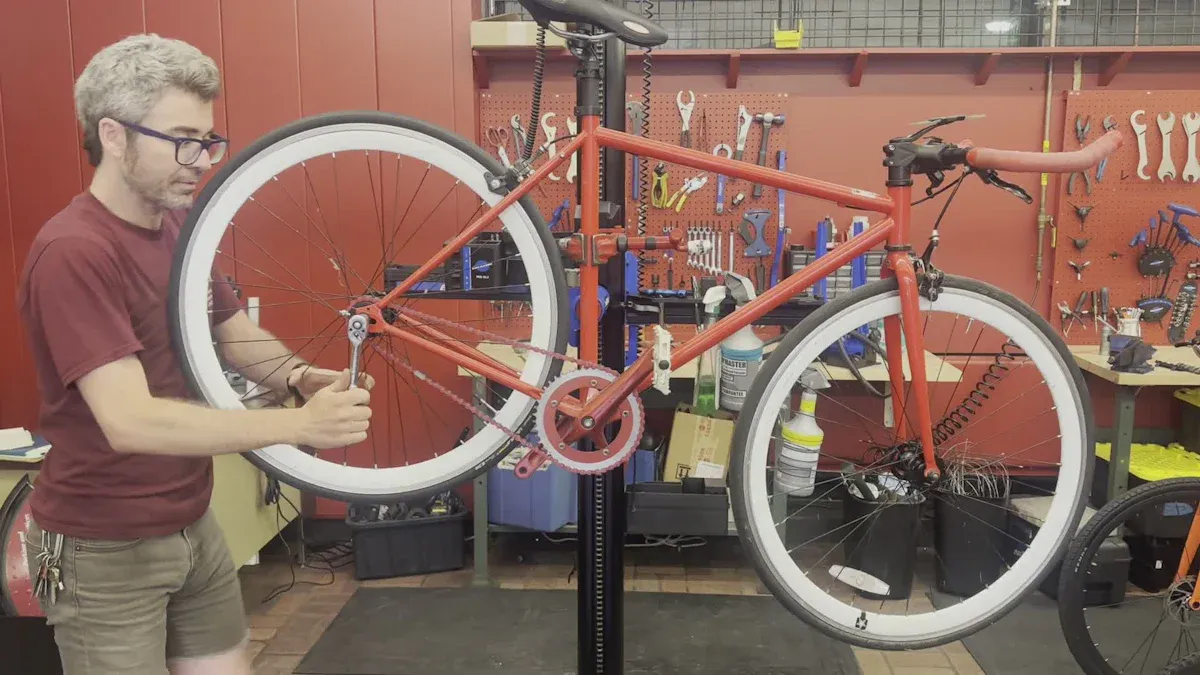
Disassembling the Bike Frame
Disassembling your bike frame might seem daunting, but it’s a crucial step in the restoration process. Follow this step-by-step guide to make it easier:
Step-by-Step Guide
Gather Your Tools: Before you start, make sure you have all the necessary tools. You’ll need wrenches, screwdrivers, and possibly a bike stand.
Remove the Wheels: Start by taking off the front and rear wheels. Use a wrench to loosen the axle nuts or quick-release levers.
Take Off the Handlebars: Loosen the bolts on the stem and gently lift the handlebars away from the frame.
Detach the Seat: Use a wrench to remove the seat post clamp. Pull the seat out of the frame.
Remove the Crankset: This part can be tricky. You may need a crank puller tool. Follow the instructions carefully to avoid damaging the frame.
Take Off the Fork: Loosen the headset and remove the fork from the frame. This step may require some patience.
Inspect Each Part: As you disassemble, check each component for wear and tear. This will help you plan your bike repair later.
Organizing Parts
Keeping your parts organized is key to a smooth reassembly. Here are some tips to help you stay on track:
Use Containers: Get small containers or zip-lock bags to store screws, bolts, and small parts. Label each bag to remember where everything goes.
Create a Diagram: Draw a simple diagram of your bike. Mark where each part belongs. This visual aid can be a lifesaver during reassembly.
Work in a Clean Area: Choose a clean, well-lit workspace. This will help you avoid losing parts and make the process more enjoyable.
Take Photos: Snap pictures of the bike before disassembly. These photos can guide you when you put everything back together.
By following these steps, you’ll be well on your way to successfully disassembling your bike frame. Remember, this is an essential part of your journey to restore an old bike, so take your time and enjoy the process!
Preparing the Frame
After you take apart your bike, you need to get the frame ready for restoration. This step is very important. A well-prepared frame helps the new paint stick well and look nice. Let’s look at some good ways to remove rust and prepare the surface.
Rust Removal Techniques
Rust can be ugly and can weaken the bike. You need to deal with it to keep your bike safe and looking great. Here are some good ways to remove rust:
Wire Brush: Start with a wire brush to scrub off surface rust. This tool works well for getting into tight spots where rust hides.
Sandpaper: Use sandpaper (about 150 grit) to smooth out rough areas. Sanding removes rust and gets the surface ready for paint. Just sand lightly so you don’t hurt the frame.
Rust Converter: After removing most of the rust, think about using a rust converter. This product changes leftover rust into a stable compound, stopping more rust from forming.
Protective Coating: Once you handle the rust, put on a rust-proofing treatment. This will help protect your frame from future rust problems.
Surface Preparation Steps
Now that you’ve taken care of the rust, it’s time to prepare the frame for painting. Follow these steps for a smooth surface:
Remove All Attached Parts: Take off everything attached to the frame, like the seat, wheels, chain, and brakes. Use the right tools like Allen wrenches and socket wrenches to make this easier.
Clean the Frame Thoroughly: Use a good cleaner to get rid of grease and dirt. A clean surface is key for good paint sticking.
Sand the Frame Surface: Lightly sand the frame to roughen the old paint. This helps the new paint stick better.
Wipe Down the Frame: After sanding, wipe the frame with a damp cloth to remove dust. This makes sure the surface is clean for painting.
Cover Unremovable Parts: Use plastic bags and masking tape to cover parts that shouldn’t be painted, like crank arms or brake posts. This keeps your restoration looking neat.
By using these rust removal techniques and surface preparation steps, you’ll be ready for a successful bike restoration. Remember, taking time to prepare the frame well will help in the end!
Painting Options for Old Bike Frames
When it comes to giving your classic bike a fresh look, you have two main options: DIY painting or professional refinishing. Each choice has its perks, so let’s break them down.
DIY Painting Techniques
If you’re feeling adventurous, you might want to try painting the frame yourself. Here’s how you can do it:
Choose the Right Paint: Look for high-quality spray paint or enamel specifically designed for metal surfaces. Brands like Rust-Oleum or Krylon offer great options.
Prep the Frame: Make sure the surface is clean and smooth. You’ve already done some sanding, so just wipe it down with a damp cloth to remove dust.
Apply Even Coats: Hold the spray can about 12 inches away from the frame. Apply light, even coats to avoid drips. Let each coat dry before adding the next.
Finish with a Clear Coat: Once the paint is dry, add a clear coat for extra protection. This will help your new paint job last longer.
DIY painting can be a fun way to express your creativity. Plus, you’ll save money!
Professional Refinishing
If you want a flawless look, consider hiring a professional. A professional finish can make your bike stand out. Here’s what to expect:
Expertise: Professionals know how to prep and paint frames properly. They can handle tricky areas and ensure an even finish.
Powdercoating: This is a popular option for a durable finish. Powdercoating involves applying a dry powder that’s cured under heat. It creates a tough, long-lasting surface.
Cost: While professional refinishing can be pricier, the results often justify the expense. You’ll get a high-quality finish that can withstand the elements.
Whether you choose to paint or powdercoat, both options can breathe new life into your classic bike frame. Just remember to take your time and enjoy the process!
Reassembly and Final Adjustments
After you’ve prepped your bike frame and given it a fresh coat of paint, it’s time to put everything back together. Reassembly can be a bit tricky, but with careful attention, you’ll have your classic bike ready to ride in no time!
Reassembly Steps
Follow these steps to reassemble your bike frame:
Start with the Fork: Begin by inserting the fork back into the head tube. Make sure it’s facing the right way! A common mistake is installing the fork backwards, which can affect safety and handling. Check official photos or reference images to confirm the correct orientation.
Attach the Handlebars: Next, secure the handlebars to the stem. Ensure they’re aligned properly. Misaligned handlebars can impact your control and comfort while riding.
Install the Crankset: Carefully reattach the crankset. If you’re unsure, consult your bike’s manual or look for online guides. This part can be tricky, so take your time.
Put on the Seat: Slide the seat post back into the frame and tighten the clamp. Make sure the saddle is level to ensure proper fit and comfort.
Reattach the Wheels: Finally, put the wheels back on. Make sure they’re securely fastened. Double-check that the brakes are aligned correctly and functioning well.
Inspect Everything: As you reassemble, keep an eye out for any parts that may need repair or adjustment. This is a good time to ensure everything is in top shape.
Tip: Use small containers or bags to keep screws and bolts organized. Label them to avoid confusion during reassembly.
Tuning the Bike
Once you’ve reassembled your bike, it’s time for some tuning. Proper tuning ensures your bike runs smoothly and safely. Here are some essential steps:
Check the Brakes: Make sure your brakes are responsive. Adjust the brake pads if they’re too close or too far from the rims. You want them to engage smoothly without rubbing against the wheel.
Adjust the Gears: If your bike has gears, shift through them to ensure they’re working correctly. If you notice any skipping or difficulty shifting, you may need to adjust the derailleur.
Inspect the Tires: Check your tires for proper inflation. The right pressure will enhance your ride quality. Look for any signs of wear or damage, and replace them if necessary.
Test Ride: Take your bike for a short test ride. Pay attention to how it feels. If something seems off, don’t hesitate to make adjustments.
Common challenges during reassembly include installing the fork backwards, having a tilted saddle, or misaligned handlebars. To avoid these issues, carefully verify each step. Use visual references or online images of completed bikes for guidance. If you’re unsure, consider seeking professional help to ensure everything is assembled correctly and safely.
By following these reassembly steps and tuning tips, you’ll be well on your way to enjoying your restored bike. Remember, regular maintenance is key to keeping your bike in great shape for years to come!
Restoring your classic bike frame is a rewarding journey. You’ve cleaned, painted, and reassembled every part with care. Now, you can take pride in your hard work! Remember, regular maintenance is key to keeping your bike in great shape. Check the brakes, clean the chain, and inspect the tires often. Enjoy the ride and show off your beautiful bike. With proper care, it’ll serve you well for years to come!
FAQ
What tools do I need to start restoring a bike frame?
You’ll need basic tools like wrenches, screwdrivers, a wire brush, sandpaper, and cleaning supplies. A bike stand can also help you work more comfortably.
How long does the restoration process take?
The time varies based on the bike’s condition and your experience. Generally, expect to spend a few days to a couple of weeks on the entire process.
Can I paint my bike frame at home?
Absolutely! DIY painting is a great option. Just ensure you use high-quality paint and follow proper preparation steps for the best results.
Is it worth restoring an old bike?
Yes! Restoring an old bike can save money and give you a unique ride. Plus, it’s a rewarding project that helps preserve history.
How do I maintain my restored bike?
Regular maintenance is key. Check the brakes, clean the chain, and inspect the tires often. This will keep your bike in great shape for years to come!
See Also
Refinished Bike Frame Looks Brand New Once More
Learn Simple Methods To Perfect Bike Frame Sketching
Key Supplies Needed To Construct Your Personal Bike Frame