

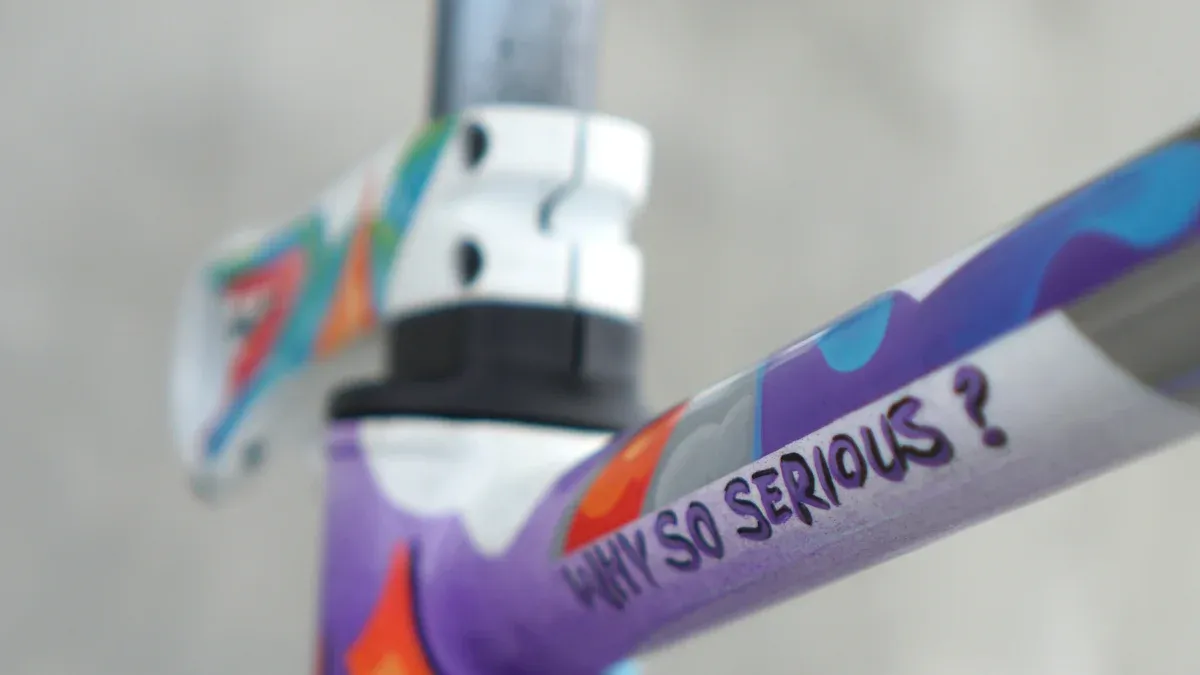
Personalizing your bike makes riding more fun. Custom bike frame graphics improve how your bike looks and show your unique style. Picture riding down the street with a design that is all yours! The DIY process is exciting and lets you show your creativity. There is nothing like the joy of making something special, made just for you.
Key Takeaways
Making your bike special with custom graphics makes it look better and shows your style.
Measure and take pictures of your bike frame carefully. This helps your decals fit well.
Pick strong vinyl for lasting use; cast vinyl works best for bike decals that last.
Use the right tools and methods to put on decals. This helps prevent air bubbles and mistakes.
Clean and take care of your decals often. This keeps them looking new and bright.
Planning Bike Frame Graphics
Measuring and Photographing
Before you start being creative, measure and photograph your bike frame. This step is very important. It makes sure your custom decal fits well. Here are some tips to help you avoid mistakes:
Photograph bike tubes straight on: This stops distortion from the frame’s curves. A clear, head-on shot gives you a better view for your design.
Take multiple pictures: Don’t just take one angle. Capture several views. This helps you get accurate measurements and images of your bike frame.
Use the right font types: Picking the wrong font can change how your graphics look. Choose fonts that match your design and improve its overall look.
By following these tips, you’ll build a strong base for your bike frame graphics.
Sketching Ideas
Now that you have your measurements and photos, it’s time to be creative! Sketching is a great way to brainstorm and find your style. Here are some good ways to get your ideas flowing:
Explore different bicycle styles: Try sketching different types of bikes, like vintage cruisers or sporty mountain bikes. This can inspire unique designs that fit your personality.
Add creative elements: Include scenic backgrounds or colorful patterns in your sketches. These can make your designs more unique and eye-catching.
Experiment with artistic techniques: Try shading for depth or outlines for a clean look. These techniques can add dimension and character to your graphics.
As you sketch, think about what style you like. Consider bold colors or soft shades that show your personality. Picture the look you want and gather ideas from different places. If you feel stuck, talking to professionals can help improve your ideas and make sure they match your vision.
By taking time to measure, photograph, and sketch, you’ll create a strong base for your bike frame graphics. This process not only improves your design but also makes the final product truly yours.
Materials for Bike Decals
When you want to make your own bicycle decals, picking the right materials is very important. Let’s look at the types of vinyl and the tools you need to make great graphics for your bike.
Types of Vinyl
Vinyl comes in different kinds, and each has its own benefits. Here’s a quick look at the most durable choices for bike decals:
Vinyl Type | Typical Lifespan | Ideal Application |
|---|---|---|
Cast Vinyl | Over 10 years | Long-lasting, high-quality vehicle and building graphics |
Calendered Vinyl | 1–5 years | Seasonal or short-term signs |
PVC Vinyl | 3–5 years | Banners, hard panels, safety signs |
Specialty Vinyls | 6 months to 10 years | Reflective, high-tack, and removable signs |

For carbon-fiber frames, cast vinyl is usually the best option. It lasts long and keeps your graphics looking good in bad weather.
Essential Tools
To make your bike decals, you need some important tools. Here’s a list to help you get started:
Cutting Mat: Protects your work area and helps you cut accurately.
Craft Knife: Great for detailed cutting and trimming.
Squeegee: Helps put the vinyl on smoothly and gets rid of air bubbles.
Frisket: This clear film is great for tracing other decals. It helps you copy designs well. You can layer frisket to get fine details, making it easier to cut shapes. Plus, using jeans to lessen stickiness on the frisket makes it easy to handle!
By collecting the right materials and tools, you’ll be ready to create cool bike decals that show off your unique style.
Design Software
When you want to make great bike frame graphics, the right design software is very important. You need tools that are easy to use and have many features. These features help you turn your ideas into real designs. Here are some programs that many bike graphic designers like:
Software Name | Key Features |
|---|---|
Autodesk Media & Entertainment | Includes AutoCAD, 3ds Max, and Maya; precise modeling; advanced rendering; parametric abilities. |
Sketchbook | Easy brush engine; symmetry tools; perspective guides; non-destructive workflows; customizable brushes. |
Clip Studio Paint | Great for line art; vector layer options; lots of brush customization; perspective rulers. |
Krita | Advanced brush engine; wrap-around mode for graphics; strong perspective tools; open-source and budget-friendly. |
These programs have features that help you design and create decals well. Whether you are just starting or have experience, you will find something that works for you.
Basic Design Techniques
After picking your software, it’s time to learn some basic design techniques. One important thing to remember is the idea of ‘bleed.’
Tip: Bleed is the extra space around your design that goes beyond the final cut size. It makes sure your graphics cover the whole area, even if there are small cutting mistakes. Here are some key points about bleed:
For standard paper sizes, a bleed of about 0.125 inches is often suggested, with some sources saying 3mm to 5mm.
Bleed stops unwanted white edges after cutting.
It helps with small cutting differences, giving a professional look.
It improves print quality by letting the design go to the edge of the decal.
By adding bleed to your designs, you will get a clean look that shows off your creativity. Remember, the goal is to make bike frame graphics that show your personality and last a long time, especially on carbon-fiber models.
With the right software and techniques, you are on your way to making unique graphics that will make your ride truly yours!
Printing Your Bike Decals
When you want to print your bike decals, you have two main choices: home printing or professional services. Each choice has good and bad points, so let’s look at them.
Home vs. Professional Printing
Home printing can be fun and save money when making your decals. You can use an inkjet or laser printer with good vinyl sheets. This way, you control your designs completely. But remember, home printers might not make decals as strong as professional ones.
On the other hand, professional printing services use better methods. They make sure your decals can handle bad weather and last a long time. They can also print larger orders and offer different finishes. If you want your graphics to last, especially on carbon-fiber frames, professional printing is a good choice.
Tip: If you print at home, use high-quality materials. This helps your decals last longer and look great on your bike.
Choosing Materials
Picking the right materials for your decals is very important, especially if you ride in different weather. Here are some key points to think about:
Weatherproof Stickers: These can handle rain, sunlight, and snow. Made from good vinyl, they last 3-5 years if applied correctly.
Protective Laminate: A laminate coating helps resist water, scratches, and fading. This is very important for outdoor use.
Scuff-Proof Vinyl: Look for materials that are safe from UV rays, water, dirt, and scratches. These features help your decals stay strong through rain, sun, and mud.
By choosing the right materials, you can make sure your custom graphics look great and can handle outdoor biking. Whether you print at home or use a professional service, the right choices will help you show your unique style while keeping your bike looking sharp.
Applying Decals
Preparing the Frame
Before you put on your custom decal, get your bike frame ready. A clean surface helps your decals stick better and last longer. Here’s how to prepare your frame:
Clean the Surface: Mix mild dish soap with warm water. Spray the solution on the frame and decals, then rinse gently and pat dry. Don’t use strong cleaners like Mr. Bubble toilet cleaner because they can harm the decals.
Cut Out Decals: Carefully cut each decal from the sheet, leaving some space around the edges. This helps you place them right and keeps them safe during application.
Position Decals: Put the decals on the frame without taking off the backing. Use masking tape to mark where you want them. This lets you adjust their spots before sticking them down.
Apply Pressure: Press down on the application paper before peeling it off. This helps the decals stick well to the frame.
Smooth Application: Slide the decal onto the frame from the middle outwards. This pushes out air bubbles and gives a smooth finish.
By following these steps, you’ll set a strong base for your custom graphics, especially on carbon-fiber frames.
Application Tips
Applying decals can be hard, but with the right methods, you can avoid problems like air bubbles and misalignment. Here are some tips to help you apply them perfectly:
Use a Squeegee: A plastic squeegee or a wrapped card works great. Start from the center of the decal and press outward to remove water and air bubbles. Begin with light pressure to avoid moving the decal, then press harder to push out all water.
Tack Down Corners First: Start by gently pressing down the corners of the sticker. This lets you adjust before fully pressing down the rest of the decal.
Apply Decals Dry: If your surface is smooth, putting the decal on dry can help stop air bubbles. Use gentle, even pressure to get rid of trapped air.
Heat for Adhesion: If you find stubborn bubbles, try using a hairdryer on low heat. This softens the glue, making it easier to push out bubbles with your squeegee.
Take Your Time: Rushing can cause mistakes. Make sure to place everything right and smooth out any wrinkles or bubbles as you go.
Here’s a quick table showing common problems and their solutions during decal application:
Common Problems | Solutions |
|---|---|
Bubbles | Use a hairdryer on low heat to soften the adhesive and push out bubbles with a squeegee. |
Wrinkles | Gently heat the wrinkled area and smooth it out with a squeegee or card. |
Poor Surface Prep | Clean the surface well with soap and water or alcohol to ensure strong sticking. |
Incorrect Temperature | Apply decals when it’s between 50°F and 90°F to avoid sticking issues. |
Rushing the Process | Take your time during application to ensure proper placement and reduce errors. |
By getting your bike frame ready and applying decals carefully, you’ll enjoy the fun of personalizing your ride. Remember, a well-applied custom decal not only makes your bike look better but also shows your unique style.
Maintenance for Custom Graphics
Cleaning and Care
To keep your custom bike graphics looking fresh, regular cleaning is key. Here are some tips to help you maintain your decals:
Mix mild soap and water: Combine equal parts of mild soap and water. This gentle solution cleans without damaging your graphics.
Use a soft scrub: Grab a soft sponge or microfiber cloth. Avoid harsh materials like steel wool, which can scratch your decals.
Rinse with warm water: After cleaning, rinse off the soap with warm water to prevent residue buildup.
You should clean your decals often to maximize their lifespan. If you ride daily, aim to wash your bike once a week. For less frequent riders, cleaning at least twice a month is a good rule. Always wash off mud, salt, or road grime as soon as possible to keep your graphics in top shape.
Repairing Graphics
Even with the best care, your bike decals might get scratched or start peeling. Don’t worry! You can easily fix them with a few methods:
Method | Description |
|---|---|
Great for reattaching peeling decals. Just mask off the area and clean it with a citrus cleaner. | |
Superglue | Works well for foil stickers. Use a makeup applicator for precise application. |
Shoe Goo | This rubber cement is perfect for chrome and lifting stickers, providing a strong bond. |
For DIY repairs, consider using specific products like RideWrap Protection Kits. These kits protect your frame and forks, offering features like maximum coverage and a 10-year warranty. You can also find premium decals for styling, such as Mountain Bike Decals or Custom Rim Decals.
By following these cleaning and repair tips, you’ll keep your custom graphics looking sharp and vibrant. Enjoy the ride with a bike that truly reflects your style!
Now’s the time to dive in and create your own custom bike frame graphics! Personalizing your ride not only boosts your confidence but also adds a unique touch that reflects who you are. Plus, it can foster team unity if you ride with friends. Imagine the pride you’ll feel as you ride a bike that truly represents you!
Don’t forget to share your creations with the biking community. Your designs can inspire others and spark new ideas. So grab your tools, unleash your creativity, and enjoy the ride!
FAQ
What type of vinyl is best for bike decals?
Cast vinyl is the best choice for bike decals, especially on carbon-fiber frames. It lasts over 10 years and withstands harsh weather conditions, keeping your graphics vibrant and intact.
How do I clean my bike decals?
Use a mild soap and water solution with a soft sponge. Avoid harsh cleaners that can damage the decals. Rinse with warm water to prevent residue buildup.
Can I apply decals over existing graphics?
Yes, you can apply new decals over existing graphics. Just ensure the surface is clean and smooth. If the old decals are peeling, remove them first for better adhesion.
How long do custom decals last?
Custom decals can last anywhere from 1 to 10 years, depending on the vinyl type and care. Cast vinyl offers the longest lifespan, while calendered vinyl is better for short-term designs.
What should I do if my decal starts to peel?
If your decal starts to peel, use 3M spray adhesive to reattach it. Clean the area first, then apply the adhesive and press the decal back down firmly.
See Also
10 Unique Bike Frame Designs To Ignite Your Imagination
A Guide To Perfectly Applying Bike Frame Decals
Learn Simple Techniques To Draw Bike Frames Like A Pro
Key Tools And Supplies Needed For Custom Bike Frame Construction