
Building a DIY steel bike frame can be a fun project. But, knowing the costs of materials is very important. Many things affect these costs. This includes the quality of materials and where you buy them. Good steel tubing can cost between $300 and $400. Extra parts, like a carbon fiber fork, can add another $300 to $400. These choices can change your total budget a lot. By looking at different material options and budgeting tips, you can make smart choices. This will help your project succeed.
Key Takeaways
Pick the right kind of steel for your bike frame. Chromoly and Reynolds 531 are strong and light. They help your bike perform better.
Plan your budget by listing all the materials you need. Look up prices and add some extra money for surprises. This helps keep your project on schedule.
Think about getting materials from local stores. This can save you money on shipping and avoid extra fees. It can lower your total costs.
Buy good tools and equipment. Quality tools make building easier and improve your bike frame’s quality.
Look for recycled materials. They can save you money and are good for the environment, as long as they are in good shape.
Steel Frame Materials
When you start building your DIY steel bike frame, it is important to know the types of steel. Different steels have special features. These features can change how well your frame works and lasts.
Types of Steel
The most common steels used for DIY bike frames are:
Chromoly Steel: This strong steel mix is liked for being light. It can be made into thin tubes, which is great for bike frames.
Mild Steel: Also called high tensile steel, this type is used in cheaper frames. It is strong but not as light as chromoly.
Reynolds 531: This steel mix has manganese and molybdenum. It is known for being strong and light.
4130 Chromoly: This is another good choice that is strong and works well.
Tip: Think about the special features of each steel type when picking your materials.
Comparison of Steel Grades
Different steel grades have different strengths. This can change how your bike frame performs. Here’s a quick look at some common steel grades:
Property | 4130 Chromoly Steel (Normalized) | Reynolds 953 Stainless Steel |
|---|---|---|
Density (g/cm³) | ~7.85 | ~8.00 |
Yield Strength (MPa) | ~460 | >2000 |
Tensile Strength (MPa) | ~560 | >2000 |
Stiffness (GPa) | ~200 | ~200 |
Fatigue Behavior | Good | Excellent |
As you can see, Reynolds 953 is stronger and lasts longer. This makes it good for high-performance bike frames. But, it costs more, usually between $299 and $799 for high-grade steel bikes. Super high-grade options like Reynolds 853 can cost around $1695.
Knowing these differences will help you choose the right materials. The best choice can improve your bike’s performance and how long it lasts.
Cost Breakdown of Materials
When you make a DIY steel bike frame, knowing the costs of materials is very important. Let’s look at the costs in three main groups: steel tubing, extra parts, and finishing materials.
Steel Tubing Costs
Steel tubing is the main part of your bike frame. The price of steel tubing can change based on the type and where you buy it. Here’s a table showing the prices for different tube sets:
Tube Set | Price (EUR) |
|---|---|
Columbus XCR Tube Set | 795 |
Columbus Spirit Tube Set | 270 |
Columbus SPIRIT Tube Set for Lugs | 227 |
Columbus MAX Steel Tube Set | 200 |
Columbus Spirit Keirin Tube Set | 247 |
Columbus SL Niobium Tube Set | 167 |
Columbus SLX Niobium Tube Set | 247 |
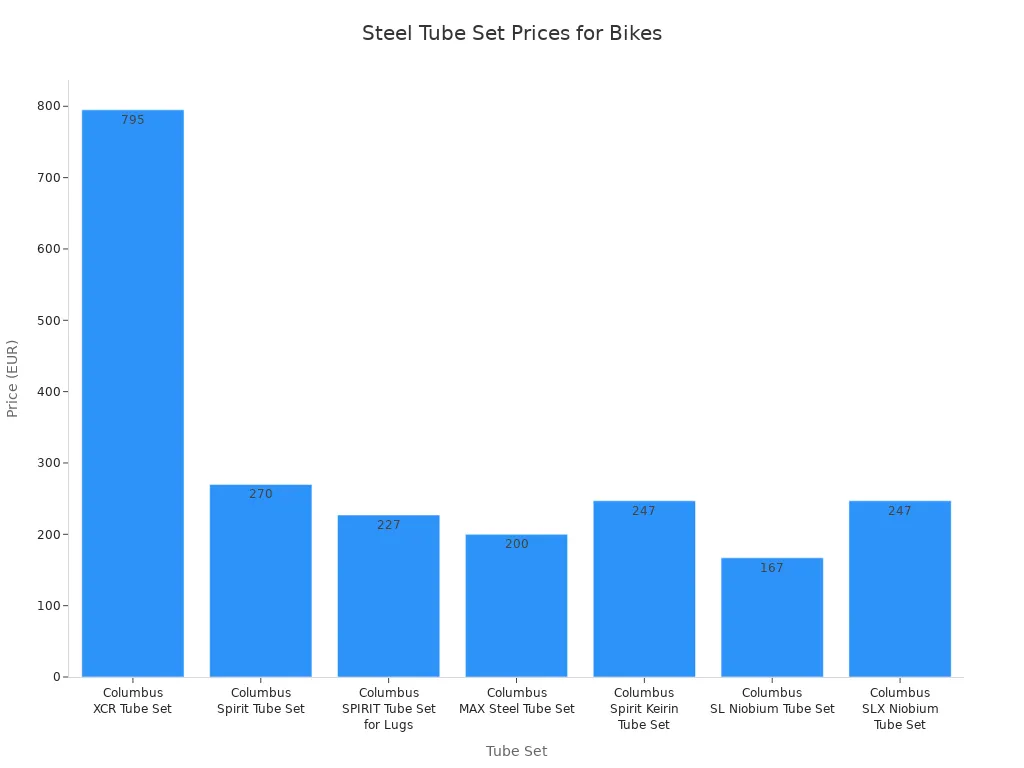
The kind of steel tubing you pick affects the total cost of your bike frame. However, tubing usually makes up only about 5% of the total cost. Things like the builder’s skill and finishing touches, like paint, can really change the final price. In fact, paint alone can be 20-50% of the total cost.
Additional Components Costs
Besides steel tubing, you will need different parts to finish your bike frame. Here’s a table showing the usual costs for some important parts:
Component | Cost |
|---|---|
Dropout Replacement | $180 |
Dropout Replacement (Pair) | $315 |
These parts are key for how well your bike works and lasts. Remember that the cost of parts can change based on quality and brand. Choosing high-quality parts can improve your bike’s performance and how long it lasts.
Finishing Materials Costs
Finishing materials include paint, decals, and protective coatings. These materials not only make your bike look better but also protect it from weather. The cost of finishing materials can vary a lot, but here are some general price ranges:
Basic Paint: $50 – $100
High-Quality Paint: $100 – $300
Decals and Stickers: $20 – $50
Protective Coating: $30 – $100
Picking the right finishing materials can greatly affect how your bike frame looks and how long it lasts. A well-finished frame not only looks nice but also holds up better over time.
Factors Influencing Cost
When you build a bike, many things affect the total cost. Knowing these things helps you make smart choices for your project.
Quality vs. Price
The quality of steel tubing affects both the price and how well your bike frame works. Better quality steels let you use thinner walls. This makes the bike lighter but still strong. However, these stronger materials cost more money. Spending more on better steel can improve your bike’s design, comfort, and handling.
Here’s a quick look at the differences between expensive and cheaper steel options:
Aspect | Higher-Priced Steel | Affordable Steel |
|---|---|---|
Durability | Better durability | May not last as long |
Weight | Usually lighter | Heavier |
Corrosion Resistance | Better resistance | Needs more care |
Overall Value | Higher starting cost | Saves money overall |
Choosing the right steel can change how much it costs to build a bike. While cheaper options save money at first, they might lead to higher maintenance costs and lower performance later.
Sourcing and Availability
Where you get your materials also changes the costs. Most bike frames are made in Asia, where labor and costs are lower. For example, Taiwan is known for making high-quality bikes, while China often makes cheaper ones. Relying on international sources can cause changes in availability and cost because of global supply issues.
On the other hand, getting materials from local sources can lower costs by avoiding tariffs. But many builders still rely on international sources, which can raise prices because of tariffs.
Think about these points when getting your materials:
International sourcing can raise prices because of tariffs.
Using recycled materials can help reduce the carbon footprint.
By knowing these factors, you can better understand the costs of building a bike. This will help you make choices that fit your budget and performance needs.
Budgeting for Your DIY Project
Making a budget for your DIY steel bike frame is very important. A good budget helps you keep track of costs and avoid surprises. Here are some steps to make a material budget and tips for finding materials easily.
Creating a Material Budget
Start by writing down all the materials you need for your bike frame. This includes steel tubing, parts, and finishing materials. Here’s a simple way to set up your budget:
Identify Materials: List every material you need. Include steel tubing, dropouts, paint, and decals.
Research Costs: Check the prices for each item. Use online stores, local shops, and forums to find the best prices.
Estimate Quantities: Figure out how much of each material you need. This helps you avoid buying too much or too little.
Add a Buffer: Include an extra 10-15% in your budget for unexpected costs. This can cover price changes or extra materials you might need.
Here’s an example of a simple budget table:
Material | Estimated Cost (USD) |
|---|---|
Steel Tubing | $300 |
Dropouts | $180 |
Paint | $100 |
Decals | $30 |
Total | $610 |
By following these steps, you can make a clear material budget that keeps your DIY steel bike frame project on track.
Tips for Cost-Effective Sourcing
Finding materials at good prices can really lower your total costs. Here are some ways to help you find materials easily:
Buy in Bulk: Buying steel tubing and parts in bulk can save money. Steel is usually cheaper than aluminum, which can lead to savings. When you buy more, suppliers often give discounts.
Group Buys: Think about teaming up with other builders for group purchases. This can help you get better prices on materials. You can share shipping costs and get better deals together.
Local Suppliers: Look for local suppliers for materials. They might have lower prices than online stores. Plus, you can save on shipping costs.
Recycled Materials: Search for recycled steel or used parts. These options can be cheaper and good for the environment.
Online Marketplaces: Check online marketplaces for deals on new and used materials. Websites like eBay or Craigslist can have great finds.
Tip: Always compare prices from different places before buying. This helps you get the best deal possible.
By using these tips, you can manage your budget well and lower the costs of building your DIY steel bike frame.
Tools and Equipment Costs
Building a DIY steel bike frame needs different tools and equipment. Knowing these costs helps you plan your budget well for your project.
Essential Tools
You will need some important tools to build your bike frame. Here’s a list of the main tools and their usual costs:
Welder or Torch: $300 – $1,000
Frame Fixture: $200 – $500
Mill or Drill Press & Hole Saws: $150 – $400
Bike Stand: $50 – $200
Hex & Torx Wrench Sets: $20 – $50
Bottom Bracket Tool: $10 – $30
Cable Routing Tool & Cable Housing Cutter: $20 – $50
Hacksaw or Angle Grinder: $30 – $100
Star Nut and Crown Race Install Tool: $10 – $30
Cassette Installation Tool: $10 – $30
Torque Wrench: $50 – $150
General Hand Tools: $100 – $300
These tools are very important for working with materials. They help make sure your bike frame is built right. Buying good tools can improve your experience and the final result.
Specialized Equipment Costs
Besides essential tools, you might need special equipment for certain tasks. Renting or borrowing this equipment can help you save money. Here are some things to think about:
Renting Specialized Equipment: This choice is a smart way to avoid buying costly machines. It helps you avoid the costs of owning, maintaining, and storing them.
Budget Constraints: If you don’t have much money, renting is a good option. It lets you use high-quality tools without paying a lot upfront.
By knowing the costs of both essential tools and special equipment, you can plan your budget better for building a DIY steel bike frame. This knowledge helps you make smart choices that fit your budget.
Building a DIY steel bike frame needs careful planning and budgeting. You should think about many things, like material costs and tools for building. Here are some important points:
Pick good materials for strength and performance.
Include costs for extra parts and finishing materials.
Check local bike shops and online stores for better prices.
A bike frame is a thing with certain performance rules and limits. This takes a lot of planning, measuring, and figuring.
By following these tips, you can make a project that fits your needs and budget.
FAQ
What type of steel is best for a DIY bike frame?
You should think about using chromoly steel. It is strong and light. Reynolds 531 is also a good choice because it lasts long. Both types work well for a reliable bike.
How much should I budget for materials?
Plan to spend between $600 and $1,200 on materials. This depends on what you choose. This cost includes steel tubing, parts, and finishing items. Always add extra money for unexpected costs.
Can I use recycled materials for my bike frame?
Yes, using recycled steel can help you save money. It also helps the environment. Just make sure the materials are in good shape to keep your bike frame strong.
How do I find the best prices for materials?
Look for local suppliers and check online stores. Compare prices and think about buying in bulk or with a group to save money. Always look for discounts or sales.
What tools do I need for building a bike frame?
You will need some important tools like a welder, frame fixture, drill press, and different hand tools. Buying good tools helps you get better results and makes building easier.
See Also
Understanding The True Expenses Of Custom Bike Frame Construction
Key Tools And Supplies Needed For Custom Bike Frame Creation
Comparing Carbon, Aluminum, And Steel Frames For Bike Enthusiasts