
You stand in your garage. Your hands hold a rough plank. You wonder if you can make it into a wooden bike frame. The process feels exciting but also a little scary. You have to make choices, like picking the right wood. Douglas Fir might last a long time. Scotch Pine could break quickly. You must line up every part just right. This includes the bottom bracket and the wheel axles. Some people do not think building a wooden bike frame is a good idea. Still, you get to be creative. You can mix Cherry and White Oak for a special look. Making something unique and useful feels great. It is even better when you see your bike move for the first time.
Challenges:
Getting every part lined up right
Planning each step carefully
Dealing with doubts about wood’s strength
Rewards:
Designing your own bike frame
Feeling proud of your work
Using both skill and creativity
Key Takeaways
Pick wood that is strong and light. Think about what kind of bike you want to make. This helps you build a wooden frame that will last.
Make clear goals for how the bike should fit. Decide on the style you want. Think about how you will take care of the bike. This helps you make a bike that works for you and lasts a long time.
Shape the wood carefully. Use laminating and good epoxy. This makes your frame strong and keeps it together well.
Check if everything lines up while you build. This helps your bike ride smooth and safe.
Have fun making your bike. Feel proud when you finish a special wooden bike frame that rides great.
Planning Your Wooden Bike Frame
Choosing Bike Type
You start by picking the kind of bike you want to build. Do you dream of a smooth road bike, a sturdy touring bike, or a trail bike for rough paths? Your choice shapes every step. For example, if you want a bikepacking or trail bike, you need more space for gear and better mud clearance. Rufus, a builder who focuses on bikepacking bikes, uses curved seat tubes and special frame shapes to fit bags and keep the ride stable. Touring bikes need long chainstays and room for racks and wide tires. These choices affect how you design your wooden frame. If you want a road bike, you focus on light weight and stiffness for speed. Each bike type asks for different frame geometry and materials. Some builders use engineered ash wood for gravel bikes because it gives a smooth, stable ride on rough ground. You get to decide what matters most—comfort, speed, or carrying gear.
Setting Goals
Before you cut any wood, set clear goals for your project. Ask yourself what you want from your custom bike. Do you want a frame that fits you perfectly? Maybe you want a bike that stands out in a crowd. Here are some things to think about:
Make sure the frame size fits your body. This helps you ride comfortably and safely.
Plan for real-world testing. Try your bike and see how it feels. You may need to adjust things.
Think about how easy it will be to keep your bike in good shape. Wooden frames need regular care, like sealing or staining.
Decide if you want to add special touches, like carvings or a unique finish. A custom wooden bike can show off your style.
Tip: Wooden frames can last 20-30 years if you take care of them. Regular maintenance keeps them strong and beautiful.
Research and Community
You do not have to plan your custom bike alone. Many online communities can help you. The Custom Framebuilding Forum is a great place to start. You will find experts like Eva and Daniel_Y who share tips on design, 3D printing, and even business ideas. They offer tutorials and answer questions from beginners. Here is a quick look at some helpful forums:
Community/Forum Name | Resources Offered | Description & Focus |
|---|---|---|
Custom Framebuilding Forum | Tutorials, education, CNC, 3D printing, fixture tips | Active group sharing knowledge on custom frame design and building, including wood. |
Bike Forums | General framebuilding advice | Less focus on wood, but still useful for general bike building questions. |
You can also find inspiration from many places. Some builders remember cool bikes from TV shows as kids. Others love the look and feel of wood, calling their bikes “furniture on wheels.” Many choose wood for its eco-friendly benefits. Your custom bike can reflect your story and values.
Wooden Bicycle Frame Design and Materials
Selecting Wood
You get to choose the wood for your wooden bicycle frame. This step feels exciting because each wood species brings its own look and strength. Some woods are easy to work with, while others need special tools and more patience. If you want a frame that lasts, you should look for strong, lightweight woods. Laminating thin layers of wood together can make your frame even tougher and help prevent cracks.
Here’s a quick guide to popular wood choices:
Wood Species | Strengths | Weaknesses |
|---|---|---|
Douglas Fir | Strong, beautiful grain, stable, easy to find | Peels when hand hewn, not ideal for hand finishing |
Hemlock | Strong, economical, rot-resistant, renewable, looks better with age | May have shake (delamination), affects appearance |
White Pine | Stable, straight grain, easy to stain and plane, affordable | Weaker than hemlock and fir, not good for long spans or small beams |
Oak | Very strong, weather resistant, locally available | More expensive, less stable, prone to surface and heart checking |
Cedar | Resistant to rot and insects, good for outdoor use | N/A |
Cypress | Hard, stable, strong, decay resistant, holds glue well | N/A |
Some builders use plywood for frames because it’s easy to shape and widely available. Plywood frames are simple to build with common tools, but they can be heavier and less durable than carved wood frames. Carved wood frames look beautiful and absorb road vibrations, but they need thicker tubes and careful treatment to keep out moisture.
Tip: Laminating thin layers of wood helps your frame stay strong and flexible. You can use glue and clamps to bond the layers tightly.
If you care about the environment, wood is a smart choice. It needs less energy to produce than steel or concrete. Wood stores carbon, which helps fight climate change. You can build a custom wooden bike frame that looks great and helps the planet.
Frame Geometry
When you start designing your wooden bicycle frame, you need to think about geometry. Geometry means the shape and size of the frame tubes and how they fit together. This affects how your bike rides and how long it lasts. A relaxed frame with a long wheelbase and tall head tube gives you a smooth, stable ride. You feel confident, even on bumpy roads or fast descents.
Wood has natural vibration-damping properties. If you use bow-shaped seatstays or a springy top tube, your bike absorbs shocks and feels comfortable. You can plan your frame to be stiff where you need power and flexible where you want comfort. Computer-aided design helps you get every angle right, so your wooden bicycle frame stays strong and safe.
Check out how wood compares to other materials:
Material | Density (g/cm³) | Tensile Strength (MPa) | Young’s Modulus (GPa) | Strength Efficiency (MPa/g/cm³) | Stiffness Efficiency (GPa/g/cm³) | Typical Tube Diameter (mm) | Wall Thickness (mm) | Cross-sectional Area (mm²) | % Area Difference vs Steel | % Strength Difference vs Steel |
|---|---|---|---|---|---|---|---|---|---|---|
Steel | ~7.85 | 1080 | 207 | 138.82 | 26.6 | 38.1 | 0.6 | 70.7 | N/A | N/A |
Titanium | ~4.5 | ~1194 | N/A | N/A | N/A | 38.1 | 0.9 | 105.2 | +32.8% | +10.4% |
Aluminum | ~2.7 | ~1005 | N/A | N/A | N/A | 42 | 1.4 | 178.6 | +60.4% | -6.9% |
White Ash | 0.60 | 103 | 11.6 | 171.67 | 20.0 | 56 | 5 | 852.5 | +91.7% | +13.0% |
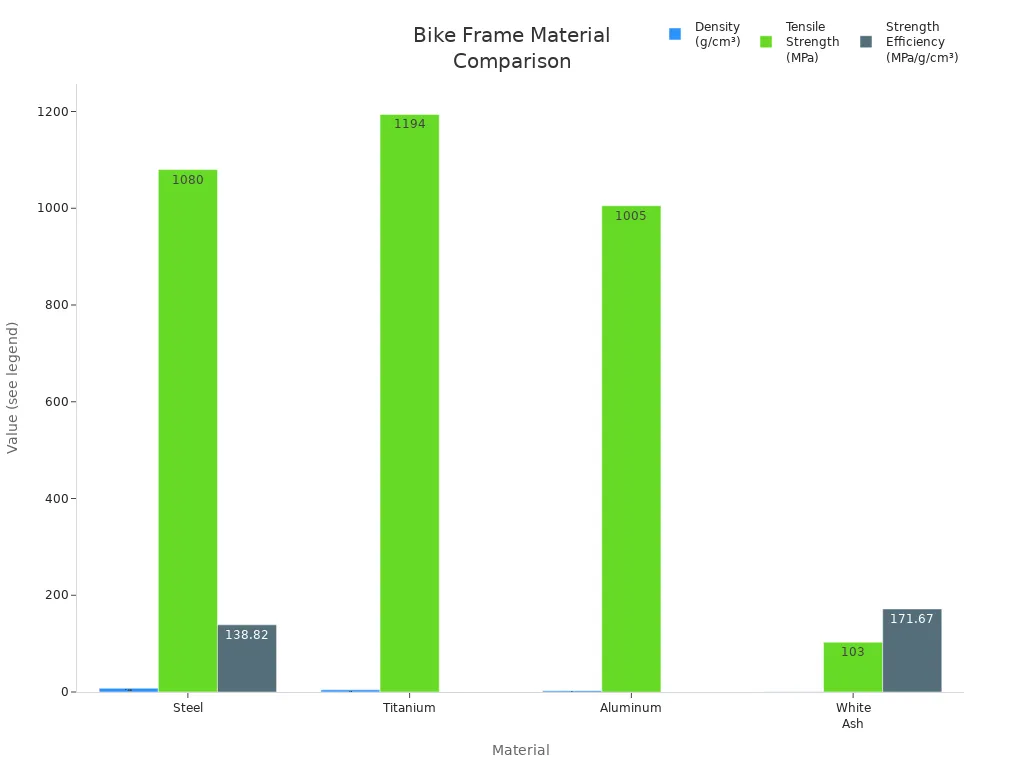
You might worry that wood is weaker than metal. When you design your frame with larger tubes and thicker walls, you can match the weight and strength of steel frames. In fact, a wooden ash tube with a bigger diameter can be just as strong and stiff as a steel tube of the same weight. This means your wooden bicycle frame can handle tough rides and last for years.
Note: Always plan for frame sag. Wood can bend over time, so you need to make sure your geometry stays true after many rides.
Combining Wood and Steel
You can get creative by mixing wood and steel in your custom bike. Many modern wooden bike frames use steel headtubes or rear triangles for extra strength at key points. Some builders add 3D-printed aluminum parts to connect wooden tubes. You might see metal bolts and inserts at the bottom bracket or head tube. These metal parts help your frame stay aligned and make it easier to attach wheels and brakes.
Here are some cool design features you can try:
Use modular dropouts made from steel or aluminum. These let you swap wheels or change your bike’s setup.
Reinforce junctions at the top tube and seat tube for extra durability.
Integrate wooden housing guides for cables throughout the frame.
Try thin oak veneer layers to absorb vibrations and give your bike a springy feel.
Combine wood with aluminum for a unique look and better performance.
If you want to go all out, you can build wooden wheels, handlebars, and even saddles. Some builders cover saddles and handlebars with leather for comfort. When you mix wood and metal, you get the best of both worlds—strength, style, and a ride that feels special.
Callout: Designing my wooden bicycle taught me that you can blend tradition and innovation. You can use wood’s natural beauty and resilience, then add metal parts for modern performance.
Your wooden bicycle frame can be a true custom creation. You get to choose every detail, from the wood species to the geometry and the mix of materials. The design and fabrication process lets you build a bike that fits your style and needs. When you finish, you’ll have a wooden bike frame that stands out and rides like nothing else.
Building a Bike Frame: Construction Process
Shaping and Laminating
You start with raw lumber and a big idea. The first step in building a bike frame is turning those planks into something that looks like a bike. You cut the wood into strips using a table saw or band saw. Each strip needs to be just the right size. You use a hand plane to smooth the pieces. This makes them fit together better and look cleaner.
Next, you get ready to laminate. Laminating means gluing thin layers of wood together to make a strong, curved shape. You brush epoxy onto each layer, then stack them up. You press the layers into a mold or form. Clamps hold everything tight while the epoxy cures. Sometimes you use wire to help hold tricky shapes, like around the seat tube. You wait for the glue to dry. This can take hours, but it is worth it. When you take the wood out of the mold, you see the shape of your future bike.
After the wood cures, you shape the frame. You use a router, chisels, rasps, and sandpaper. You cut, sand, and smooth the wood until it feels just right in your hands. You drill holes for dowels and bolts. You might use a drill press for this. You bevel the edges and sand everything again. The frame starts to look like a real bike.
Tip: Always use sharp tools and take your time. Rushing can lead to mistakes or splinters.
Laminating with care makes your frame strong and flexible. You can use only a few different wooden parts to keep things simple. Some builders add metal sleeves at the head tube or bottom bracket for extra strength. You finish the wood with oil or a special coating to protect it from water and scratches.
Bonding and Epoxy
Epoxy is your best friend when you build a wooden bike frame. It holds the wood layers together and bonds metal parts to the frame. You want to use a high-quality epoxy resin. This glue is strong, clear, and resists heat and water. Some builders use brands like West System 105/205 because they cure well and last a long time.
When you glue the frame halves together, you spread epoxy on every surface. You clamp the pieces tightly and let them cure for a full day or more. The epoxy locks the wood fibers in place. It helps the frame handle bumps and stress from riding. You also use epoxy to attach metal parts, like the bottom bracket shell. You roughen the metal and drill small holes so the glue can grip better.
Epoxy does more than just stick things together. It protects the wood from rain and dirt. It keeps the frame stiff and safe, even after thousands of miles. You finish the frame with several coats of oil or polyurethane. This makes the bike shine and keeps it looking new.
Note: Epoxy can get messy. Wear gloves and work in a well-ventilated space.
Alignment Challenges
Getting everything lined up is one of the hardest parts of building a bike frame. You want the wheels, chain, and pedals to run straight. If anything is crooked, the bike will not ride well.
You might run into problems when you join the seat tube to the bottom bracket or connect the downtube to the toptube. Sometimes the bottom bracket shell can twist or move before the glue sets. Chainstays and dropouts can end up too long or too short. Even a small mistake can throw off the whole frame.
Here are some ways to check and fix alignment:
Use a bubble level or tri-square to check if the dropouts are even.
Place a yardstick against the head tube and seat tube to see if both sides match.
Use a jig or fixture to hold the frame steady while you glue and clamp.
If you spot a problem, you can break the tack glue and realign the parts before the final cure.
For small bends, you can sometimes push or pull the wood gently to get it back in line.
You need to check alignment at every step. Simple tools and careful eyes help a lot. If you make a mistake, do not panic. You can often fix it with a little patience and creativity.
Callout: I spent over 150 hours in my shop before my first ride. Most of that time went into shaping, gluing, and checking alignment. The first time I rolled my wooden bike frame out into the sunlight, I knew every hour was worth it.
Assembly, Finishing, and First Ride
Assembly Details
You finally reach the assembly stage. This is where your wooden bicycle frame starts to look like a real bike. You need to pay close attention to alignment. If you get the wheels, chain, and pedals straight, your bike will ride smoothly. You use a jig or fixture to hold everything steady. Metal inserts at the bottom bracket, headset, and dropouts help keep the frame strong and safe. You attach these parts with flexible epoxy, which absorbs vibrations and reduces the risk of joint failure. You check clearances for the chainring, crank arm, and tires. If you spot a problem, you can fix it before you ride. Safety matters, so you make sure every bolt and bond is secure.
Tip: Use thinner wood plies and allow plenty of curing time. This helps prevent dry joints and keeps your frame strong for your first ride.
Finishing Touches
Now you get to add the finishing touches. You want your wooden bicycle frame to look great and last for years. You seal the wood with a topcoat like Arm-R-Seal or a water-based polyurethane. These products protect against moisture and wear. Some builders use hard wax oil or butcher block oil for a natural look. You can also try a transparent acrylic finish or a special bike frame wax. Each finishing product needs proper drying time, so be patient. You might add carvings, paint, or decals to make your custom bike stand out. Regular maintenance keeps your frame looking fresh.
Common finishing products:
Arm-R-Seal Oil-Based Topcoat
Water-Based Polyurethane
Hard Wax Oil
Frame Builder’s Top Wax
First Ride Experience
You finally take your wooden bicycle frame out for its first ride. You feel a mix of excitement and nerves. The bike rolls smoothly and feels efficient. You notice how the frame absorbs road vibrations, making the ride comfortable. Sometimes, a wooden frame can feel stiffer than steel or carbon, giving you a direct connection to the road. You might hear more cable rattling on rough roads, but the bike responds quickly. Most problems during the first ride come from construction errors, not the ride itself. Careful design and assembly help you avoid issues. If you do notice a problem, like a dry joint or harsh ride, you can fix it by adjusting your lamination or epoxy technique.
Block Quote: “The first ride on my wooden bicycle frame felt like nothing else. I could feel every bump, but the bike was quick and responsive. I knew all my hard work paid off.”
Common first ride issues and solutions:
Improper curing of chainstay lamination: Use thinner plies and allow full curing.
Joint failure: Use flexible epoxy for bonding.
No major ride problems if you build carefully.
Your first ride is a big moment. You get to enjoy the unique feel of your custom wooden bicycle frame and see your hard work in action.
Building a wooden bike frame takes patience and a lot of time. You might spend hundreds of hours learning, measuring, and fixing mistakes. The hardest part is getting every part to fit just right. Still, you get to enjoy the ride and the story behind your work.
Tip for Beginners | Why It Helps |
|---|---|
You learn faster and fix mistakes easily | |
Use used parts | You save money and can experiment more |
Check alignment | Your bike rides safer and smoother |
You may find yourself changing how you see hard work. Many builders feel proud, join new communities, and discover a love for hands-on projects. Have you tried building your own frame? Share your story or ask a question below! 🚲
FAQ
How heavy is a wooden bike frame?
Most wooden bike frames weigh about the same as steel frames. You can expect your frame to weigh between 4 and 6 pounds. The total bike weight depends on your parts and wood choice.
Can you ride a wooden bike in the rain?
Yes, you can! Just make sure you seal your frame with a good finish. Wipe your bike dry after wet rides. Regular care keeps your frame strong and looking great.
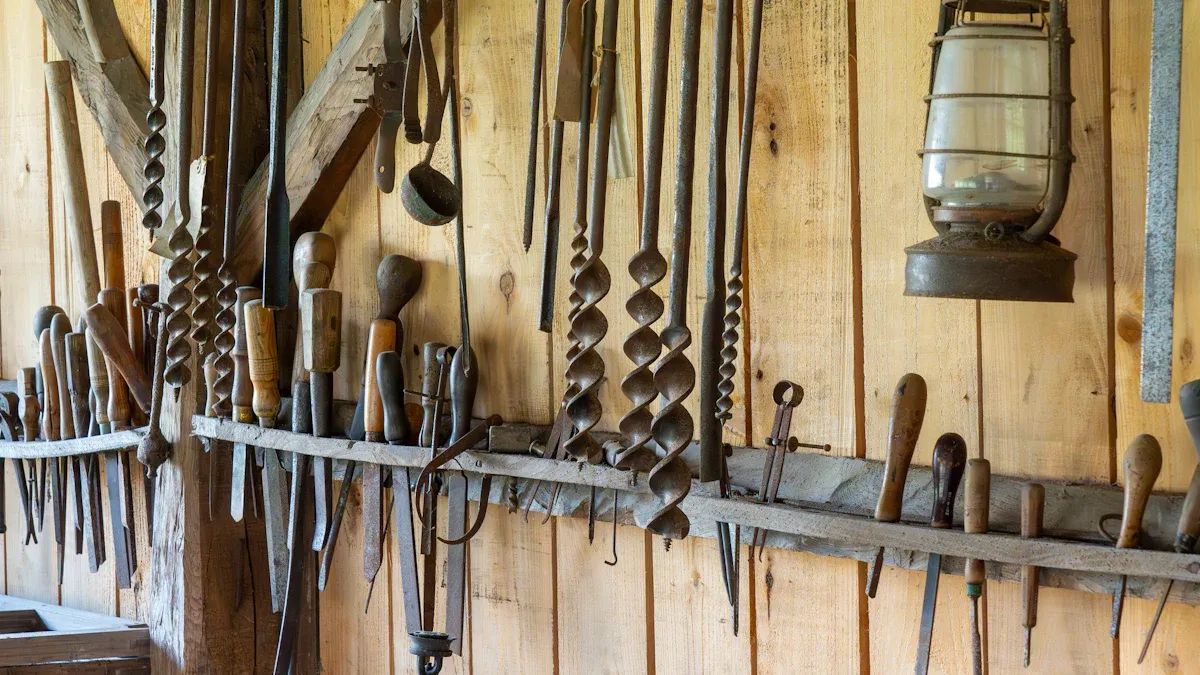
What tools do you need to build a wooden bike frame?
You need basic woodworking tools. Here’s a quick list:
Saw (table or band)
Clamps
Drill
Sandpaper
Epoxy
Tip: Start with simple hand tools if you’re new to woodworking.
How long does it take to build a wooden bike frame?
You might spend 100 to 200 hours on your first frame. This includes planning, shaping, gluing, and finishing. Take your time and enjoy each step. The process gets faster as you learn.
See Also
Must-Have Supplies And Equipment For Crafting A Bike Frame
Learn Simple Methods To Perfect Bike Frame Sketching
Step-By-Step Welding Guide For Constructing Drift Trike Frames
Understanding The True Expenses Of Custom Bike Frame Creation