
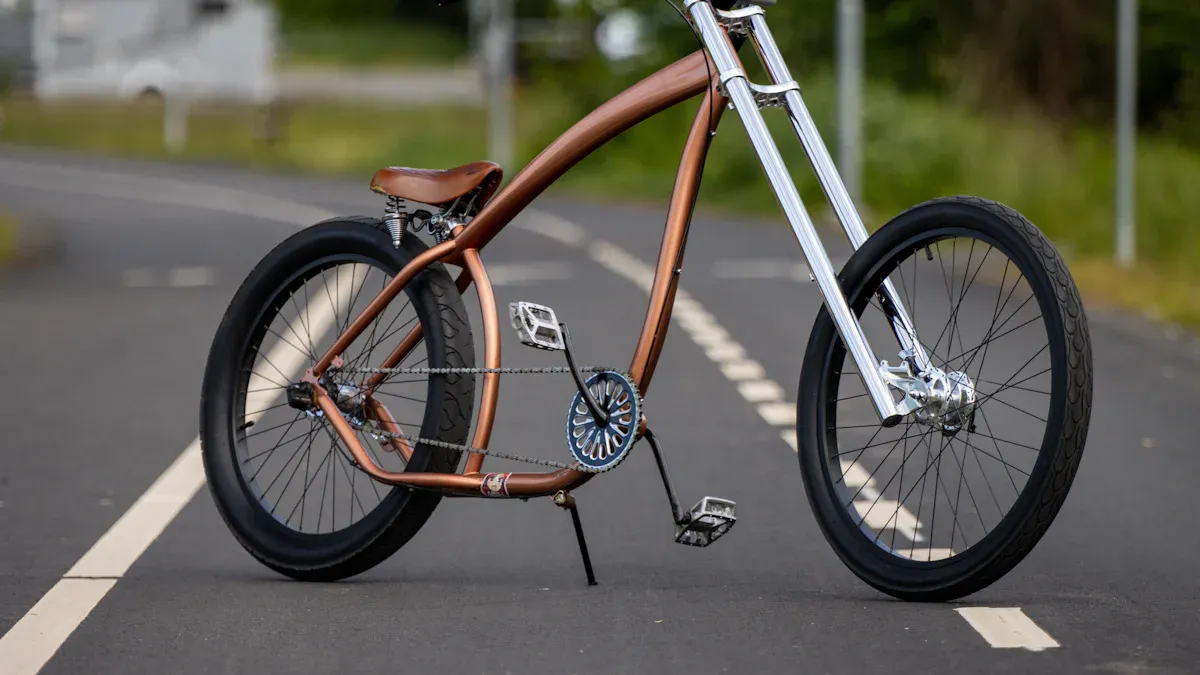
Forget everything you think you know about building a low rider bike frame. Want to really stand out? Try mixing chopper parts from a junkyard into your lowrider chopper bike. You don’t have to follow anyone’s plan—just let your imagination run wild. Your project doesn’t need to look like every other chopper on the block. Break the rules and build a low rider bike frame that shows your true style. 🚲
Key Takeaways
Use different metals and old parts to make a cool and strong lowrider bike frame. Try new frame angles and change the height or length of your bike for a bold look and smooth ride. Put together welded and bolt-on parts for a tough frame that you can upgrade easily. Pick bright paint or shiny chrome to help your bike look special and keep it safe from damage. Always check your frame for safety and test ride slowly before you go out on the road.
Frame Materials
Building a lowrider bike frame is all about pushing boundaries. You don’t have to stick to one material or follow a strict plan. Let’s talk about how you can mix things up and create a frame that’s truly yours.
Mixing Metals
You can use different metals to get the look and feel you want for your lowrider. Here’s a quick guide to the most popular materials and how they stack up:
Material | Popularity in Lowrider Frames | Mechanical Properties & Trade-offs |
|---|---|---|
Steel | Very popular | Strong, durable, heavier; absorbs vibration for a smooth ride. |
Aluminum | Popular | Lighter than steel; stiffer, less shock-absorbing; rust-resistant. |
Titanium | Used by boutique builders | Light, strong, corrosion-resistant; smooth ride; expensive. |
Carbon Fiber | Used in high-end/custom frames | Very light, strong, and moldable; excellent vibration damping; pricey and can be brittle. |
Steel and aluminum are the go-to choices for most lowrider builders. Steel gives you a classic look and a comfortable ride. Aluminum makes your bike lighter and easier to handle. If you want something wild, try titanium or carbon fiber, but be ready to pay more.
Repurposed Parts
Don’t be afraid to grab parts from old bikes or even machinery. You can find cool shapes and strong pieces that make your lowrider stand out. When you use repurposed parts, always check for cracks or signs of wear. Some parts have a limited service life, so you want to make sure your frame stays safe and strong.
Tip: Look for frames with CNC machined yokes or unique dropouts. These features help spread out impact forces and keep your bike sturdy.
Before you start welding, gather your essential tools:
Welding machine
Angle grinder
Tubing bender
Measuring tools
These tools help you cut, shape, and join different materials. Always wear safety gear like gloves, a welding helmet, and safety glasses.
Safe Experimentation
You want your lowrider to look cool, but safety comes first. When you experiment with new materials or parts, make sure everything fits together well. Align your frame parts before you start welding. Trim and fit each piece carefully so your joints stay strong.
Here’s a simple step-by-step plan for stripping paint and making templates:
Take apart your bike to get to the frame.
Sketch your new frame shape and test-fit parts before you attach them.
Make paper templates for custom shapes.
Cut and shape metal sheets using your templates.
Tape or glue parts in place to check the fit.
Weld extension tubes or new sections as needed.
After welding, paint your frame with several light coats.
Reassemble your bike and check everything for safety.
If you want to add fiberglass parts, grind off the top coat where you’ll attach them. Use paper templates to get the shape just right. After you glue and attach the pieces, trim and sand for a smooth finish.
Mixing metals, repurposing parts, and experimenting safely will help you build a lowrider that’s both unique and reliable. Don’t be afraid to break the rules—just make sure your frame can handle the ride.
Low Rider Bike Frame Geometry
Custom Angles
You don’t have to stick with the angles you see on most bikes. If you want your low rider bike frame to stand out, try changing the head tube or seat tube angles. A steeper head tube gives your chopper a sharper, more aggressive look. A slacker angle makes your ride feel longer and lower. You can even tilt the seat tube back for a stretched-out style. When you play with these angles, you change how your lowrider handles and looks. Always check that your fork and wheels still line up after you make changes. If you want a true lowrider chopper bike, don’t be afraid to go bold with your geometry.
Stretching & Lowering
Stretching the frame is a classic move in the lowrider world. You can add extra tubing to the top tube or down tube to make your bike longer. Lowering the frame brings you closer to the ground and gives your ride that unmistakable lowrider vibe. Some builders even use air ride suspension systems. These let you raise or lower your bike with the push of a button. You get the best of both worlds: a slammed look for shows and a smoother ride for cruising. Just remember, when you stretch or lower your chopper, you may need to adjust the crank and chain line so everything works smoothly.
Balancing Ride & Looks
You want your lowrider to turn heads, but you also want it to ride well. Here’s how builders balance comfort and style:
Builders tweak the geometry for a smoother ride or a more aggressive stance, depending on what you want.
Chrome and steel frames shine bright and stay strong, giving you both style and safety.
Reinforced joints and smart welding keep your frame light but tough.
Air ride suspension lets you adjust your bike’s height for comfort or show.
Custom handlebars and spoked wheels look cool and feel good in your hands.
If you want your lowrider to last, you need to know about frame standards. These specs help you pick parts that fit together. Here are some common standards you’ll see:
Specification Aspect | Details |
|---|---|
Rear Dropout Spacing | |
Bottom Bracket Type | T47 threaded shell |
Rear Axle Size | M12 x 163 mm length, 1.5 pitch |
Front Dropout Spacing | 12×100 mm thru-axle |
Front Axle Size | M12 x 130 mm length, 1.5 pitch |
Headset Upper | ZS44/28.6 mm |
Headset Lower | EC52/40 mm |
Seatpost Diameter | 27.2 mm |
Dropper Post Compatibility | Yes, external to internal routing |
Rack and Fender Mounts | Yes, included |
Accessory Mounts | Downtube, top tube, and fork mounts |
Specification Aspect | Details |
|---|---|
Rear Dropout Spacing | |
Bottom Bracket Type | Press Fit BB92 (41 x 92 mm) |
Rear Axle Size | M12 x 175 mm length, 1.0 pitch |
Front Dropout Spacing | 110×15 mm thru-axle |
Headset Upper | IS41 |
Headset Lower | IS52 |
Seatpost Diameter | 27.2 mm |
Dropper Post Compatibility | Yes, internal routing |
Rack Mounts | Front and rear compatible with lowrider racks |
Accessory Mounts | Downtube, top tube, fork mounts |
If you ignore these details, you might end up with parts that don’t fit your low rider bike frame. Always double-check your measurements before you weld or bolt anything together. This way, your lowrider will look amazing and ride even better.
Welding & Joining
You want your lowrider to look smooth and custom. Welding is the secret sauce for a frame that turns heads. You don’t have to stick with old-school methods. Let’s talk about some wild ways to join parts and break the rules.
Bolt-On Mods
Why weld everything when you can bolt on cool mods? You can use brackets, clamps, and custom plates to attach new pieces. This makes it easy to swap out parts or try new looks. If you want to add twisted fork springs or wild fenders, bolt-on mods let you experiment without making permanent changes. You can test your ideas before you start welding. Bolt-on parts also make repairs simple. If something breaks, you just swap it out.
Tip: Use lock nuts and washers to keep your bolt-on mods tight. Loose parts can rattle and mess up your ride.
Hybrid Welds
You don’t have to choose between welding and bolting. Mix both for a strong and flexible lowrider. Weld the main tubes for strength. Bolt on accessories for style. Hybrid welds let you build a frame that’s tough but easy to upgrade. You can weld custom dropouts and then bolt on racks or lights. This way, your lowrider stays fresh and unique.
Here’s a quick table showing the pros and cons:
Method | Pros | Cons |
|---|---|---|
Welding | Strong, smooth look | Hard to change later |
Bolt-On | Easy to swap parts | May loosen over time |
Hybrid Welds | Best of both worlds | Needs careful planning |
Molded Frame Look
You want your lowrider to look like it rolled out of a custom shop. Molded frames use smooth welds and hidden joints. You can grind down the welds and fill gaps with metal putty. Paint over the joints for a seamless finish. This gives your lowrider a pro look. If you want to go wild, try blending fiberglass with metal. You get wild shapes and a smooth surface.
Start welding with small tack welds to hold parts in place. Check your alignment before you finish the welds. Take your time and let your creativity lead the way. A molded frame makes your lowrider stand out at any show.
Paint & Finish

Wild Paint Jobs
You want your lowrider to turn heads? Go wild with your paint job. Forget boring colors. Try candy coats, metallic flakes, or even airbrushed murals. You can layer different shades for a deep, shimmering effect. Some builders use pinstriping or bold graphics to make their bikes pop. If you want a true showstopper, add gold leaf or glow-in-the-dark paint. Always clean and sand your frame before painting. Use a primer to help the color stick. Spray several thin coats instead of one thick layer. This helps your paint last longer and look smoother.
Tip: Use painter’s tape to create sharp lines and protect areas you don’t want painted.
Chrome Plating
Nothing says classic lowrider like chrome. Chrome plating gives your bike a mirror-like shine that lasts for years. The process uses polishing and electroplating to create a tough, corrosion-resistant surface. Chrome protects your parts from rust, pits, and wear—even in harsh weather. Unlike regular paint, chrome does not chip or fade easily. You only need mild soap, water, and a little chrome polish to keep it looking new. Chrome plating also boosts your bike’s value and style. It makes finishing the bike feel like a true work of art.
It resists water and keeps your lowrider looking sharp.
Maintenance is simple and quick.
DIY Finishes
You don’t need a pro shop to get a cool finish. Try spray paint, powder coating, or even hand-painted designs. Use stencils for patterns or fade effects. Some riders wrap their frames with vinyl for a unique look. Always let each layer dry before adding the next. Protect your work with a clear coat. This keeps your lowrider frame looking fresh and guards against chips. If you mess up, just sand it down and try again. Custom finishes show off your creativity and make your bike one of a kind.
Lowrider Accessories
You want your lowrider to stand out, right? Accessories make all the difference. Let’s check out some wild upgrades you can add to your ride.
LED Lighting
LED lights do more than just help you see at night. They turn your lowrider into a rolling light show. You can pick from several types, each with its own style and brightness. Here’s a quick look:
LED Lighting Type | Key Features & Specs | Visibility Enhancement | Style & Installation Notes |
|---|---|---|---|
Custom Dynamics Shark Demon LED | DOT & SAE compliant, 5800-6500K color, 3600-9080 lumens, waterproof, plug-and-play | Super bright, sharp beams, safer rides | Glossy housing, sticks out, needs drilling, lifetime warranty |
Custom Dynamics ProBEAM LED | Aftermarket, less bright than Shark Demon, plug-and-play | Better than stock, instant upgrade | Sleek look, easy install |
Factory Low Rider ST Headlight | OEM, low output, basic setup | Weak beam, not much help | Stock look, no mods needed |
Baja Designs LP6 LED | Off-road, 11,225 lumens, not DOT approved, pricey | Very bright, not street legal | Needs extra parts, expensive |
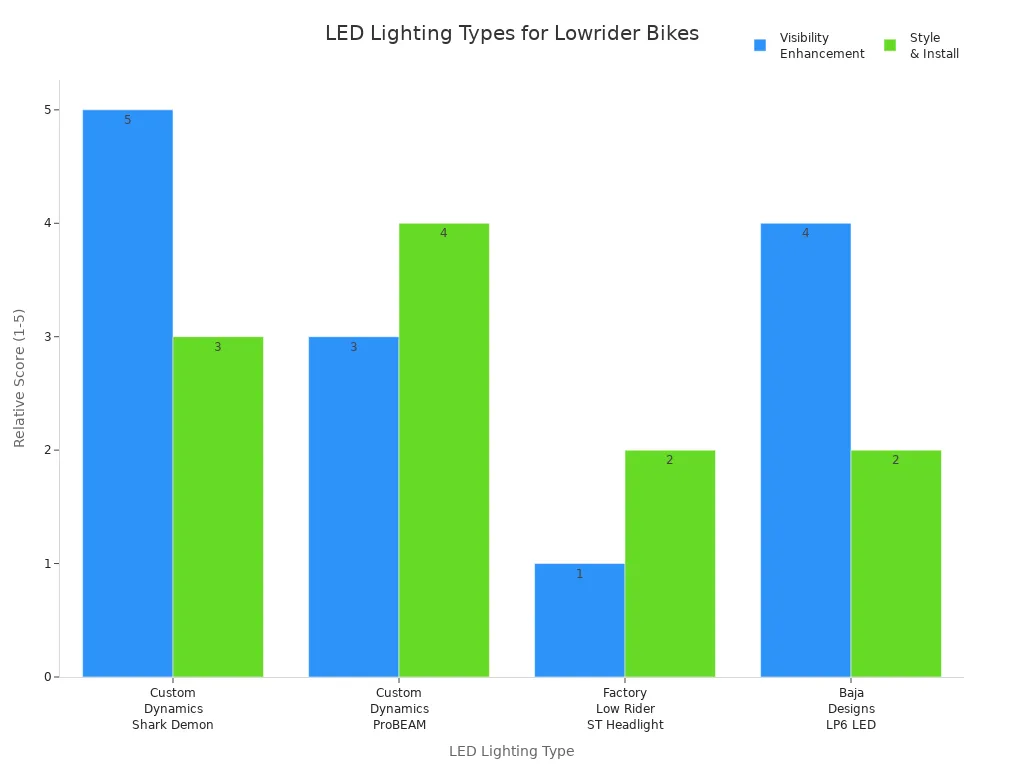
If you want your chopper to shine, go for the Shark Demon or ProBEAM. These lights boost safety and style. Make sure you follow the instructions and use the right hardware for a secure fit.
Tip: Always check that your wiring is neat and doesn’t rub against moving lowrider bike parts.
Custom Handlebars & Fenders
Handlebars and fenders shape the look of your lowrider. You can choose curved or ape-hanger handlebars for a bold, classic stance. Stretched fenders give your bike smooth lines and a longer profile. Many riders add chrome engravings or custom paint to show off their style and heritage. These parts don’t just look cool—they make cruising more comfortable and turn your bike into a piece of art.
Curved or ape-hanger handlebars create an iconic silhouette.
Stretched fenders add sleek, flowing lines.
Chrome details and paintwork show off craftsmanship.
These upgrades support the “low and slow” vibe.
Twisted Springs
Twisted fork springs are a classic lowrider touch. They add bounce and a unique look to your front end. You can mount them with brackets or clamps for easy swaps. Want to keep everything safe? Use Velcro straps, rubber lashings, or Bow Tie Strap Anchors to secure accessories. Always check that nothing blocks your suspension or steering.
Note: Secure mounting keeps your lowrider safe and lets you show off your upgrades without worry.
Safety & Inspiration
Reinforcement
You want your custom bike to look wild, but you also need it to stay strong. After you stretch or lower your frame, check every joint and weld. Add gussets or extra tubing where you see weak spots. Use a flashlight to spot cracks or thin metal. If you find a problem, fix it before you ride. You can reinforce the bottom bracket area with a steel plate. Try wrapping joints with metal bands for extra support. Always use fresh bolts and lock washers when you bolt on new parts. Safety comes first, so don’t rush this step.
Tip: Test your frame by pressing down hard on the seat and handlebars. If you hear creaks or see movement, reinforce those areas.
Testing Rideability
You built a bike that looks amazing. Now, make sure it rides smooth. Start with a slow test in your driveway. Check the brakes, steering, and suspension. Ride over bumps and turn in tight circles. Listen for rattles or strange noises. If your bike feels wobbly, adjust the wheels or tighten the bolts. Ask a friend to watch you ride and spot any problems. Keep a small toolkit handy for quick fixes. You want your lowrider to roll safe and steady every time.
Test Step | What to Check | Quick Fixes |
|---|---|---|
Brakes | Stop quickly, no drag | Adjust pads, tighten |
Steering | Turns smooth, no shake | Check headset, lube |
Suspension | Bounces, no squeaks | Grease springs, tighten |
Frame | No flex or cracks | Add gussets, weld |
Finding Ideas
You don’t have to build alone. Get inspired by checking out custom motorcycle shows like the Handbuilt Motorcycle Show. These events show off wild designs and creative builds. You can watch documentaries or browse online galleries for new ideas. Many builders share videos that explain their tricks and techniques. Local clubs, like the Española Lowrider Bike Club, welcome new riders and builders. Teens work with artists to design and build bikes, mixing culture and creativity. When you join a club or visit a show, you see what’s possible and meet people who share your passion. Your next idea might come from a mural, a chrome detail, or a story you hear at a meet-up.
Note: Snap photos of your favorite bikes and keep a sketchbook for your own ideas. Inspiration is everywhere—just keep your eyes open!
You have the power to break the rules and build a low rider bike frame that shows your true style. Try new materials, wild angles, and bold finishes. Share your photos and stories with others. When you do, you help the community grow and inspire new builders. Clubs and online groups feel like family because everyone shares their journey. Drop a comment below or post your latest creation—your story could spark the next big idea!
FAQ
Can I build a lowrider bike frame without welding?
Yes! You can use bolt-on parts, clamps, and brackets. Many builders start with these methods. They let you try new ideas and swap parts easily. If you want a permanent look, you can weld later.
What tools do I need to start my first lowrider frame?
You need a wrench set, angle grinder, measuring tape, and a drill. If you want to weld, get a basic welder. Always wear gloves and safety glasses. These tools help you cut, shape, and join parts.
How do I make sure my custom frame is safe to ride?
Check every joint and weld for cracks. Press down on the seat and handlebars to test strength. Ride slowly at first. If you hear creaks or see movement, reinforce those spots. Safety comes first!
Where can I find inspiration for my lowrider bike design?
You can visit local bike shows, join online forums, or scroll through social media. Many builders share photos and videos. Keep a sketchbook for your ideas. Inspiration can come from art, cars, or even music!
See Also
Top Three Tips For Choosing The Best Lowrider Frames
Important Gas Bike Frame Advice Every Builder Must Learn
Easy Techniques To Keep Your Bike Frame Well Protected