

You want a perfect fit frame bike, but not every chart helps you. Some guides do not give the answer you need. Inseam length is more important than rider height. It matches the distance from saddle to pedals. This is key for comfort and pedaling efficiency. Manufacturer size charts often miss this detail. They usually rely on height alone. Inseam gives you a better prediction for bike fit. If you try different setups, you can find what feels best. You should ask for advice or help if you need it.
Key Takeaways
Measure your inseam with care to pick the right bike frame size. This is more important than your height for comfort and pedaling. Always check the standover height. Make sure there is safe space between your legs and the bike frame when you stand over it. Adjust the saddle height, handlebar reach, and stem length one step at a time. This helps you stay comfortable and avoid pain while riding. Do not make big changes on a frame that is the wrong size. Picking a smaller frame often gives you better control and safety. Pay attention to how your body feels. Get help from a professional bike fitter if you feel pain or want to get better at cycling.
Frame Size Basics

Inseam and Standover
You want a bike that fits you well. The most important measurement is your inseam. Inseam tells you how long your legs are from the ground to your crotch. This number helps you pick the right frame size. Clothing size or manufacturer charts often use only rider height. These charts do not show how your legs and body match the bike. Your inseam gives you a better way to find the right size bike.
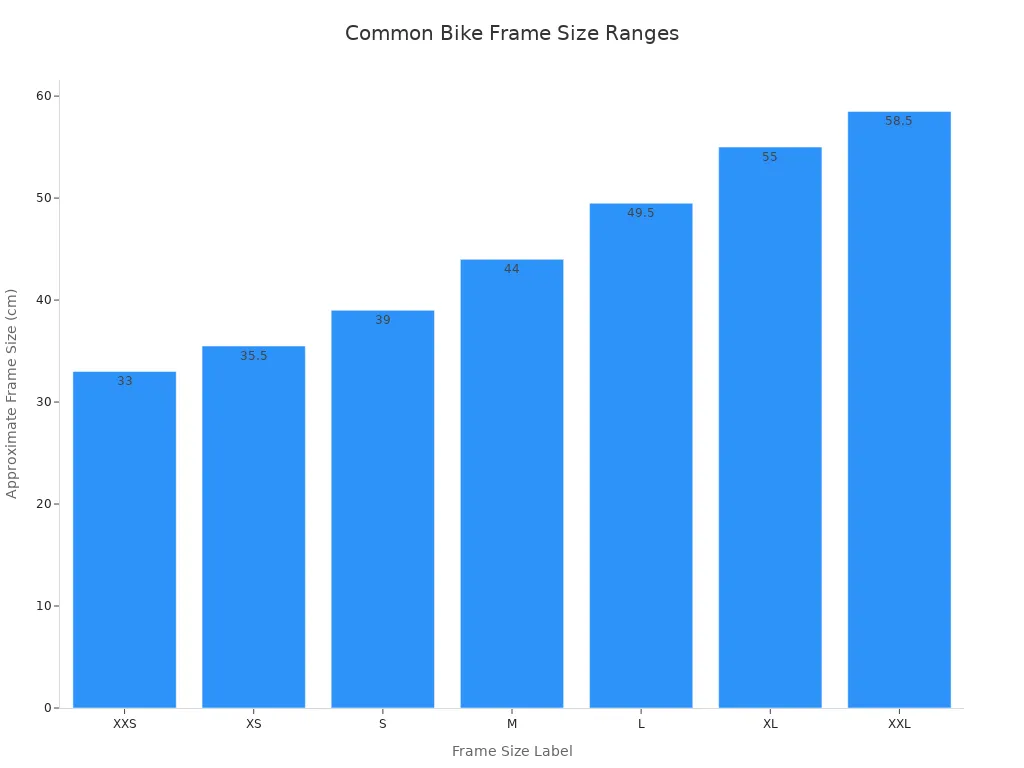
Most bike brands offer several frame sizes. You can see how they match up in the table below:
Rider Height (cm) | Frame Size Label | Approximate Frame Size (cm) |
|---|---|---|
150 – 160 | XXS | 32 – 34 |
150 – 165 | XS | 35 – 36 |
155 – 170 | S | 37 – 41 |
170 – 180 | M | 42 – 46 |
180 – 190 | L | 47 – 52 |
187 – 196 | XL | 53 – 57 |
195+ | XXL | 58 – 59 |
You should also check standover height. Standover height means the space between the top tube and your inseam when you stand over the bike. You want at least 2-5 cm of clearance. This helps you get on and off safely. If the standover is too high, you might hurt yourself when you stop.
Sizing Up or Down
If you fall between two frame sizes, you should size down. A smaller frame size gives you more control. You can adjust the seat post and handlebars to fit your inseam. A larger frame size may feel too stretched and hard to handle. Most brands design frame sizes with some overlap. This lets you choose based on your inseam and comfort, not just rider height.
Tip: Always measure your inseam before you buy a bike. Try standing over the frame to check the standover height. You will feel safer and more comfortable.
Choosing the right frame size means you get a bike that fits your body. You avoid pain and enjoy your ride more.
Key Bike Fit Adjustments

Saddle Height
Getting your seat height right is the most important step in bike fit. You want your legs to move smoothly and your knees to stay healthy. If you set your seat height too high or too low, you risk pain and injury. Many riders use their inseam to find the best seat height. You can follow these steps to adjust seat height for your frame size:
Stand against a wall and measure your inseam from the floor to the top of your inner leg.
Multiply your inseam by 0.883. This gives you a starting seat height from the center of the bottom bracket to the top of the saddle.
Loosen the seatpost clamp and move the saddle up or down to match your measurement.
Sit on the bike and place your heel on the pedal at its lowest point. Your leg should be straight but not locked.
Check for hip sway or trouble reaching the pedal. Make small changes if needed.
Use a level to make sure the saddle is flat.
Test your new seat height over several rides. Watch for knee angles around 30° at the lowest pedal point.
Note: A seat height that keeps your knee flexion between 25° and 35° helps prevent knee pain and improves cycling performance. Riders with seat height outside this range often feel more fatigue and discomfort.
If you use a different crank length, you may need to raise or lower your seat height by a few millimeters. Always make small changes and let your body adapt.
Handlebar Reach and Stack
Handlebar reach and stack affect your comfort and posture. Reach is the distance from the saddle to the handlebars. Stack is the height of the handlebars above the bottom bracket. When you adjust handlebar position, you change how your back, arms, and neck feel on the bike.
A good reach lets your hands rest naturally on the brake hoods. Your elbows should bend slightly. If the reach is too long, you stretch your back and arms, which can cause pain. If the reach is too short, you may feel cramped. Stack height also matters. Lower handlebars make you lean forward, which can increase speed but also strain your neck and hands. Higher handlebars help you sit upright and reduce pressure on your back.
Adjustment | Effect on Posture | Comfort Impact |
|---|---|---|
Longer Reach | Flatter back, stretched arms | More neck/shoulder pain |
Shorter Reach | Upright, bent elbows | Less pain, less speed |
Higher Stack | Upright, relaxed position | More comfort |
Lower Stack | Aggressive, forward lean | More strain |
Tip: Adjust handlebar position slowly. Try different setups to find what feels best for your body and riding style.
Stem and Crank Length
Stem length changes how far you reach for the handlebars. A longer stem stretches your body forward. A shorter stem brings the bars closer. You want a stem that matches your flexibility and riding goals. Crank length affects how your legs move. Longer cranks increase hip and knee flexion, which can raise the risk of knee pain. Shorter cranks reduce joint strain and may help you pedal more smoothly.
Research shows that changing crank length by 10 mm does not change your power much, but it does change how your hips and knees move. Shorter cranks can lower injury risk and improve comfort, especially for riders with knee problems. You should pick a crank length that feels natural and lets you pedal without pain.
Note: Adjusting stem and crank length helps you fine-tune your bike fit. Small changes can make a big difference in comfort and efficiency.
Pedal Position
Pedal position affects your knees and overall comfort. Many riders use the Knee Over Pedal Spindle (KOPS) rule, but it is not always necessary. You want your knee to stay healthy and your muscles to work together. If your saddle is too far forward, you put extra stress on your knees. If it is too far back, you may lose power.
Cleat position and pedal float also matter. Cleats that are too tight or too loose can cause knee pain. You should adjust your cleats so your feet feel stable but can move a little. Regular cycling helps keep your knees strong and lowers the risk of joint problems. A good bike fit balances seat height, saddle position, handlebar placement, and pedal setup.
Tip: If you feel pain in your knees or feet, check your pedal and cleat position. Small changes can improve comfort and prevent injury.
Perfect Fit Frame Bike Guide
Measure Your Body
You need to start with accurate measurements before you choose a bike. Your inseam is the most important number. It helps you find a perfect fit frame bike. Follow these steps to measure your inseam and standover height:
Stand with your back against a wall. Keep your feet shoulder-width apart.
Wear your cycling shoes or shoes similar to what you ride in.
Take a large hardcover book and place it between your legs. Push it up against your crotch to simulate the bike’s top tube.
Make sure the book is level and parallel to the ground.
Use a tape measure to check the distance from the top of the book to the floor. This is your inseam.
Repeat the measurement two or three times. Average the results for accuracy.
To measure standover height, stand with your back against a wall and feet six to eight inches apart. Place the book snugly between your legs, pushing it up as high as possible. Measure from the floor to the top of the book. This number is your standover height. You want at least one inch of clearance between your inseam and the bike’s top tube for safety and comfort.
Tip: Always measure with the shoes you plan to ride in. Take your time and repeat each measurement for the best results.
Match to Frame
Once you have your inseam and standover height, you can match your body to the right frame size. Look for a frame that gives you enough standover clearance. Compare the stack and reach of the frame to your body measurements. Stack is the vertical distance from the bottom bracket to the top of the head tube. Reach is the horizontal distance from the bottom bracket to the top of the head tube.
Stack and reach help you predict how a bike will fit before you ride it.
Choose a frame with stack and reach measurements close to your ideal numbers. If the difference is more than 20 mm, you may have trouble getting comfortable.
Saddle and handlebar positions can be adjusted, but large changes can affect how the bike handles.
Your flexibility, leg length, and riding style also matter. Try different setups to see what feels best.
Traditional sizing methods use seat tube length or labels like S, M, or L. These do not always match your body. Stack and reach give you a better way to compare frames and find a perfect fit frame bike.
Measurement | What It Tells You | Why It Matters |
|---|---|---|
Inseam | Leg length | Guides saddle height |
Standover Height | Clearance over top tube | Safety and comfort |
Stack | Handlebar height | Posture and back comfort |
Reach | Handlebar distance | Arm and shoulder comfort |
Adjust and Test
After you pick a frame size, you need to fine-tune your bike. Make small adjustments to saddle height, saddle tilt, handlebar height, and reach. Change one thing at a time, usually by 2-5 mm or 1-2 degrees. Test ride your bike after each adjustment. Pay attention to comfort, power, and any pain or numbness.
Set your saddle height so your leg has a slight bend at the bottom of the pedal stroke.
Use a bubble level to check saddle tilt. Adjust by 1-2 degrees if you feel pressure.
Change handlebar height and reach with spacers or by flipping the stem.
Start with cleat position, then move to saddle height, fore-aft, and tilt, followed by handlebar adjustments.
Ride and notice how your body feels. If you feel discomfort, make another small adjustment.
Allow your body time to adapt before making more changes.
Note: Professional bike fitters use technology and rider feedback to test comfort and performance. They re-evaluate your posture and technique after each adjustment. If you cannot get comfortable after several tries, consider asking a professional for help.
You should revisit your bike fit as your flexibility and riding style change. Regular testing and small tweaks help you stay comfortable and perform your best. When you fine-tune your bike, you get the most out of every ride.
Right Size Bike Mistakes
Choosing the right size bike can be tricky. Many riders make common mistakes that lead to discomfort, poor performance, or even injury. You can avoid these problems by learning what to watch out for and knowing when to seek expert help.
Ignoring Proportions
You might think height is all you need to pick a bike, but your inseam and arm length matter just as much. If you ignore your body proportions, you risk pain in your knees, hips, or back. Studies show that riders who skip personal measurements often develop long-term issues like joint pain, muscle imbalances, and numbness. Always measure your inseam and consider your reach before choosing a frame.
Common mistakes include:
Using only height or stand over height to pick a frame
Forgetting that different bike types need different sizing
Overlooking how your riding style affects fit
Tip: Your comfort and health depend on a bike that matches your unique body.
Over-Adjusting Large Frames
Trying to make a big bike fit by changing the stem, seatpost, or handlebars can cause more harm than good. If you ride a frame that is too large, you may feel stretched out, which can strain your back, neck, and wrists. Over-adjusting can also make your bike harder to control and less safe. For example, a very short stem can make steering twitchy, while too many spacers under the handlebars can weaken the bike’s structure.
Signs of over-adjustment:
Excessive seatpost extension
Too many spacers under the handlebars
Unusual stem lengths
If you find yourself making extreme changes, you probably need a smaller frame.
Copying Others’ Setups
Every rider has a different body. Copying a friend’s bike setup or using a generic chart will not guarantee a good fit. You need to test ride and adjust your bike based on how you feel. Skipping this step can lead to discomfort and poor cycling performance.
Skipping Professional Help
Sometimes, you need more than a tape measure. Professional bike fitters use advanced tools and consider your flexibility, injury history, and riding goals. They help you avoid pain and improve your speed and endurance. If you buy a new bike, feel pain, or recover from injury, a professional fitting can make a big difference.
Note: A right size bike is about more than numbers. Listen to your body and do not hesitate to ask for expert advice.
Pro Bike Fit Tips
Use Fit Tools
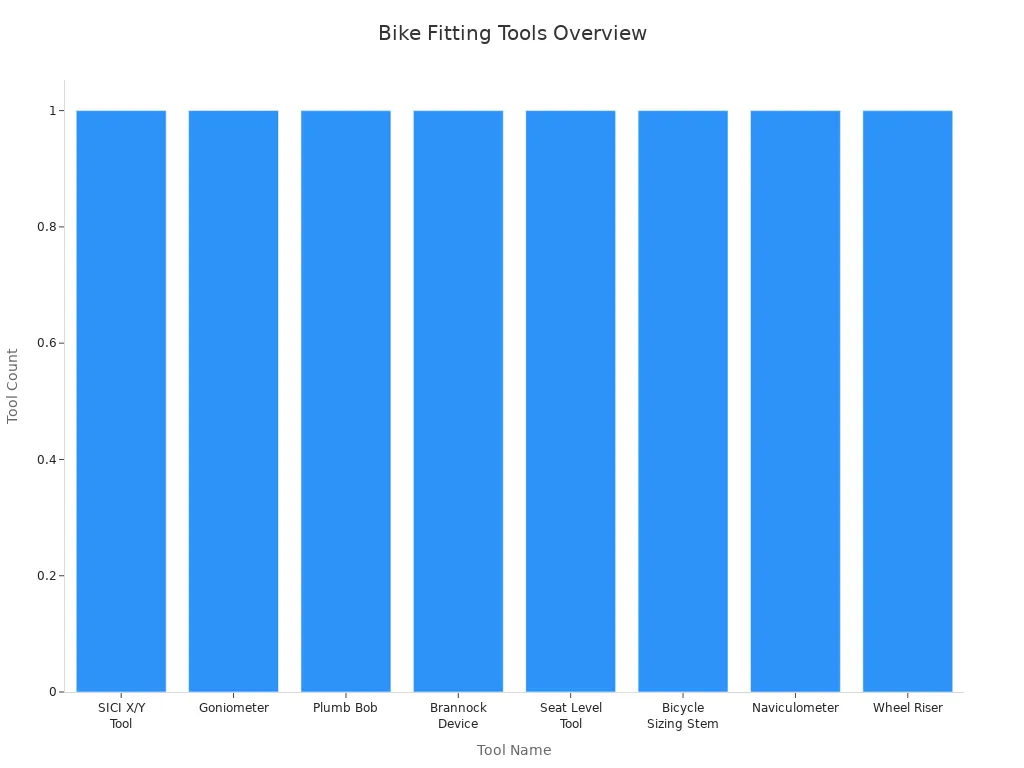
You can improve your bike fit by using special tools. These tools help you measure your body and your bike with great accuracy. For example, a goniometer checks your joint angles, while a plumb bob helps you see if your knee lines up with the pedal. A seat level tool makes sure your saddle is flat. The SICI X/Y tool measures how far your saddle and handlebars are from the bottom bracket. Each tool gives you clear numbers, so you can repeat your setup or compare different bikes.
Tool Name | Function / Measurement Purpose | How It Improves Accuracy |
|---|---|---|
SICI X/Y Tool | Measures handlebar and saddle positions relative to the bottom bracket, including stack and reach. | Gives you exact X/Y coordinates and helps you copy your position to other bikes. |
Goniometer | Measures joint angles and range of motion. | Shows if your leg extension is correct, helping you set saddle height. |
Plumb Bob | Checks knee alignment over the pedal axle. | Makes sure your knee is in the right spot for safe pedaling. |
Brannock Device | Measures foot length and width. | Helps you pick shoes that fit well and support your feet. |
Seat Level Tool | Checks saddle and handlebar angles. | Keeps your saddle flat, which prevents sliding and discomfort. |
Bicycle Sizing Stem | Lets you change handlebar reach and angle quickly. | Helps you find the best stem length and angle for your comfort. |
Naviculometer | Measures foot arch height. | Tells you if you need extra arch support for better power transfer. |
Wheel Riser | Holds your bike steady during fitting. | Makes it easier to record measurements without errors. |
Fit bikes are advanced tools that let you test different positions before you buy a new bike or change your current one. These tools work for all types of bikes, such as road, gravel, or mountain. They help you get the same fit, even if the bike shapes are different.
Listen to Your Body
Your body gives you important feedback during every ride. You should pay attention to any pain or discomfort. If you feel stretched out, you might be reaching too far for the handlebars. If your hands, wrists, or shoulders hurt, your handlebar width or angle may not match your body. A saddle that feels too high or low can cause knee pain. You may also notice numbness or tingling if your fit is not right.
Here are some signs that your fit needs work:
You reach too far for the bars and feel unsafe.
Your knees hurt or your hips feel tight.
Your seatpost or saddle is at an extreme angle.
Your feet hit the front wheel when you turn.
You feel pain in your neck, back, or hands.
If you notice these problems, start customizing the fit. Make small changes and test them on short rides. Your comfort should always come first.
When to Get a Pro Fit
Sometimes, you need help from a professional. You should see a bike fitter if you have pain that does not go away, if you ride long distances, or if you want to race. A pro will check your feet, hands, and seat position. They will also look at your flexibility and body shape. The fitter uses special tools and watches you ride to find the best setup.
An interview about your goals and riding habits.
Tests of your flexibility and body movement.
Careful measurements of your saddle, handlebars, and pedals.
Test rides and follow-up visits to make sure you stay comfortable.
Tip: If you change bikes, recover from injury, or notice new pain, a professional fitting can help you ride better and feel great.
You can achieve a perfect fit frame bike by following these steps:
Adjust saddle height, handlebar position, and stem length for comfort.
Test ride and make small changes until you feel great.
Listening to your body and experimenting with adjustments helps you avoid pain and enjoy every ride. If you need extra help, a professional fitting can boost your confidence and cycling performance. Start your journey to a perfect fit frame bike and discover how much more fun cycling can be!
FAQ
How do you measure your inseam for bike fitting?
Stand with your back against a wall. Place a book between your legs, push it up to your crotch, and measure from the top of the book to the floor. Repeat and average the results for accuracy.
What should you do if you fall between two frame sizes?
Choose the smaller frame. You can adjust the seatpost and handlebars for comfort. A smaller frame gives you better control and safety. Test ride both sizes if possible.
Why does standover height matter?
Standover height keeps you safe when you stop or get off your bike. You need at least 2–5 cm of clearance between your inseam and the top tube. This prevents injury and makes mounting easier.
Can you use the same bike fit for road and mountain bikes?
No, you need different fits. Road bikes use a lower handlebar for speed. Mountain bikes use a higher handlebar for control. Adjust your saddle and handlebars for each bike type.
When should you get a professional bike fit?
You should get a professional fit if you feel pain, buy a new bike, or want to improve performance. A fitter uses tools and checks your posture. This helps you ride comfortably and avoid injury.
See Also
How To Choose The Perfect Bike Frame For Yourself
Mountain Bikers Share Unexpected Advantages Of Small Frames
Top Strategies To Find Affordable Bike Frames In 2025