

Sandblasting your bike frame can significantly enhance its appearance and durability. This method effectively removes dirt, oils, and rust, preparing your frame for a fresh finish. A smooth surface from the sandblast bike frame process allows new paint to adhere better, ensuring your bike maintains its good looks for an extended period.
Many cyclists appreciate that sandblasted bike frames do not show fingerprints, making them easier to clean. If you’re looking for an affordable and eco-friendly way to rejuvenate your bike, sandblasting the bike frame might be the ideal solution!
Key Takeaways
Get your workspace and tools ready before you start sandblasting. This helps everything go smoothly and look better.
Always wear safety gear like masks and gloves. Safety is very important to avoid getting hurt while sandblasting.
Pick the right abrasive material for your bike frame. Using the right stuff stops damage and makes the finish better.
Keep a steady distance and angle while sandblasting. This method helps you get an even and professional look.
Clean the frame well after sandblasting. Good cleaning stops rust and helps the paint stick better.
Preparation for Sandblasting

Before you start sandblasting your bike frame, getting ready is very important. Using the right tools and equipment makes the job easier. It also helps you get a great finish. Let’s look at what you need.
Tools and Equipment
To sandblast your bike frame well, gather these important tools and equipment:
Sandblasting Cabinet: This is needed to hold the abrasive material. It keeps everything clean. Make sure it’s big enough for your bike frame.
Compressor: You need a strong compressor. For example, a Craftsman 4HP compressor with a 25-gallon tank rated at 7.0 SCFM works great.
Siphon Hopper Unit: This unit sends the abrasive into the air stream. It might take some time to work because of its duty cycle.
Abrasive Material: Pick the right media for your frame. Black beauty media is a common choice. But softer options like walnut shells or plastic beads are better for aluminum frames to prevent damage.
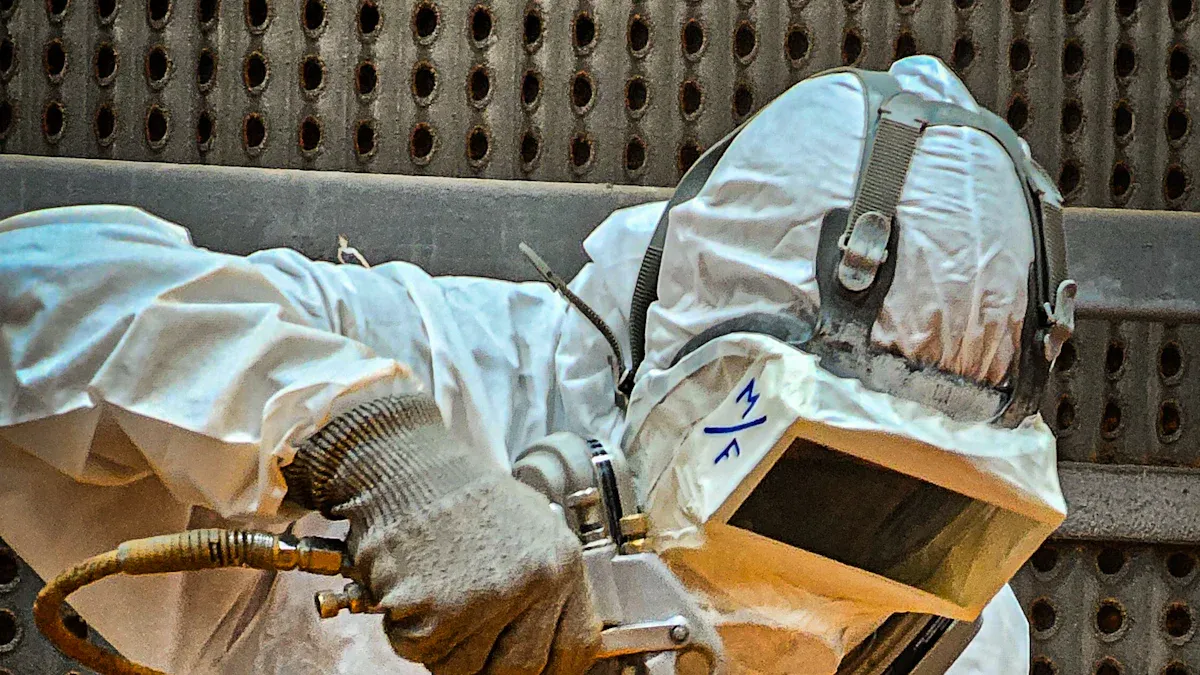
Protective Gear: Don’t forget your personal protective equipment (PPE). This includes respirators, gloves, and face shields to keep you safe from harmful particles.
When sandblasting bike frames, remember that round tubes can be hard to do. You’ll need to turn the frame to make sure all areas get enough blasting.
Safety Precautions
Safety should always come first when sandblasting. Here are some important precautions to follow:
Wear Appropriate PPE: Use an abrasive blasting respirator to protect your lungs from harmful particles. Face shields and helmets will stop skin irritation from flying debris. Don’t forget hearing protection to guard against loud noise.
Secure Your Workspace: Clear the area of any tripping hazards. A clean workspace lowers the chance of accidents.
Inspect Equipment: Before starting, check your blasting equipment for any damage. This helps avoid problems during the process.
Ventilation: Make sure your workspace has good airflow. Proper ventilation reduces harmful dust and fumes.
Understand Risks: Learn about common injuries from sandblasting, like silicosis from breathing in silica dust. Always wear protective gear and follow safety rules to reduce these risks.
By preparing well and focusing on safety, you set yourself up for a good sandblasting experience. This preparation protects you and helps your bike frame get the smooth finish it needs.
How to Sandblast Bike Frame
Now that you have your tools and workspace ready, it’s time to start sandblasting. Follow these steps to sandblast your bike frame safely and well.
Setting Up the Sandblaster
Setting up your sandblaster the right way is very important for a smooth finish. Here’s what to do:
Connect the Compressor: First, connect your air compressor to the sandblasting cabinet. Make sure all connections are tight to stop air leaks.
Choose the Right Nozzle: Pick a nozzle that fits your compressor output. Check the table below for the best settings:
Air Compressor Output
Gun Type
Nozzle Type
4-9 CFM
S-35 Small
Small Ceramic
10-15 CFM
S-35 Medium
Medium Ceramic / Medium Carbide
20-25 CFM
C-35-S Large
Large Ceramic
25+ CFM
High-Volume Gun
N/A
Adjust Air Pressure: Set the air pressure to about 120 PSI for most bike frames. This pressure helps you get a steady finish without hurting the material.
Load the Abrasive: Fill the siphon hopper with your chosen abrasive material. Aluminum oxide grit, size 80-100, works well for most frames.
Techniques for a Smooth Finish
To get a smooth finish, pay attention to detail and technique. Here are some tips to help you:
Maintain the Right Angle: Hold the blasting gun at a 45° to 60° angle. This angle helps avoid damage to the frame while covering it evenly.
Keep a Consistent Distance: Stay about 6 to 12 inches away from the frame. This distance allows for good blasting without harming the surface.
Use the Right Media: For gentler options, think about using silica or soda. These choices are less harsh and can help keep thinner metal frames safe.
Avoid Common Mistakes: Watch out for these common problems:
Using the Wrong Abrasive: Always pick an abrasive that fits your material.
Inadequate Safety Measures: Never skip safety gear and make sure there’s good airflow.
Incorrect Pressure Settings: Test pressure on a small area first.
Inconsistent Technique: Keep your distance and angle steady.
Ignoring Surface Preparation: Clean the surface well before starting.
Overlooking Cleanup: Follow local rules for disposal and clean your workspace.
By following these steps and techniques, you will be on your way to sandblasting your bike frame successfully. Remember, preparation and technique are key to getting that smooth, professional finish you want.
Post-Sandblasting Care
After you finish sandblasting your bike frame, it’s very important to clean and prepare it for painting. Taking care of it helps make sure your hard work gives you a smooth and strong finish.
Cleaning the Frame
Cleaning your frame after sandblasting is key to stop rust and help the paint stick. Here’s how to do it well:
Rinse the Frame: First, rinse the frame with water. This removes any loose abrasive material. It helps avoid scratches while cleaning.
Use Cleaning Agents: Use a cleaning agent like WD-40. This not only removes rust but also gets rid of moisture. It leaves a protective layer that lasts up to six months. You can also use automotive wax for extra rust protection.
Dry Thoroughly: After cleaning, dry the frame completely. Moisture can cause rust, so make sure no water is left on the surface.
Tip: Look at the frame closely and feel it for any problems like dents or rust spots. Fix these issues before you start painting.
Final Touches
Before you paint, do a few last steps to make sure the paint sticks well and looks great:
Sanding: Lightly sand the frame with P320 grit sandpaper. This smooths out any rough spots and removes hidden stickers, helping the paint stick better.
Suspension and Priming: Hang the frame at eye level for easy access. Put on a filling primer to cover any flaws. Use P320 grit followed by P500 grit for sanding. For the best durability, use a special adhesion primer before the filler primer.
Final Preparation: Make sure the surface is dry, clean, and free of grease. Don’t sand finer than P500 to keep good adhesion between layers.
By following these cleaning and preparation steps, you’ll get your bike frame ready for a professional-looking finish. Remember, taking the time to do this right will help you in the long run!
In short, sandblasting your bike frame gives it a smooth and strong finish. Here are some important points to remember:
Clean and check the frame well for a good finish.
Cover delicate parts of the frame to stop damage.
Pick the right abrasives to get the finish you want without hurting the frame.
Keep the air pressure between 90 and 100 PSI to avoid damage.
Make sure your workspace is safe for effective sandblasting.
By using these tips and safety steps, you can improve how long your bike frame lasts and how it looks. Enjoy sandblasting! 🚴♂️
FAQ
What type of abrasive should I use for my bike frame?
For steel frames, use aluminum oxide. For aluminum frames, choose softer options like walnut shells or plastic beads. These help prevent damage.
How long does the sandblasting process take?
The time depends on your frame’s size and condition. Usually, it takes about 30 minutes to an hour for good sandblasting.
Can I sandblast my bike frame indoors?
It’s better to sandblast outside or in a place with good airflow. This helps reduce dust and fumes, keeping you safe while you work.
What should I do if I notice rust after sandblasting?
If you see rust, clean it with a rust remover and sand it lightly. Then, put on a rust-inhibiting primer before painting.
Is sandblasting safe for all bike frame materials?
Sandblasting is safe for steel and some aluminum frames. But don’t use it on carbon fiber or delicate materials, as it can cause damage.
See Also
Applying Decals on Bike Frames for a Perfect Look
Best Methods to Eliminate Rust from Your Bike Frame
Essential Tips for Building Your Dirt Bike Frame Kit
Key Advice for Safely Painting Carbon Bike Frames
Simple Steps for Achieving Successful Bike Frame Powder Coating