
Welcome! You can master drawing bike frames with just a little practice and the right tools. This tutorial uses a step-by-step guide that starts with basic shapes. If you want to know how to draw a bike or how to draw a bicycle, gather your supplies first. Many artists recommend these essentials:
Quality erasers
A sturdy sketchbook
Ink pens for bold details
This tutorial makes drawing fun and helps you avoid common mistakes in riding bike frames drawing. Get ready to enjoy how to draw a bike step by step!
Key Takeaways
Begin your bike drawing by making two big wheels. Make sure they are spaced out the same. This helps you get the right size and shape.
Put marks in the middle of each wheel. This keeps your bike frame straight and even.
Draw the main triangle by joining the wheel centers with straight lines. Watch the angles so your frame looks real.
Add the fork and chain stays. Use the right lengths and angles. This finishes the bike’s shape and makes it look better.
Use easy shapes for things like the seat, handlebars, and pedals. Then, add more details and some shading to make your drawing look nice.
Step-by-Step Guide: Draw a Bicycle
Sketch the Wheels
Start your drawing by making two big circles for the wheels. These circles are the base for your bike frame. Use a ruler or compass to help make the circles round and even. Most guides say to draw the wheels first. The wheels help you get the right size for the rest of the bike. If you want to know how to draw a bicycle well, watch the size and space between the wheels.
Tip: Put the wheels far enough apart so the frame looks even. If the wheels are too close, the bike will look squished.
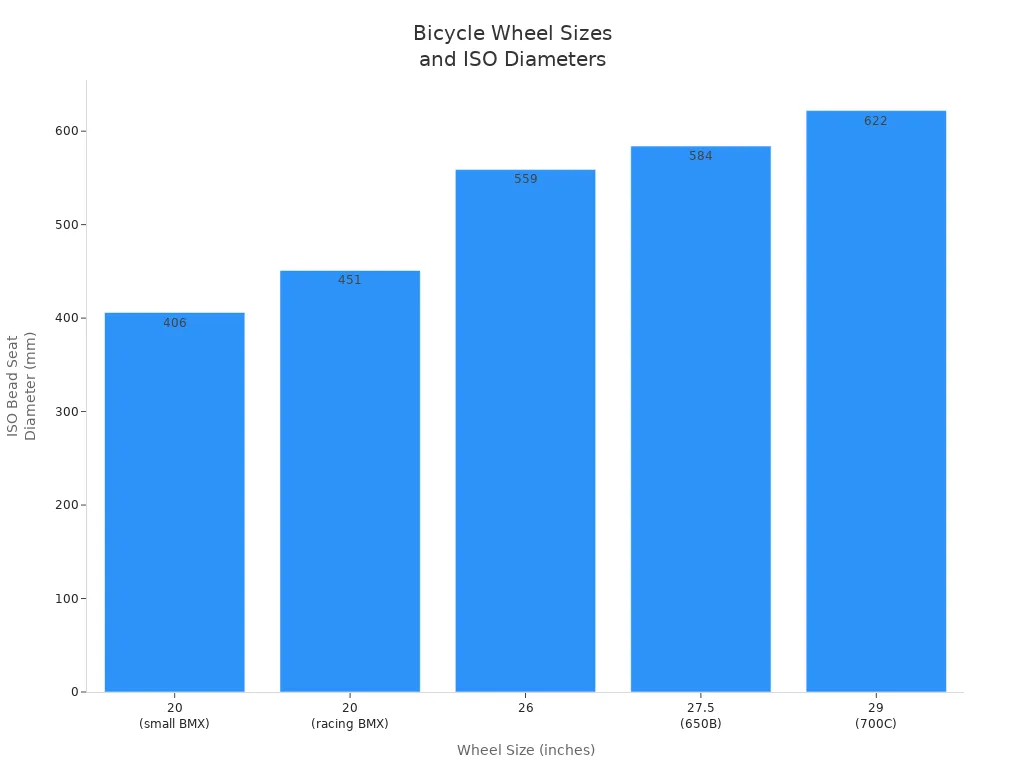
Here is a table that shows normal wheel sizes you can use for your drawing:
Wheel Size (inches) | ISO Bead Seat Diameter (mm) | Typical Application / Notes |
|---|---|---|
20 (small BMX) | 406 | BMX wheels for young/small riders, strong for jumps and stunts |
20 (racing BMX) | 451 | Lightweight BMX racing wheels, also used on classic British folding bikes |
26 | 559 | Common mountain bike wheel until early 2010s; outside tire diameter ~670 mm |
27.5 (650B) | 584 | Midway between 26 and 29 inch wheels; used for mountain bikes with knobby tires |
28 (various types) | 635 to 647 | Old English, Dutch, and classic bicycles; includes 700, 700A, 700B, 700C sizes |
29 (700C) | 622 | Popular for road, hybrid, touring, and cross-country mountain bikes; outside tire diameter ~740 mm |
32 | N/A | Used on unicycles and some bicycles for taller riders |
36 | N/A | Developed for taller riders |
Mark the Wheel Centers
Once you finish the wheels, mark the centers of each one. The centers help you know where to put the frame and other parts. Use math to find the middle of every circle. You can use a ruler to measure across the circle and mark the halfway spot. This step helps you keep both sides of the bike the same.
Lining up the wheels right keeps them in the center of your drawing.
Good alignment makes your bike frame look neat and even.
If the wheels are not lined up, the bike will look crooked and the frame may not fit right.
You need to use careful measuring and triangulation to mark the wheel centers. For example, measure from the bottom bracket to the front axle. This way, you keep the right shape and size. If you follow this step-by-step guide, your drawing will look more real and neat.
Remember, every good bike drawing starts with careful planning. Take your time with these steps, and your finished bike will look great.
Frame Structure in Riding Bike Frames Drawing
Draw the Main Triangle
You start building the core of your bicycle by connecting the wheel centers with straight lines. This step forms the main triangle, which includes the top tube, seat tube, and down tube. The triangle gives your riding bike frames drawing its strength and shape. Use your ruler to draw each tube. Make sure the lines are straight and meet at the right points.
The seat tube usually sits at an angle between 71 and 75 degrees. This angle helps position the rider for comfort and efficient pedaling. The top tube does not have a standard angle, but its length affects the size and fit of the bicycle frame. The down tube connects the bottom bracket to the head tube. You can see these standard measurements in the table below:
Tube Type | Standard Angle / Measurement | Notes |
|---|---|---|
Seat Tube | 71-75 degrees | Angle relative to horizontal; affects rider position and bike handling. |
Top Tube | N/A (effective horizontal length) | No standard angle; length used for sizing instead of angle. |
Down Tube | N/A | Not explicitly mentioned or standardized in the sources. |
When you draw the triangle, pay attention to the angles. Steeper seat tube angles make the bike feel more responsive, while slacker angles give a stable and comfortable ride. Road bikes often use a horizontal top tube and longer wheelbase for comfort. Mountain bikes use sloping top tubes for better standover clearance and control.
Tip: Always connect the tubes at the wheel hubs, not the tire edges. This keeps your riding bike frames drawing realistic and proportional.
Many beginners struggle with this part of the tutorial. You might place the wheels too close, causing the front wheel to overlap with the down tube. Some try to fix this by drawing smaller wheels, but this makes the rear part look too long. Remember, the fork holding the front wheel angles forward, creating space between the down tube and the wheel. The seat tube should angle backward, so the rider sits in the right spot for pedaling. The top tube and down tube meet at the head tube, not just a simple point.
Here are common challenges you may face:
Placing wheels incorrectly, causing overlap with the down tube.
Drawing smaller wheels, which distorts proportions.
Forgetting the fork angles forward, creating space.
Not angling the seat tube backward for proper rider position.
Overlooking the head tube connection.
Struggling with complex geometry and non-intuitive angles.
Skipping step-by-step instructions, leading to mistakes.
You can avoid these mistakes by following each step in the tutorial and checking your measurements as you go.
Add Fork and Chain Stays
After you finish the main triangle, you add the fork and chain stays. These parts connect the wheels to the triangle and complete your riding bike frames drawing. The fork holds the front wheel and passes through the head tube. The chain stays run from the bottom bracket to the rear dropouts and rear axle.
Use your ruler to measure the length of each stay. Road bikes usually have shorter chain stays, around 41 cm, for quick handling. Touring bikes use longer chain stays, about 46 cm, for stability. The fork rake, or offset, is about 40 mm for road bikes and 45 mm for touring bikes. You can see these measurements in the table below:
Component | Typical Length/Measurement | Attachment Points Description |
|---|---|---|
Chainstay | ~46 cm (touring), 41 cm (road) | Connects bottom bracket to rear dropouts and rear axle |
Fork Rake (Offset) | ~45 mm (touring), 40 mm (road) | Distance front wheel dropout is moved forward from head tube axis; fork passes through head tube housing headset assembly |
When you draw the fork, make sure it angles forward from the head tube. This creates space for the front wheel and affects how the bike handles. Chain stays should connect from the bottom bracket to the rear axle, forming a straight line. If you draw a mountain bike, use longer chain stays and a slacker head tube angle for more stability. Road bikes need shorter chain stays and steeper angles for quick steering.
Note: Always measure from the wheel center to the frame connection points. Use quality measuring tools and mark your points clearly. Sight directly above your ruler to avoid errors. Draw ‘V’ shaped marks to show exact measurement spots.
You can use full-size drawings and adjustable bevels to transfer angles accurately. Advanced tools like digital calipers help with precise measurements, but you can achieve good results with careful layout and marking. Clamp parts together and mark across all pieces for perfect alignment.
The geometry of your riding bike frames drawing changes how the bike looks and feels. Steeper angles and shorter stays make the bike look sporty and agile. Longer stays and slacker angles give a stable, comfortable style. Materials and paint schemes add to the visual appeal. Every choice you make in your drawing shapes the ride quality and the look of your bicycle frame.
🚲 Quick Check: Before you finish, review your connections. Make sure every tube meets at the right spot. Double-check your angles and lengths. This step helps your riding bike frames drawing look professional and accurate.
How to Draw a Bicycle: Add Components
Seat and Seat Post
You can start by sketching a simple rectangle or oval for the seat. Place it above the seat tube, making sure it sits level or with a slight upward tilt. The seat post connects the seat to the frame. Draw a straight line from the seat down into the seat tube. Most bike seats use a clamp to hold them in place. You can use a small rectangle to show the clamp in your drawing.
Here is a table showing common seat post types and their features. This helps you understand how to represent them in technical drawings:
Seatpost Type | Material | Features/Specs | Clamp Style | Offset (mm) | Notes |
|---|---|---|---|---|---|
Origin8 Compe-Lite | Aluminum 6000 | Single-bolt adjustable clamp, lightweight and durable | Single-bolt clamp | N/A | Available in many colors |
Sunlite Adjustable Suspension | Aluminum | Coil spring suspension, adjustable preload, micro-adjust seat clamp | Micro-adjust clamp | N/A | Provides plush suspension |
Dimension Suspension | Aluminum | Suspension seatpost, 35mm travel, standard rails clamp | Std Rails | 0 | Max height 255mm, min height 130mm |
Whisky Parts Co. No.7 | Carbon + forged aluminum head | Carbon shaft absorbs trail chatter, lightweight, durable | N/A | N/A | Designed for cross and trail use |
Cane Creek Thudbuster ST | Aluminum | Suspension seatpost, 50mm travel, tool-free elastomer change, single-bolt clamp | Single-bolt clamp | N/A | High rider weight limit (330lbs) |
Ritchey WCS 1-Bolt | 3D Forged 7050 Alloy | Single bolt side load clamp, multiple diameters and lengths, 20mm offset | Single bolt side load | 20 | Includes 7x7mm saddle rail clamp, torque spec 12Nm |
RockShox Reverb AXS | Aluminum | Dropper post, multiple travel options (100-250mm), compatible with all rail types | N/A | N/A | Air-over-air design, active platform for climbs |
Thomson Covert Black | Aluminum | Dropper post, internal routing, multiple travel options (60-150mm), ISO tested | Thomson saddle clamps | N/A | Cartridge-based system, durable seals |
RaceFace Next | Carbon | Lightweight, 2 bolt design, rubber grommet seal, compatible with alloy and carbon rails | 2 bolt clamp | N/A | Tilt adjustment 6° up, 12° down |
ENVE Composites | Carbon Fiber | Twin-bolt design, titanium hardware, adjustable saddle angle 0-27°, compatible with carbon and alloy rails | Twin-bolt clamp | N/A | Torque spec 5.5Nm clamp bolts |
Tip: Use simple shapes for the seat and seat post in your drawing. You can add details later.
Handlebars and Stem
Draw the handlebars by sketching a straight or slightly curved line from the top of the head tube. The stem connects the handlebars to the frame. You can use a short rectangle or cylinder for the stem. For road bikes, place the handlebars below the seat height. This gives a sporty look. For mountain bikes, keep the handlebars level with or above the seat for comfort.
Road bike handlebars usually form a 90-degree angle between your torso and upper arm. You should add a slight bend to the elbows in your drawing. Mountain bike handlebars often have an up sweep of about 5 degrees and a back sweep of 8 degrees. Handlebar width is usually around 780mm. You can adjust the rise and sweep to match your style.
Note: Rotate the handlebars so your wrists look neutral in the drawing. Place the brake levers inward for better control.
Pedals and Crank
Draw the crank as two straight lines coming out from the bottom bracket. Each line should be equal in length. Add a small rectangle or oval at the end of each crank to show the pedals. Make sure the pedals sit flat and look balanced in your drawing.
Crank length depends on rider height. Use the table below to match crank length to rider size. This helps your drawing look realistic.
Rider Height Range (cm) | Recommended Crank Length (mm) |
|---|---|
Up to 160 | Up to 160 |
160 to 170 | Around 165 |
170 to 180 | Around 170 |
180 to 190 | Around 172.5 |
190 to 200 | Around 175 |
200 to 210 | Around 177.5 |
Over 210 | Around 180 |
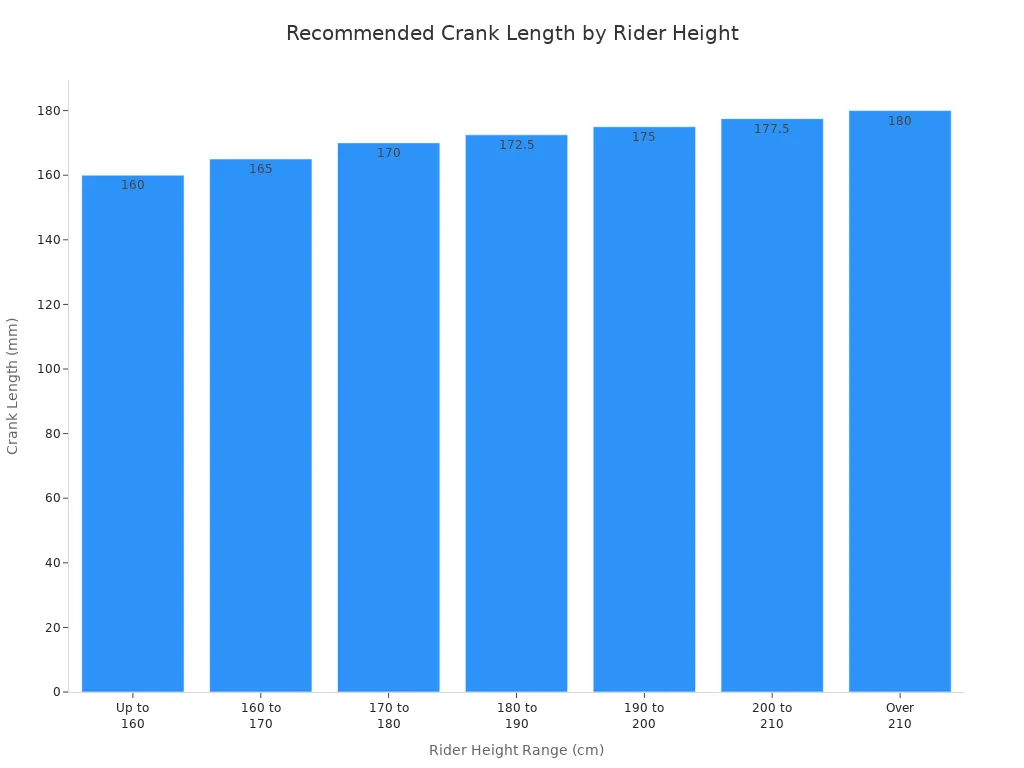
Longer cranks give more leverage, but they need more joint movement. Shorter cranks help with faster pedaling and less strain. You can choose crank length based on the rider you want to show in your drawing.
🚲 Tip: Use circles and rectangles for pedals and cranks. Refine the shapes after you finish the basic layout.
Drawing a Bicycle: Details and Finishing Touches
Outline and Refine
You can make your drawing stand out by outlining the frame and refining each part. Start with quick contour sketches to get the shape of the bike. This helps you relax and see the outline better. Next, use a sharp pencil to trace over the main lines. Focus on the tubes, wheels, and joints. Try to keep your hand steady for clean lines.
Professional illustrators suggest moving from loose sketches to detailed graphite drawings. You can look at real bikes or photos to check your details. Add small parts like hubs, brakes, and bolts. If you want more depth, use charcoal to darken some areas. This step makes your drawing a bicycle look more realistic.
Tip: Combine different studies and try using both hands for quick sketches. This builds your skills and helps you feel confident.
Add Gears and Spokes
Now you can add gears and spokes to your drawing. Draw the gears near the pedals. Use circles and small rectangles to show the chainrings and cogs. For the spokes, start at the center of each wheel and draw straight lines out to the rim. Try to space the spokes evenly. Most bikes have 32 or 36 spokes per wheel, but you can draw fewer for a simple look.
You can also add details like the chain, derailleurs, and even small logos. These touches make your drawing a bicycle look finished and complete.
Draw gears with overlapping circles for a layered effect.
Use a ruler for straight, even spokes.
Add tiny details like nuts and bolts for extra realism.
Shading and Color
Shading and color bring your drawing to life. Begin by looking at where the light hits the bike. Shade the frame with a soft pencil or brush, pressing lightly for bright spots and harder for shadows. Add a dark color to the main parts, such as the frame and handlebars, to create depth. Use lighter colors for small details like screws and rims.
You can use colored pencils or markers to add color. Start by outlining the bike parts with a darker pencil. Fill in large areas with smooth strokes. Pick colors that look good together. Blend colors with a blending pencil or cotton swab for smooth transitions. Add highlights with white paint or pencil to make the frame shine.
Note: Always clean up smudges and refine your lines at the end. This makes your drawing a bicycle look neat and professional.
You get better at drawing when you practice often. Making mistakes helps you learn new things. Keep trying different bike frame styles to improve. Here are some ways to stay excited:
Draw a little every day to feel more sure and get better.
Split hard drawing jobs into easy steps so you don’t get upset.
Use drafting boards, compasses, and graph paper for neat drawings.
Try drawing diamond frames, step-through frames, and old designs.
Remember, “Every artist started as a beginner.” Keep drawing and let your creative ideas get bigger.
FAQ
How do you start a bike frame drawing if you are a beginner?
You should begin with two circles for the wheels. Use a ruler or compass for accuracy. Mark the centers. This step helps you build the rest of your drawing with the right proportions.
What tools help you make your bike frame drawing more accurate?
You can use pencils, rulers, and a compass. These tools help you keep lines straight and circles round. Good tools make your drawing look neat and professional.
Why does your drawing sometimes look uneven or crooked?
If your wheels or frame lines do not line up, your drawing may look off. Always check your measurements. Mark the wheel centers and use straight lines for the frame.
Can you add your own style to a bike frame drawing?
Yes! You can change the frame shape, add colors, or try different handlebars. Drawing lets you show your ideas. Try new styles to make your drawing unique.
How do you fix mistakes in your drawing?
Use an eraser to remove lines you do not like. Draw lightly at first. This way, you can fix your drawing easily. Practice helps you make fewer mistakes over time.
See Also
Key Supplies Needed To Construct A Custom Bike Frame
Top Ten Unique Bike Frame Ideas To Boost Imagination
Important Gas Bike Frame Advice For Every Builder
Simple Three Step Guide To Perfect Bike Frame Coating
Comprehensive Welding Guide For Constructing Drift Trike Frames