
Protecting your bike frame from scratches and damage is crucial. You want your bike to look great and last longer, right? Installing bike frame armor offers several benefits. It helps prevent damage from rocks and debris, reduces scratches, and even maintains your bike’s resale value. Plus, it keeps your bike looking fresh! To get started, you’ll need a few materials: bike frame armor, cleaning supplies, a squeegee, and a wetting agent. Let’s dive into the steps to give your bike the protection it deserves!
Key Takeaways
Clean your bike frame well with isopropyl alcohol. This helps the armor stick better and stops it from peeling.
Pick the right protective film. Consider how strong it is, how easy it is to use, if it works with your bike material, and your riding style.
Use a wet method with a slip solution. This helps you place the film easily and keeps bubbles away during installation.
Carefully align the film. Use a squeegee to push out air bubbles and hold the armor in place for a smooth, lasting finish.
Let the armor set for 24 hours after you install it. Take care of your bike to keep the protection working and your bike looking new.
Frame Cleaning
Before you put on the bike frame armor, you must clean your bike frame. A clean surface helps the protective film stick well. This stops peeling or bubbling later. You need to get rid of all dirt, grease, and anything else that might stop it from sticking.
Supplies Needed
To start, gather these supplies:
Isopropyl alcohol (IPA): This is great for cleaning. It’s safe for many bike frame materials and won’t hurt the paint.
Microfiber cloth: Use this to wipe the frame without leaving lint.
Spray bottle: Fill it with IPA for easy use.
Squeegee: You will need this later to smooth out the film.
Cleaning Techniques
First, spray isopropyl alcohol directly on the frame. Then, take your microfiber cloth and wipe every part of the surface. This method removes dirt and grease well.
Tip: Watch out for common things that can stick. Lint from clothes and pet hair can stick to the sticky side of the protection film. This can cause problems when you install it. To prevent this, keep pets away and clean your area well.
Isopropyl alcohol is better than stronger cleaners like acetone or lacquer thinner. It cleans well without hurting your bike’s finish. If you’re not sure about your bike’s paint, test the IPA on a small hidden spot first. Many people find that IPA works great, even on tough matte finishes.
By cleaning your bike frame well, you prepare for a good installation of your bike frame armor. A clean surface means better sticking and a longer-lasting protective layer.
Preparing Bike Frame Protection
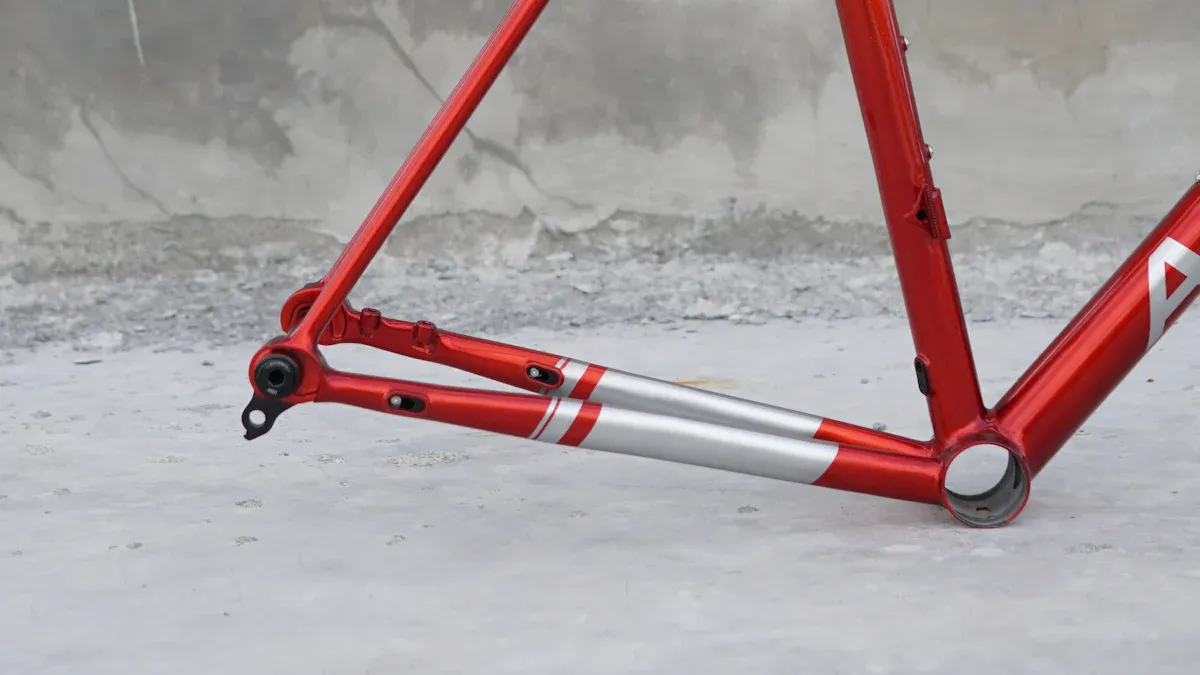
Now that your bike frame is clean, you need to get the bike frame protection ready. This step is very important. It makes sure the armor fits well and sticks to your bike. Let’s split this into two parts: picking the right film and cutting it to size.
Choosing the Right Film
When you pick a bike frame protection film, you have many choices. The most common choice is polyurethane-based tape, like Racer Tape. This film was made for helicopter blades. It is strong and flexible. It comes in different thicknesses, usually 8 mil (203 microns) and 14 mil (355 microns). The 8 mil version is strong and easy to use.
Here are some things to think about when choosing your film:
Durability and Longevity: Find protection that can handle regular use.
Ease of Application and Removal: Pick products that are easy to apply and remove without hurting your bike frame.
Compatibility with Frame Materials: Make sure the film works with your bike’s material, like aluminum, carbon, steel, or titanium.
Protection Level and Coverage Area: Choose protection that fits the risks of your riding conditions.
Appearance and Transparency: Look for a film that keeps your bike’s look with little visual change.
Cost and Value: Compare price with how well it works.
When you think about your riding style and where you ride, you can find the best protection for you. For example, if you ride on gravel or rough trails, you might want a thicker film for more strength.
Cutting to Size
After you pick the right film, it’s time to cut it to size. Before you put on the protection film, dry fitting is very important. This means you should place the film on the bike frame without taking off the sticky backing. This helps you check that the film fits right and lines up with other parts. It helps avoid common mistakes like air bubbles and misalignment, which can cause peeling edges later.
To make cutting easier, think about using a wetting agent. A simple mix of baby shampoo and water can help slow down the sticky bond. This gives you more time to place and adjust the film correctly. Here are some benefits of using a wetting agent:
It lets you peel off parts of the film if needed, allowing small changes without hurting the sticky side.
It helps with the squeegeeing process by pushing out water from under the protective panel, making a stronger bond.
It cuts down on bubbles and dust trapped under the film, making the installation better.
Using a wetting agent is like putting a protective film on a phone screen. It helps with alignment and sticking, especially on curved areas.
By carefully picking the right film and cutting it to size, you prepare for a good installation of your bike frame protection.
Applying Moisture
Now that you’ve prepared your bike frame and cut the protection film to size, it’s time to apply moisture. This step is crucial for making the installation process smoother and more effective.
Wet Application Method
Using a wet application method helps you position the film accurately. You can create a slip solution by mixing a few drops of baby shampoo with water. This mixture allows the film to slide easily over the frame, giving you time to adjust its placement before it sticks.
Here’s how to make your slip solution:
Frame Finish | Film Finish | Concentrate Amount (drops or mL) | Water Volume |
|---|---|---|---|
Gloss | Gloss | 1 liter | |
Matte | Gloss | 1 to 2 drops (0.125 to 0.25 mL) | 1 liter |
Gloss | Matte | 1 to 2 drops (0.125 to 0.25 mL) | 1 liter |
Matte | Matte | 0.5 to 1 drop (0.0625 to 0.125 mL) | 1 liter |
Make sure to use a clean spray bottle to avoid contamination. Stir the solution well for consistency.
Benefits of Moisture
Moisture plays a vital role in the installation process. Here’s how it helps:
You can spray the slip solution onto both the bike frame and the protection film pieces.
This moisture creates a lubricated surface, allowing you to position and reposition the film easily.
The more slip solution you use, the easier it is to adjust the placement of each piece.
After you’ve positioned the film, remove moisture from the edges to increase adhesion and lock the film in place.
If needed, you can apply more slip solution to reset pieces.
Light heat can help dry out the slip solution and secure the edges, but avoid excessive heat.
By using moisture effectively, you ensure that the film adheres properly while allowing for adjustments during installation. This step is essential for achieving a clean, bubble-free finish on your bike frame.
Positioning the Tape
Now that you’ve prepared everything, it’s time to position the tape on your bike frame. This step is crucial for ensuring that the protection adheres properly and looks great. If you don’t align the film correctly, you might end up with gaps or bubbles that can ruin the appearance and effectiveness of the protection.
Aligning the Film
Start by carefully aligning the film on the bike frame. Make sure it’s centered and positioned correctly. You can use a measuring tape or ruler to check the dimensions of the area you’re covering. This helps you avoid mistakes and ensures a snug fit.
Tip: If you’re using a tailored protection kit, it often comes with pre-cut pieces that fit specific bike models. This can make alignment much easier and reduce waste.
Tips for Placement
Here are some helpful tips to ensure accurate placement and avoid those pesky air bubbles:
Clean the Frame: Always clean the bike frame thoroughly before applying the tape. This ensures proper adhesion and prevents peeling edges.
Wet the Surface: Use a slip solution on both the frame and the adhesive side of the tape. This allows for easier positioning and reduces the chance of bubbles.
Gentle Placement: Place the tape gently on the frame without pressing too hard initially. This gives you time to adjust its position.
Use a Squeegee: After positioning, use a squeegee or credit card to push out water and air bubbles from the center towards the edges. This ensures full adhesion.
Final Inspection: Once you’ve applied the tape, take a moment to inspect it. Look for any remaining air bubbles or lifting edges. If you see any, gently lift the tape and reapply it.
By following these steps, you’ll achieve a clean, bubble-free finish that maximizes the protection your bike frame needs. Remember, taking your time during this process pays off in the long run!
Securing Bike Frame Armor

Now that you’ve positioned the tape correctly, it’s time to secure the bike frame armor. This step is essential for ensuring that the protection adheres well and lasts a long time. You’ll want to use a squeegee to help with this process.
Using a Squeegee
A squeegee is your best friend when it comes to securing bike frame armor. It helps you remove air bubbles and ensures that the film sticks properly. Here’s how to use it effectively:
Start from the Center: Begin at the center of the film and work your way outward. This technique pushes air bubbles toward the edges, where they can escape.
Apply Gentle Pressure: Use firm but gentle pressure. You want to avoid damaging the film while ensuring it adheres well to the frame.
Keep the Surface Wet: If you used a slip solution, keep the surface wet while you work. This allows for smooth movement and repositioning if needed.
Inspect for Bubbles: After you’ve gone over the entire area, check for any remaining air bubbles. If you find any, gently lift the film and reapply it while using the squeegee to push the air out.
Using a squeegee not only improves adhesion but also extends the longevity of the bike frame armor. When you remove air bubbles, you prevent dirt and moisture from getting trapped underneath, which can lead to peeling or premature wear.
Final Touches
Once you’ve secured the film, it’s time for the final touches. This step ensures everything looks neat and functions well.
Trim Excess Material: If there’s any excess film hanging over the edges, carefully trim it with a sharp knife or scissors. This gives your bike a clean finish.
Dry the Edges: Use a microfiber cloth to dry any moisture around the edges. This helps the film stick better and prevents lifting.
Apply Heat: If you notice any stubborn areas, applying gentle heat can help the film conform better to curves and edges. Just be careful not to overheat it.
Curing Time: Allow the bike frame armor to cure for about 24 hours before riding. This time lets the adhesive bond properly, ensuring a secure fit.
By following these steps, you’ll have a well-secured bike frame armor that not only protects your bike but also enhances its appearance. Remember, taking your time during this process pays off in the long run!
Installing bike frame armor offers you great benefits. It helps protect your bike from scratches, chips, and cable rub. Plus, it keeps your bike looking fresh and new. By following these five easy steps, you can ensure a secure fit that lasts.
To extend the life of your bike frame armor, consider these tips:
Use frame protectors or tapes to shield your bike from damage.
Store your bike in a secure, dry place to avoid environmental harm.
So, why wait? Take action today and protect your bike for better performance and longevity!
FAQ
What is bike frame armor?
Bike frame armor is a protective film that you apply to your bike frame. It guards against scratches, chips, and other damage, helping to keep your bike looking new.
How long does bike frame armor last?
With proper installation and care, bike frame armor can last several years. Factors like riding conditions and maintenance can affect its lifespan.
Can I remove bike frame armor?
Yes, you can remove bike frame armor. Use a heat source like a hairdryer to soften the adhesive, making it easier to peel off without damaging the paint.
Is bike frame armor waterproof?
Yes, most bike frame armor is waterproof. It protects your bike from moisture and prevents water damage, ensuring your frame stays in great condition.
Can I apply bike frame armor myself?
Absolutely! You can install bike frame armor yourself with the right tools and techniques. Follow the steps in this guide for a successful installation.
See Also
Effective Methods To Keep Your Bike Frame Safe
Three Simple Steps For Perfect Powder Coating Results
Must-Know Tips To Safeguard Your Bike Frame Properly