

You love your bike, so it makes sense to want to protect your bike from scratches and everyday damage. Taping your frame is a simple way to boost bike frame protection without breaking the bank. Many riders use clear film, electrical tape, or special kits to tape bike frame areas that see the most wear.
When you tape your frame, you can avoid chips, rub marks, and shuttle wounds:
The tape acts as a shield, taking the hits so your paint stays fresh.
You can swap out worn tape instead of paying for costly repairs.
Removing the tape later often reveals a shiny, undamaged frame.
Beginners and casual cyclists find these methods easy and quick for lasting protection.
Key Takeaways
Taping your bike frame helps stop scratches and chips. It keeps your bike safe from damage. Your bike will look new for a longer time.
Clear film tape gives strong protection. It lasts a long time. It lets you see your bike’s paint. It does not turn yellow.
Electrical tape is cheap and fast to use. It works well for short-term protection. Use it on chainstays and places where cables rub.
Frame protection kits have pieces cut to fit your bike. They cover your bike neatly. These kits can cost more. You need to install them carefully.
Always clean your bike frame before you tape it. Put the tape on slowly to stop bubbles. Check the tape often to see if it is worn out.
Bike Frame Protection Tape
Clear Film
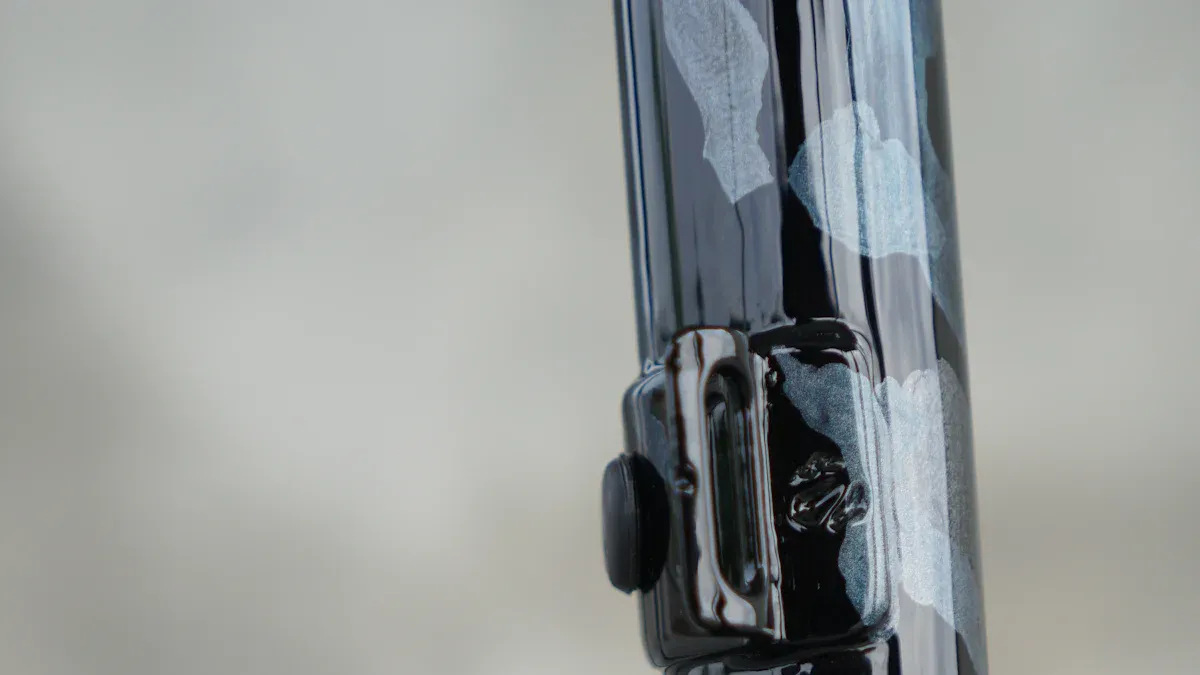
Clear film is a great way to keep your bike looking new. Many brands sell this bike frame protective tape. Some top brands are All Mountain Style, 3M Scotchgard, DYEDBRO, Lizard Skins, VeloSkin, Ground Keeper, ISC Racers Tape, RideWrap, Muc-Off, and Roost MX. These brands give you choices for coverage, strength, and style.
Clear film is see-through, so your bike still looks the same. It stops scratches and bumps from hurting your bike. Good brands like 3M Scotchgard and VViViD tape block UV rays and do not turn yellow. You can take off the film without sticky mess or paint damage.
Here are some popular brands and what they offer:
Brand | Features & Coverage | Price Range | Notes |
|---|---|---|---|
All Mountain Style | Strong, cool honeycomb patterns | $31-$97 | Won’t turn yellow |
3M Scotchgard | Clear, car-grade, easy to cut | $25 | Hard to see on your bike |
DYEDBRO | Custom designs, artist styles | $45 | Fits most bikes |
RideWrap | Covers almost all of your frame | $35-$125 | Best for new bikes |
Application Areas
Put tape on the parts that get hit the most. The best bike frame protection tape works well on:
Downtube (rocks and trail stuff)
Top tube (knees and bag straps)
Chainstays (chain slap and bouncing)
Cable rub spots
Crank arms (feet touch here)
These spots get damaged a lot when you ride. Protecting them keeps your bike nice.
How to Apply
First, clean and dry your bike frame. Cut the bike frame protective tape to fit each spot. Peel off the backing and stick the tape on. Use a squeegee or card to smooth out bubbles. Go slow and be careful. Good prep and careful work help the tape last longer.
Tip: Cutting your own tape fits better than buying precut kits, especially for odd shapes.
Pros & Cons
Product / Brand | Pros | Cons |
|---|---|---|
Cheap, easy to use, works wet or dry | You need to be careful to avoid bubbles | |
All Mountain Style Honeycomb | Thick, strong, fun patterns, simple to put on | Does not cover everything, hard to use on curves |
invisiFRAME | Cut to fit, fixes itself, light, hard to see | Costs more, hard to put on, needs water |
RideWrap | Custom kits, fixes itself, hard to see | Kits cost more, hard to install |
Clear film gives strong protection and keeps your bike looking good. It works on both carbon and aluminum frames. You get long-lasting safety from damage, but putting it on takes time and care.
Tape Bike Frame with Electrical Tape
Best Uses
Electrical tape gives you a quick and cheap way to protect your bike from damage. Many riders use it on chainstays to stop chain slap and chain suck. You can also tape bike frame spots where cables rub or where bag straps touch the paint. Electrical tape works well for temporary fixes or when you want to try out different protection methods. You can even use old inner tubes for extra padding. The tape comes in many colors, so you can match your bike or add a pop of style. If you want to tape those spots that get hit the most, electrical tape is a solid choice.
Application Tips
You want the tape to stick well and last. Here are some tips to help you get the best results:
Clean and dry the area before you tape bike frame sections. Dirt and grease make the tape peel off.
For curved tubes, warm the tape with a hair dryer. This helps it stretch and fit better.
Cut small slits in the tape so it wraps around bends without bunching up.
If you see bubbles, poke them with a pin and press the tape flat.
Leave a small gap at the bottom of the taped area. This lets water escape and keeps your frame dry.
Step-by-Step
Follow these steps to tape bike frame areas with electrical tape:
Wipe down the frame with a clean cloth and rubbing alcohol.
Start at the top of the tube and wrap the tape downward. Overlap each layer a little.
Use long strips for chainstays or cable rub points. Press the tape down as you go.
For tight curves, warm the tape and make small cuts so it fits smooth.
Finish by pressing the tape flat and checking for bubbles.
Inspect the tape often. Replace it when it starts to wear or peel.
Pros & Cons
Pros | Cons |
|---|---|
Wears out faster than special frame tapes | |
Quick to apply and remove | Not as tough for long-term protection |
No sticky mess when you peel it off | May need frequent replacement |
Good for testing or temporary fixes | Less coverage for big impacts |
Lots of color choices | Not designed for carbon frame protection |
Electrical tape costs much less than most frame protection kits. Check out this price comparison:
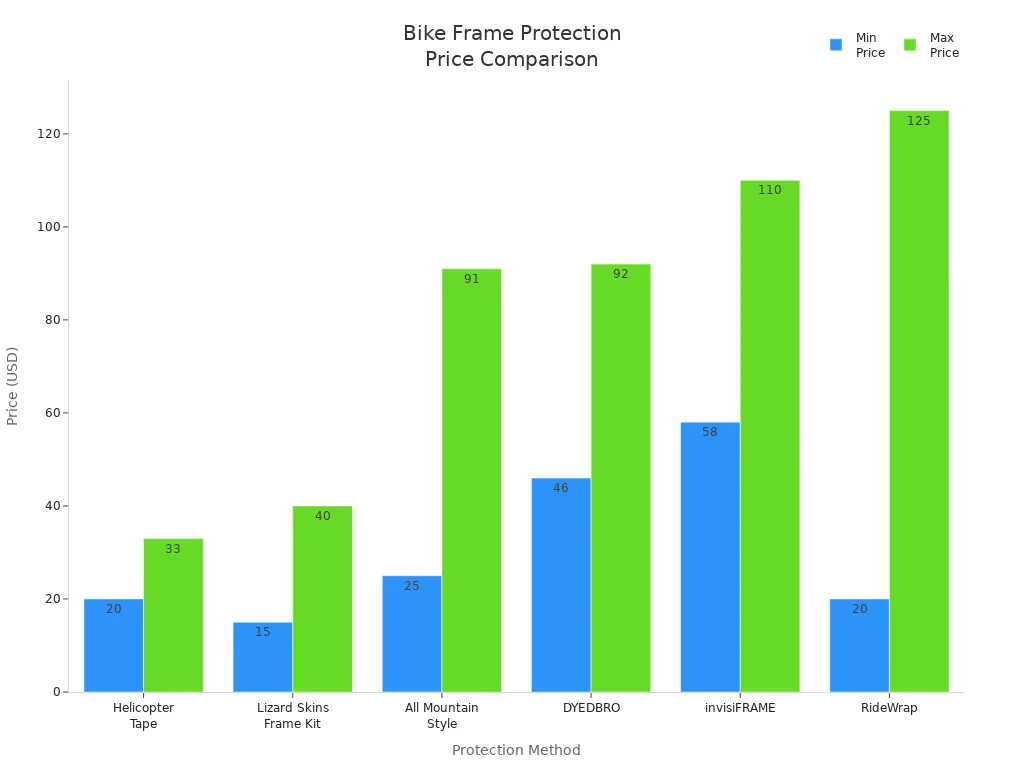
You can tape bike frame spots for just a few dollars, while other methods cost much more. If you want to stop damage fast and on a budget, electrical tape is a smart pick.
Frame Protection Tapes & Kits
What’s Included
When you buy frame protection tapes or kits, you get more than just a roll of tape. Most kits come with pre-cut pieces that fit the main parts of your bike. You might see shapes for the downtube, top tube, chainstays, and even fork legs. Some kits include extra patches for cable rub or crank arms. Many brands use tough, weatherproof materials that stick well and last a long time. Some even have anti-slip or water-resistant coatings to keep your bike safe in all conditions.
Here’s a quick look at some popular frame protection kits and what they offer:
Frame Protection Kit Brand | Key Features | Kit Types / Variants |
|---|---|---|
Muc-Off Frame Protection Kits | Ultra-tough Cube-Tec material, weatherproof 3M adhesive, universal fit, easy to install, stylish designs | Graphical kits, clear kits, complete bundles |
Clear Skinz Kits | Self-healing, non-yellowing, stain resistant, universal fit, options for different bikes and budgets | MTB, gravel, budget, universal, DIY kits |
Installation
You don’t need to be a pro to install frame protection tapes, but you do need patience. Start by cleaning your bike frame with rubbing alcohol. Make sure the surface is dry. Lay out the pieces and match them to the right spots. Peel off the backing and press each piece onto the frame. Use your fingers or a soft cloth to smooth out bubbles. Some kits need a little heat from a hair dryer to help the tape stick better, especially on curves.
Tip: Always follow the instructions from the kit’s maker. Each brand has its own tricks for the best fit and longest-lasting protection.
Best Practices
Want your bike frame protective tape to last? Here are some simple tips:
Clean the frame before you start. Dirt makes the tape peel off.
Take your time lining up each piece. Rushing can lead to wrinkles or missed spots.
Use a squeegee or credit card to push out air bubbles.
Check the tape every few months. Replace any pieces that look worn or loose.
Pros & Cons
Frame protection tapes and kits have lots of fans, but they aren’t perfect. Here’s what you should know:
Pros:
You get custom-cut pieces for a neat, full-coverage look.
Many kits use lightweight, self-healing materials.
Some offer shock absorption to protect carbon frames.
Cleaning your bike gets easier with tape in place.
Certain kits, like All Mountain Style Honeycomb, go on easily and resist bubbles.
Cons:
Full-coverage kits can cost a lot.
Installation can be tricky, especially for full wraps.
You need to apply the tape carefully to avoid bubbles.
Some tapes are thick or show up more on your frame.
DIY options need more skill and time to cut and fit.
Frame protection tapes give you peace of mind and keep your bike looking sharp. If you want the best coverage and style, a kit is a smart choice.
Bike Frame Protection Tips
Surface Prep
You want your tape to stick well and last a long time. Start by cleaning your bike frame. Use a soft cloth and rubbing alcohol to wipe away dirt, grease, and dust. Make sure the frame is dry before you put on any tape. If you skip this step, the tape may peel off or let water get underneath.
Tip: Always work in a clean, dry space. This helps you avoid trapping dirt under the tape.
Avoiding Bubbles
Bubbles can make your tape look messy and may let water in. You can stop bubbles before they start. Lay the tape down slowly and press it as you go. Use a squeegee, a credit card, or even your fingers to smooth out the tape. Start in the middle and push air out to the edges. If you see a bubble, poke it with a pin and press it flat.
A smooth finish not only looks better but also helps with protecting your frame from damage.
Maintenance
You need to check your tape every few months. Look for spots where the tape is peeling, dirty, or worn out. Replace old tape right away to keep your bike safe. If you ride in mud or rain, check the tape more often. Clean the tape with a damp cloth to keep it clear and sticky.
Regular care helps you protect your frame and keeps your bike looking new.
By following these tips, you make sure your tape does its job. You get the most out of your effort and keep your bike safe from harm.
You have three easy ways to tape bike frame spots and protect your bike from scratches. Pick the method that matches your style and wallet. Here’s a quick checklist to help you get started:
Clean your frame
Choose the right tape
Apply it with care
Check it often
Keep your bike looking sharp and ready for every ride. You’ve got this! 🚲
FAQ
How often should you replace bike frame tape?
You should check your tape every few months. If you see peeling, dirt, or damage, swap it out. Riding in mud or rain? Inspect it more often to keep your frame safe.
Can you remove tape without damaging your bike?
Yes! Most bike frame tapes peel off cleanly. Warm the tape with a hair dryer first. This helps soften the adhesive. You won’t leave sticky residue or harm your paint.
Is clear film better than electrical tape?
Clear film lasts longer and looks better. It protects your frame without hiding the paint. Electrical tape works for quick fixes or testing spots. Choose what fits your needs and budget.
Where should you put tape on your bike frame?
Focus on high-wear spots:
Downtube
Top tube
Chainstays
Cable rub points
These areas get the most scratches and chips. Covering them keeps your bike looking new.
See Also
Effective Methods To Keep Your Bike Frame Safe
Must-Know Tips For Protecting Your Bike Frame Properly
Best Advice To Paint Carbon Frames Without Harm